> ## Documentation Index
> Fetch the complete documentation index at: https://docs.acelabusa.com/llms.txt
> Use this file to discover all available pages before exploring further.
# Syncing Data Between Material Hub & Revit
> How data exchange works between Material Hub and Revit
*Written by Patricia Causey · Updated March 20, 2026*
### Summary
Syncing connects your Acelab project to your Revit model so data flows in both directions. Product information from your Materials Hub schedule — including keynote tags, keynote text, and MasterFormat hierarchy — is written into Revit. Revit model data — such as family type, quantities, dimensions, and material assignments — is pulled back into your Acelab schedule. Run a sync any time you want to push updates from either side.
***
### Before You Begin
* The Acelab Revit plug-in must be installed. See [Installing and Uninstalling the Revit Plugin](/help-center/revit-integration/installing-and-uninstalling-revit-plugin).
* Your Material Hub project must be linked to your Revit project. See [Linking and Unlinking Material Hub Projects to Revit](/help-center/revit-integration/linking-and-unlinking-material-hub-projects-to-revit).
* Products must be mapped to Revit families or materials before sync data will appear. See [Mapping Acelab Products to Revit Elements](/help-center/revit-integration/mapping-acelab-products-to-revit-elements).
***
### Data Exchange Summary
| **Direction** | **What gets synced** |
| ------------------ | ------------------------------------------------------------------------------------------------- |
| **Acelab → Revit** | Product information (manufacturer, model, URL), keynote tag, keynote text, MasterFormat hierarchy |
| **Revit → Acelab** | Revit family & type, area, count, dimensions, material name, material mark, keynote, room |
***
### View Acelab Product Information in Revit
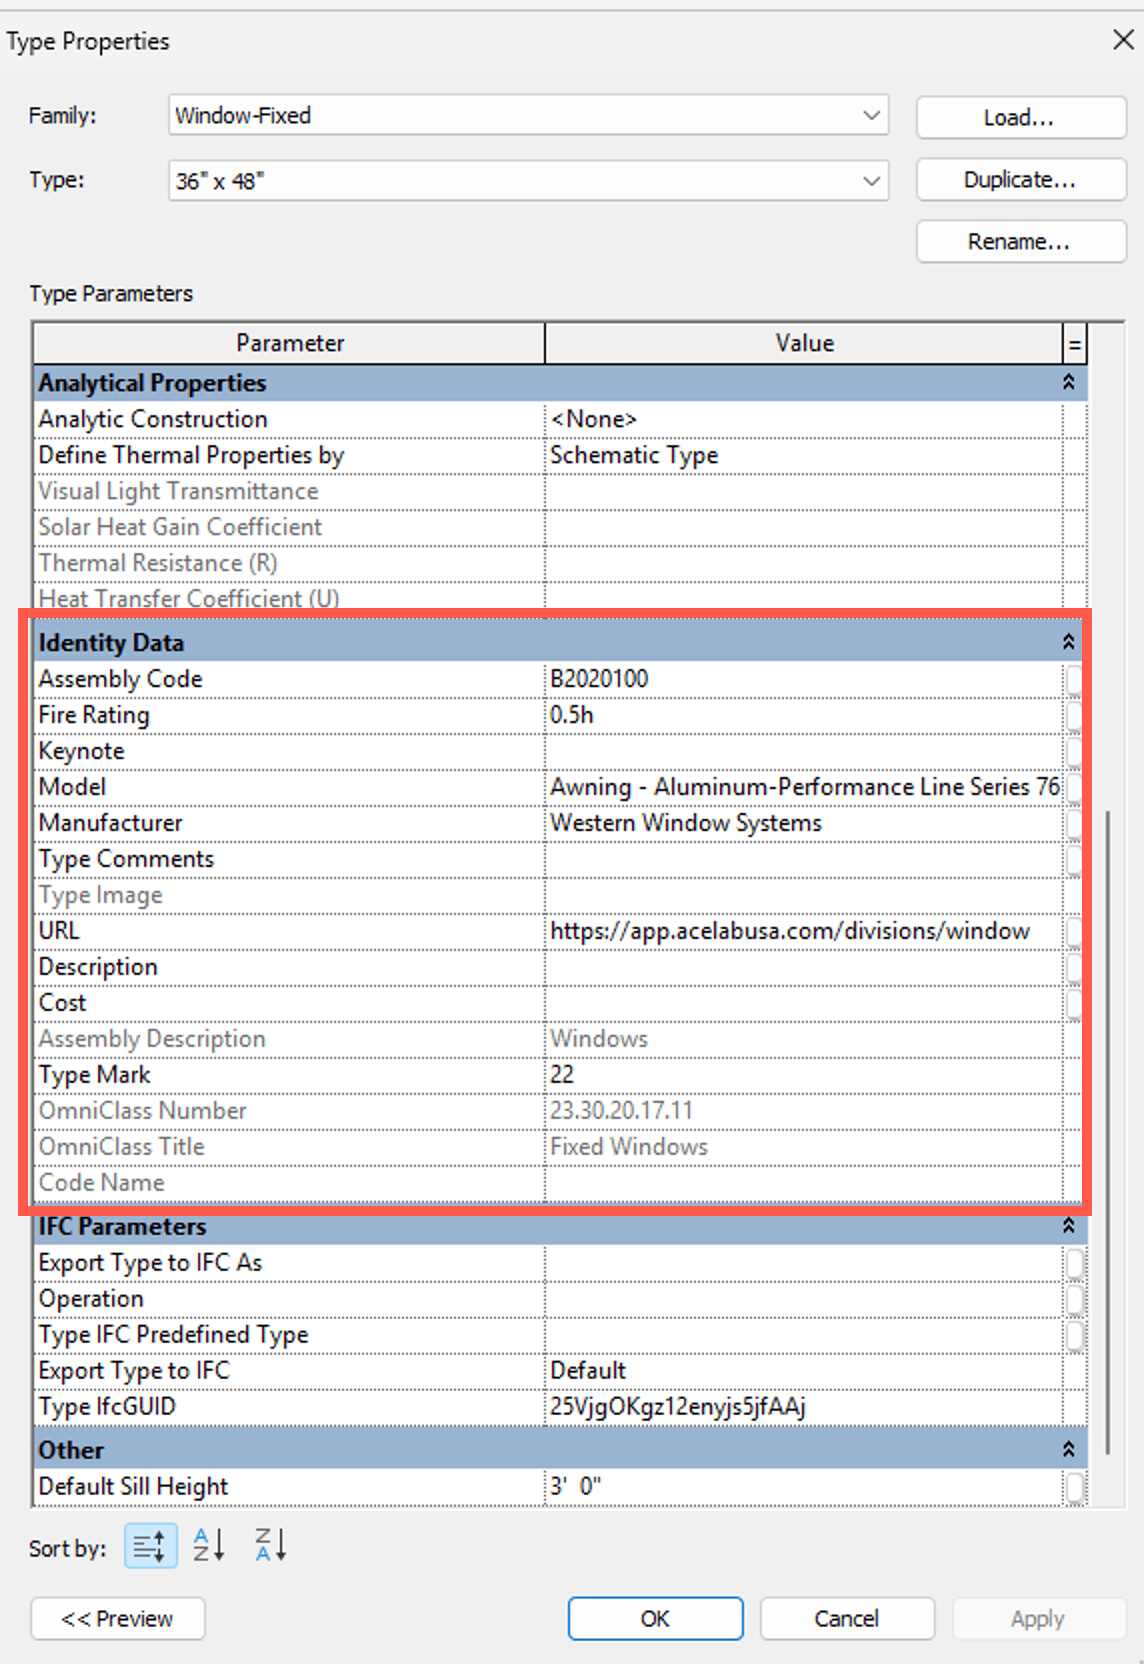
Once synced, Acelab product data is written into the Identity Data fields of the linked Revit family or material.
### View information linked to a family
1. Select the asset in Revit.
2. Click **Edit Type**.
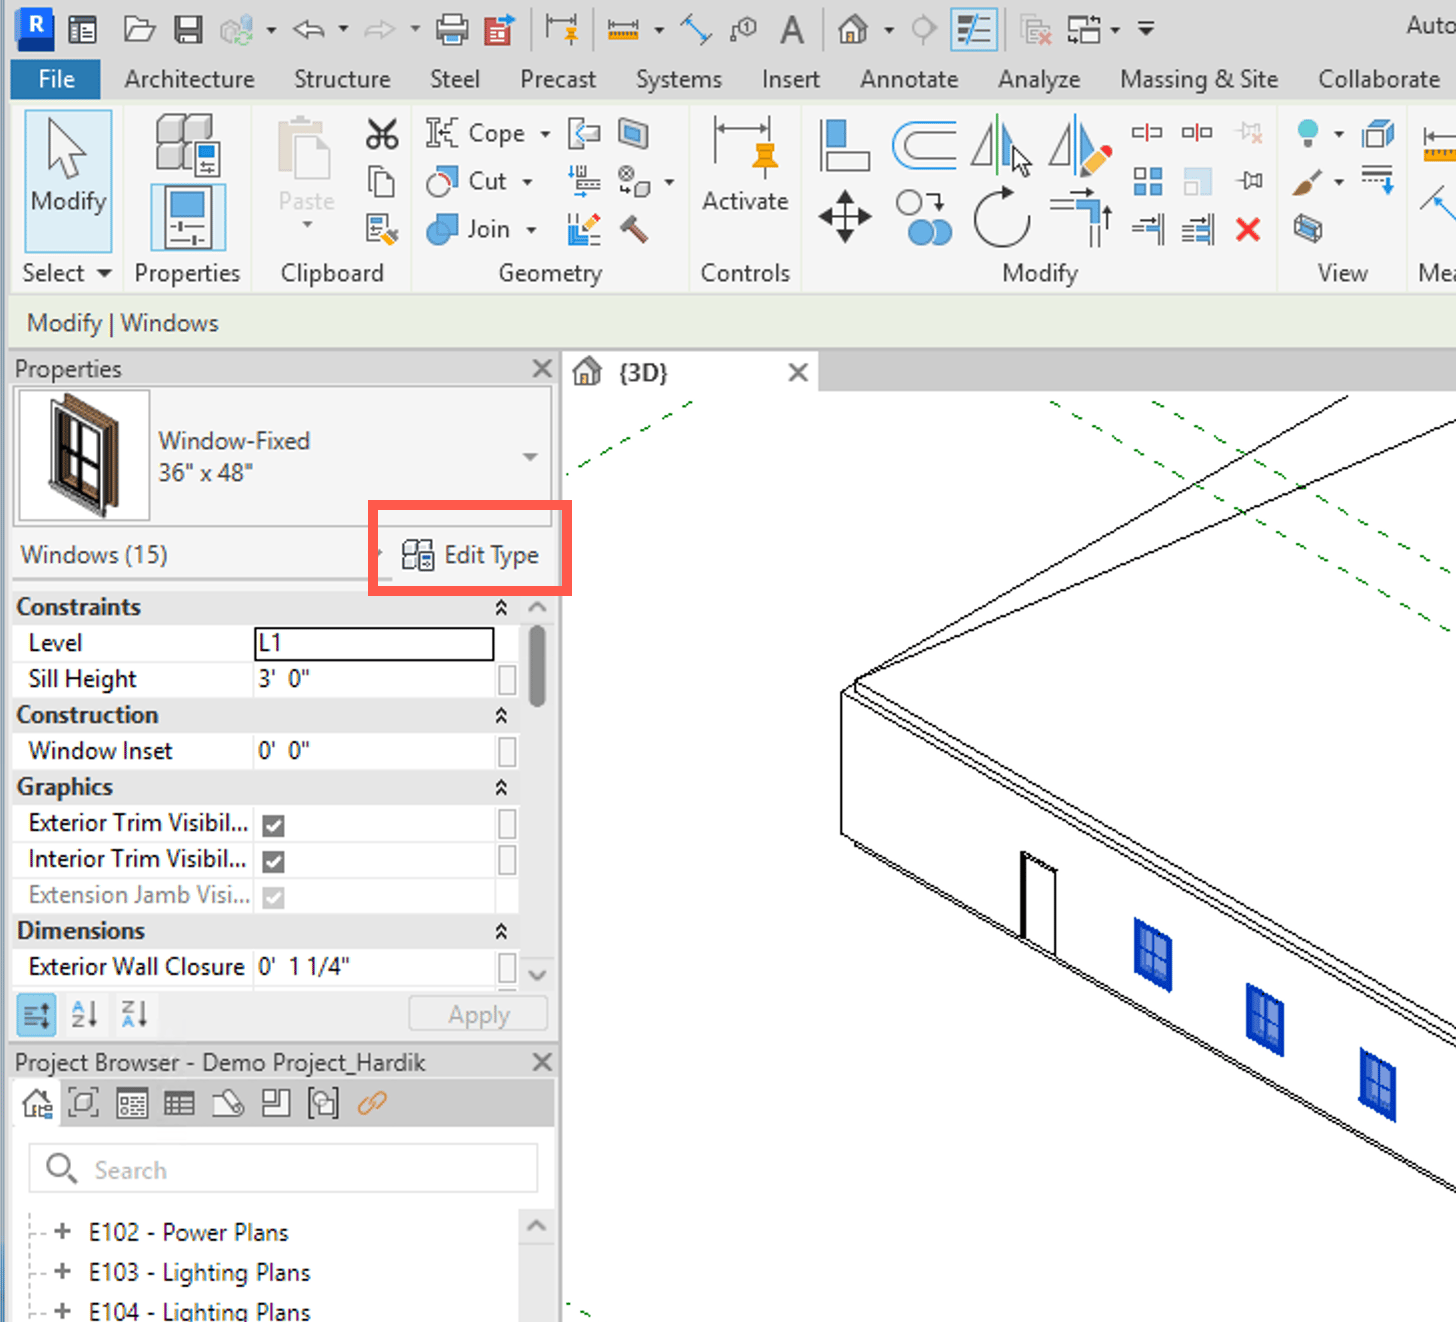 3. In the **Type Properties** window, scroll down to **Identity Data** to see product information from Acelab's database.
 ### View information linked to a material
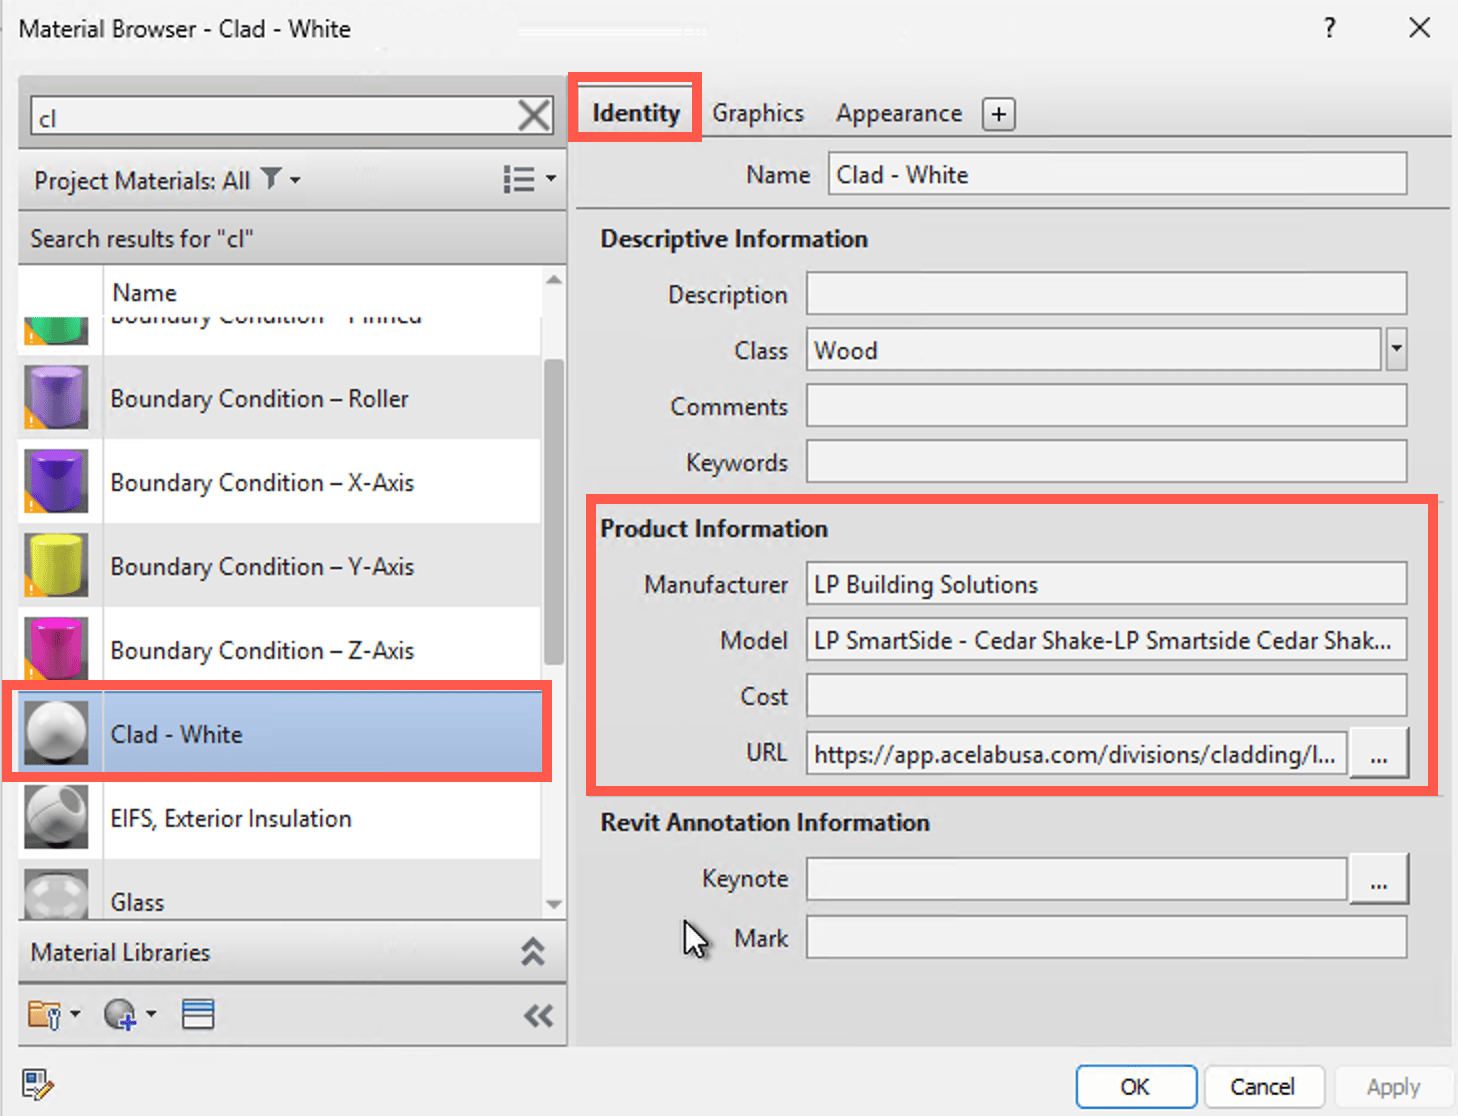
1. Open the **Material Browser**. Select the material.
2. In the **Identity** tab, Acelab product data appears in the **Product Information** section.
### View information linked to a material
1. Open the **Material Browser**. Select the material.
2. In the **Identity** tab, Acelab product data appears in the **Product Information** section.
 ***
## Sync with Acelab's Material Hub
1. Click the **Sync** button from the Acelab tab in Revit, then select **Sync.**
***
## Sync with Acelab's Material Hub
1. Click the **Sync** button from the Acelab tab in Revit, then select **Sync.**
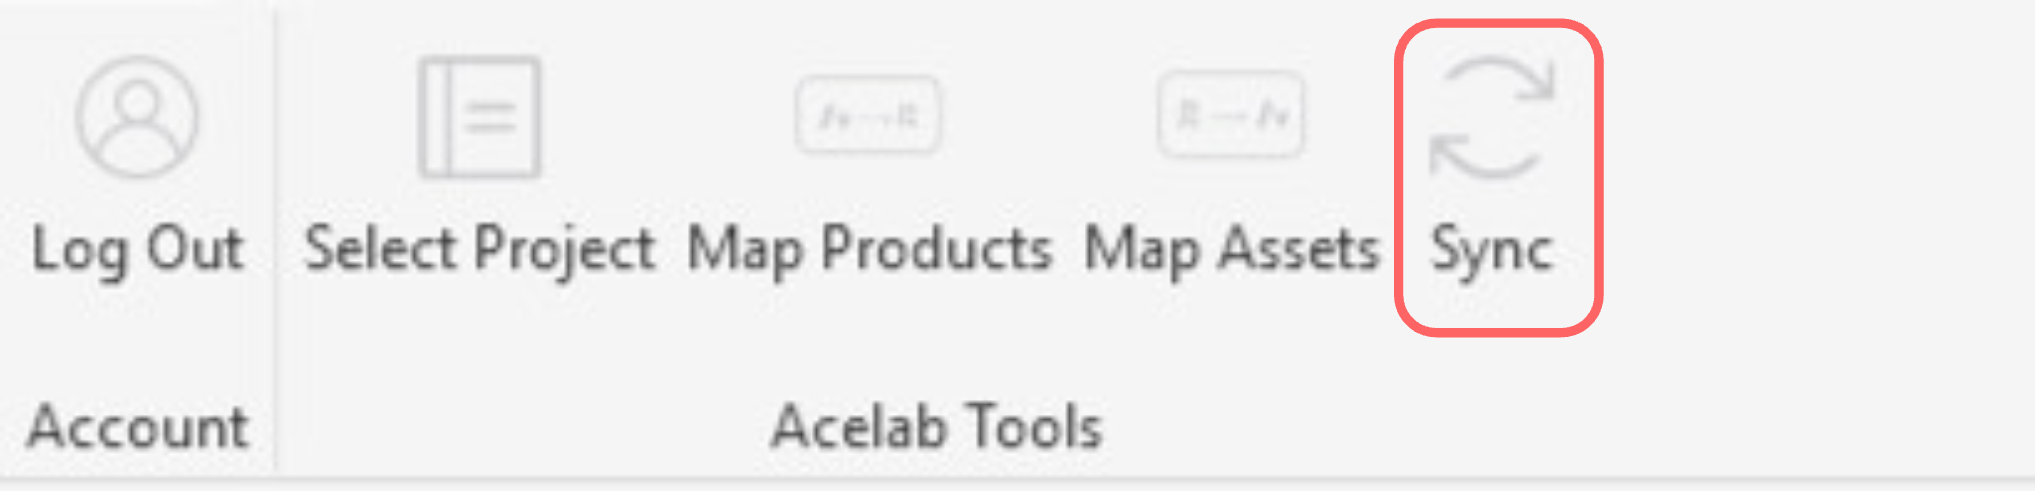 2. You will get a confirmation message when the sync completes successfully.
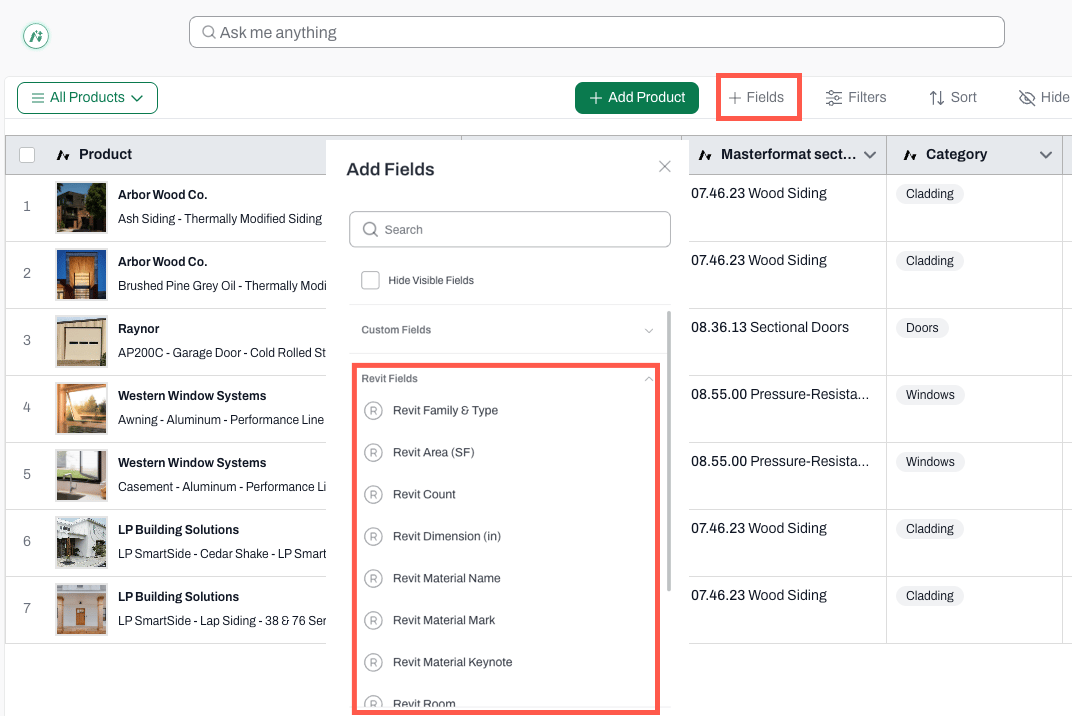
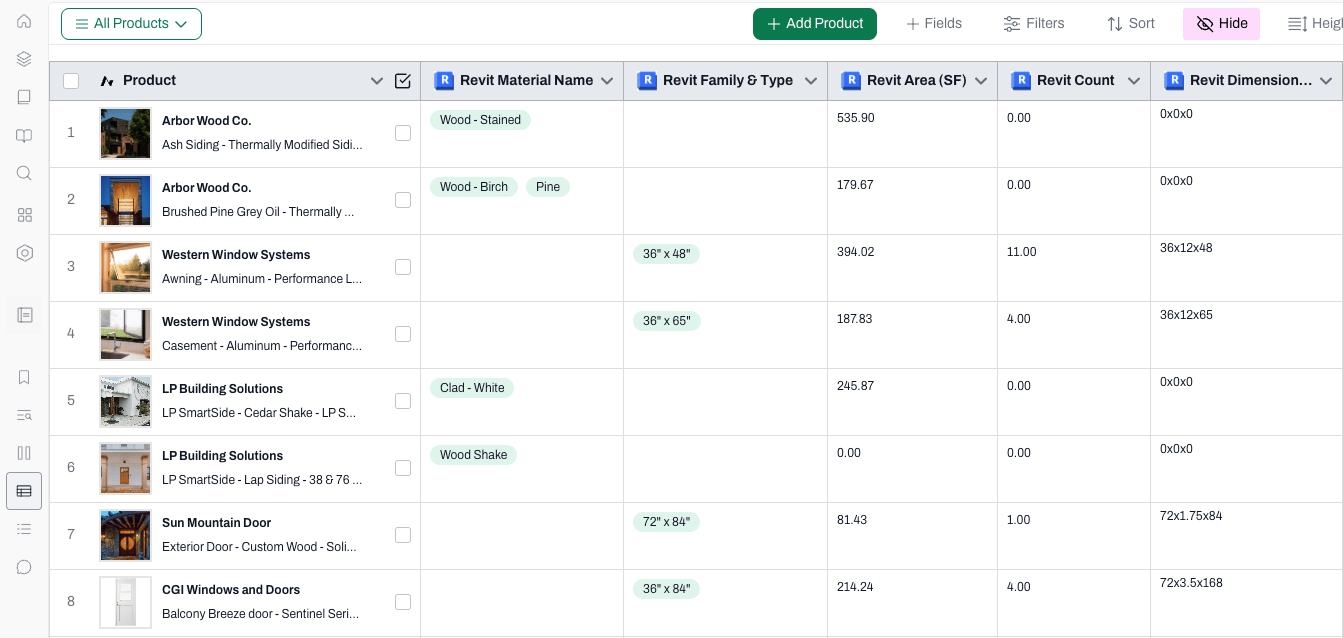
3. To view Revit data in Materials Hub, navigate to your project, go to **Schedules**, and add the **Revit fields** (columns). Revit data will populate automatically.
2. You will get a confirmation message when the sync completes successfully.
3. To view Revit data in Materials Hub, navigate to your project, go to **Schedules**, and add the **Revit fields** (columns). Revit data will populate automatically.
 ***
## MasterFormat Hierarchy in Revit Keynotes
When you sync, Acelab sends the full MasterFormat hierarchy for each mapped product to the Revit plugin. The plugin uses this to generate a structured `keynote.txt` file, organized from Division down to the leaf section (Division → Sub-Division → Group → Sub-Group).
* **Custom section titles are respected.** If you've renamed a MasterFormat section in Materials Hub, that custom title appears in the keynote hierarchy — not the default MasterFormat label.
* **Custom sections are included.** Products assigned to custom sections you created appear in their correct position within the hierarchy.
* **Products without a section assigned** are placed in an **Uncategorized** section of `keynote.txt`.
* **Partial hierarchies are supported.** If only some levels are known (e.g., Division only), the known levels are populated and the rest are left blank.
### If your project already has a keynote file
If your Revit project is already linked to an existing `keynote.txt` file, the top-level division naming in that file must match the format Acelab uses (e.g., `09 00 00`). If it doesn't, Acelab creates a new parent section using its own naming and moves the conflicting subsection — and all its entries — into it. The rest of the file stays intact.
**Example:** Your file uses `Division 09` as the parent, with `09 65 00 Resilient Flooring` and its sub-entries nested inside it.
***
## MasterFormat Hierarchy in Revit Keynotes
When you sync, Acelab sends the full MasterFormat hierarchy for each mapped product to the Revit plugin. The plugin uses this to generate a structured `keynote.txt` file, organized from Division down to the leaf section (Division → Sub-Division → Group → Sub-Group).
* **Custom section titles are respected.** If you've renamed a MasterFormat section in Materials Hub, that custom title appears in the keynote hierarchy — not the default MasterFormat label.
* **Custom sections are included.** Products assigned to custom sections you created appear in their correct position within the hierarchy.
* **Products without a section assigned** are placed in an **Uncategorized** section of `keynote.txt`.
* **Partial hierarchies are supported.** If only some levels are known (e.g., Division only), the known levels are populated and the rest are left blank.
### If your project already has a keynote file
If your Revit project is already linked to an existing `keynote.txt` file, the top-level division naming in that file must match the format Acelab uses (e.g., `09 00 00`). If it doesn't, Acelab creates a new parent section using its own naming and moves the conflicting subsection — and all its entries — into it. The rest of the file stays intact.
**Example:** Your file uses `Division 09` as the parent, with `09 65 00 Resilient Flooring` and its sub-entries nested inside it.
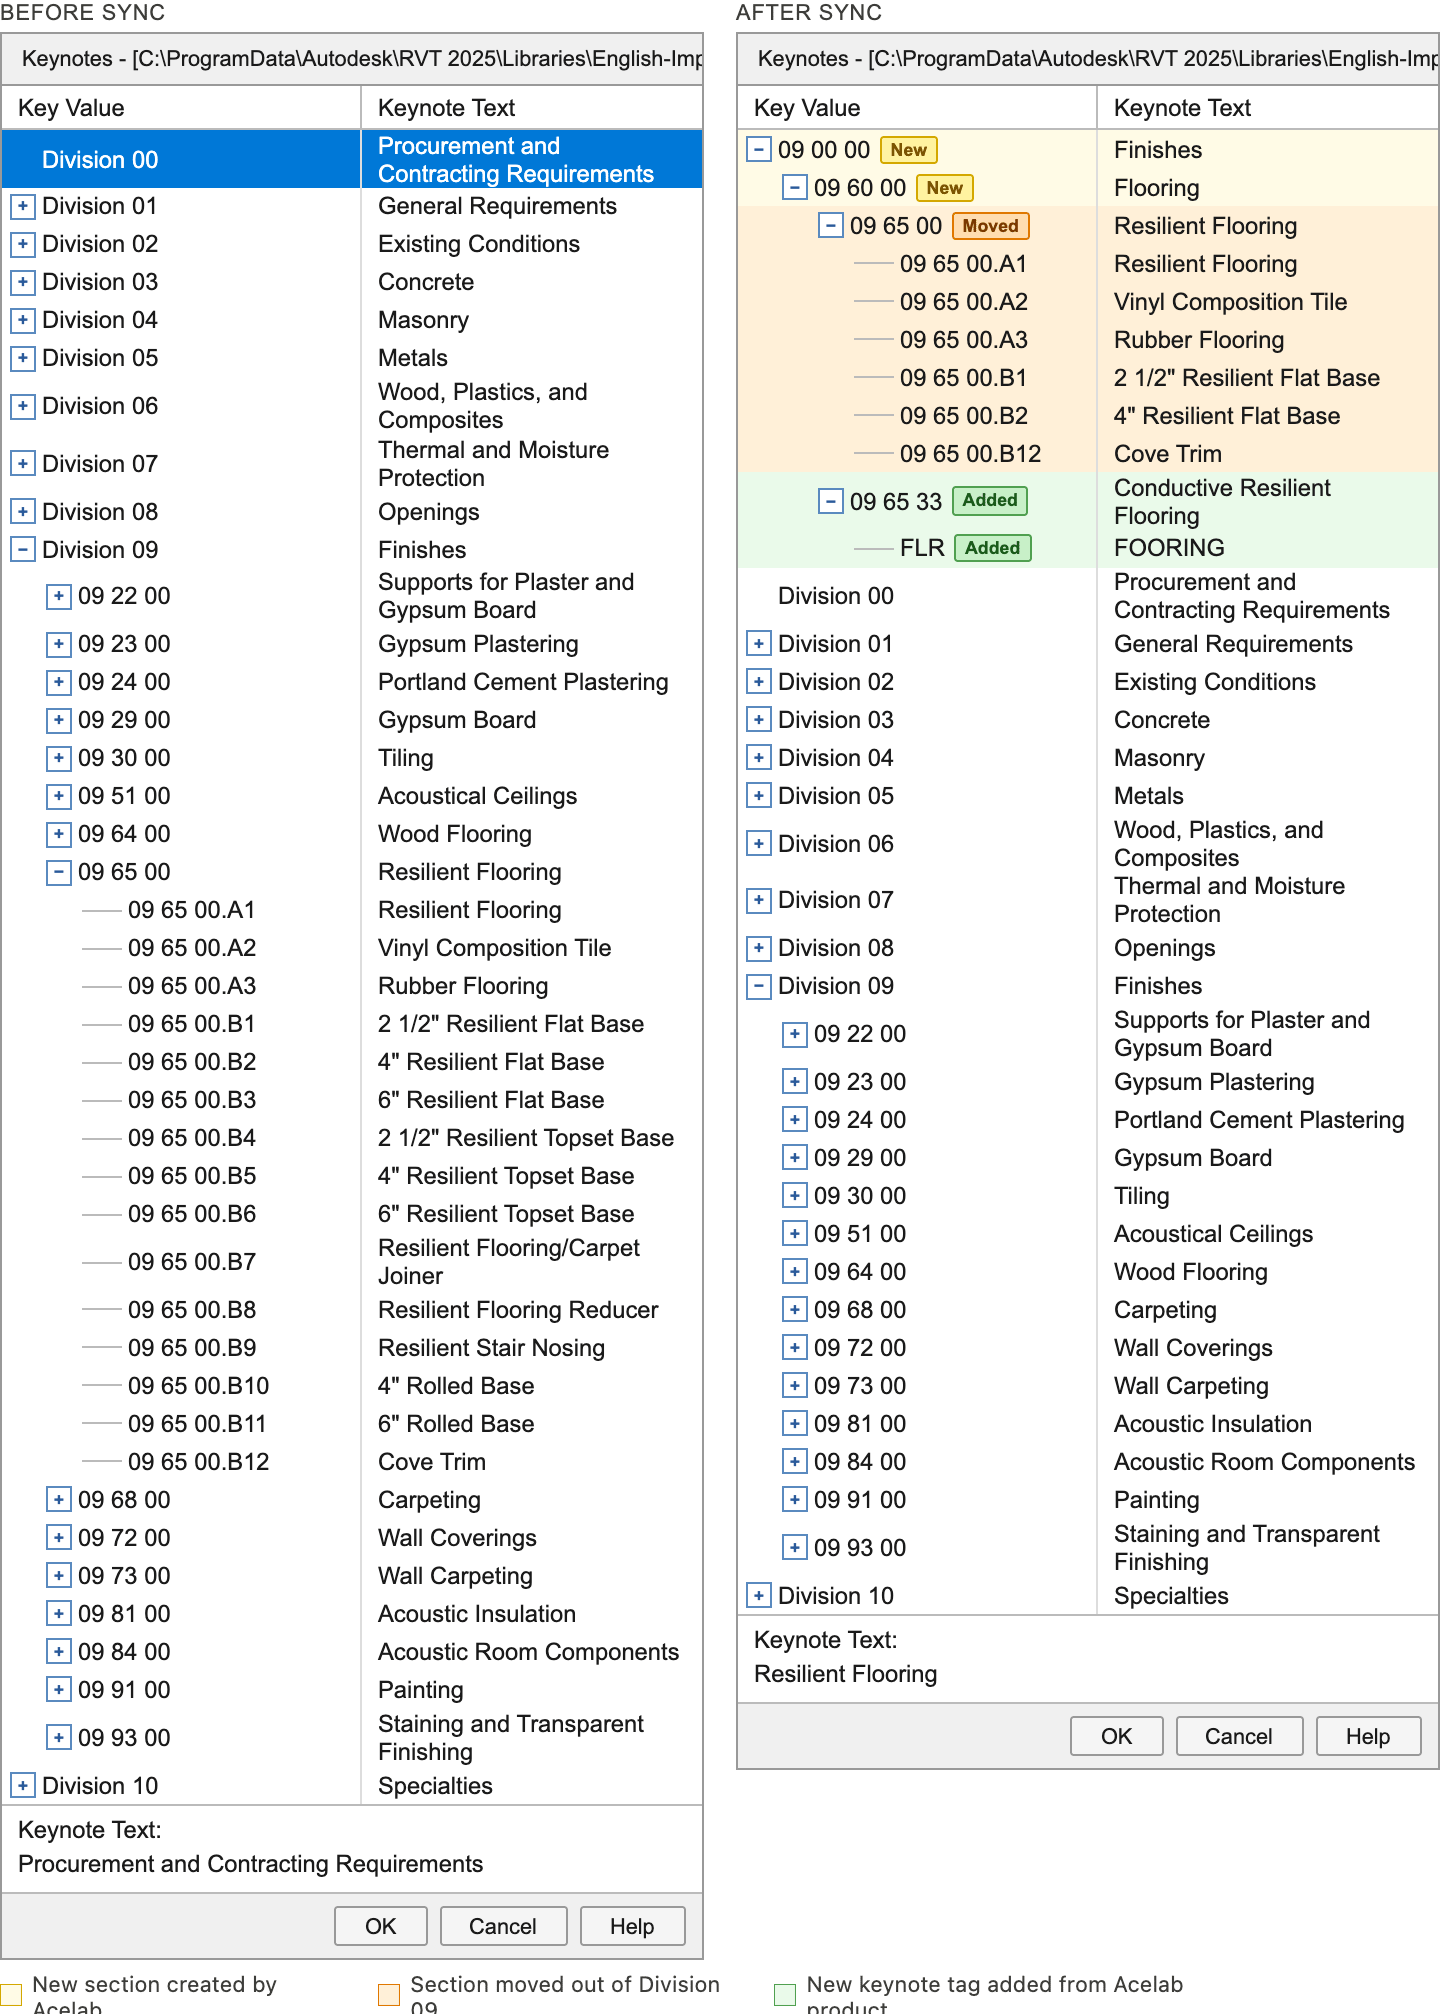 After sync, Acelab creates two new parent nodes: `09 00 00` (Finishes) containing `09 60 00` (Flooring), which now contains `09 65 00` and all its original sub-entries. A new entry `09 65 33 Conductive Resilient Flooring` is added inside it, with the product keynote tag `FLR` nested beneath. `Division 09` remains in the file, but `09 65 00` is gone from it.
| **Indicator** | **What it means** |
| ------------- | ------------------------------------------------------------- |
| **New** | Section did not exist — created by Acelab during sync |
| **Moved** | Section existed under `Division 09` — relocated to new parent |
| **Added** | New keynote tag and text written from Acelab product |
**To prevent this:** Before syncing, open the `.txt` file in a text editor and replace all `Division XX` top-level labels with the Acelab three-part format — for example, replace `Division 09` with `09 00 00`. Subsection entries like `09 65 00` don't need to change. Save the file, then sync.
***
### Outcome
After syncing, product information from Acelab appears in your Revit families and materials, and Revit model data appears in your Acelab schedule. Your `keynote.txt` file is updated with the full MasterFormat hierarchy for all mapped products. Re-sync any time you make updates in either Acelab or Revit to keep both in step.
After sync, Acelab creates two new parent nodes: `09 00 00` (Finishes) containing `09 60 00` (Flooring), which now contains `09 65 00` and all its original sub-entries. A new entry `09 65 33 Conductive Resilient Flooring` is added inside it, with the product keynote tag `FLR` nested beneath. `Division 09` remains in the file, but `09 65 00` is gone from it.
| **Indicator** | **What it means** |
| ------------- | ------------------------------------------------------------- |
| **New** | Section did not exist — created by Acelab during sync |
| **Moved** | Section existed under `Division 09` — relocated to new parent |
| **Added** | New keynote tag and text written from Acelab product |
**To prevent this:** Before syncing, open the `.txt` file in a text editor and replace all `Division XX` top-level labels with the Acelab three-part format — for example, replace `Division 09` with `09 00 00`. Subsection entries like `09 65 00` don't need to change. Save the file, then sync.
***
### Outcome
After syncing, product information from Acelab appears in your Revit families and materials, and Revit model data appears in your Acelab schedule. Your `keynote.txt` file is updated with the full MasterFormat hierarchy for all mapped products. Re-sync any time you make updates in either Acelab or Revit to keep both in step.