> ## Documentation Index
> Fetch the complete documentation index at: https://docs.acelabusa.com/llms.txt
> Use this file to discover all available pages before exploring further.
# Getting Started with SpecPlanner
> Learn how to automate specifications and create checklists to organize materials selection.
*Written by Patricia Causey · Updated March 20, 2026*
## Getting Started With SpecPlanner
This article walks you through the full SpecPlanner workflow from setup to export. Follow the steps in order the first time — after that, you'll typically jump straight to adding or managing products.
### Before You Begin
* You must be a project **Admin**, **Creator**, or **Editor** to use SpecPlanner. Viewers can read but cannot make changes.
* SpecPlanner is available on all plans. Some field types (Acelab Fields, Company Fields, unlimited fields, and horizontal navigation) require access to **SpecPlanner Pro**, which is available through the **Premium (AECO Pro) plan**.
* Not sure which plan your firm has? Contact your Acelab account Admin or reach out to Acelab support.
***
### Accessing SpecPlanner
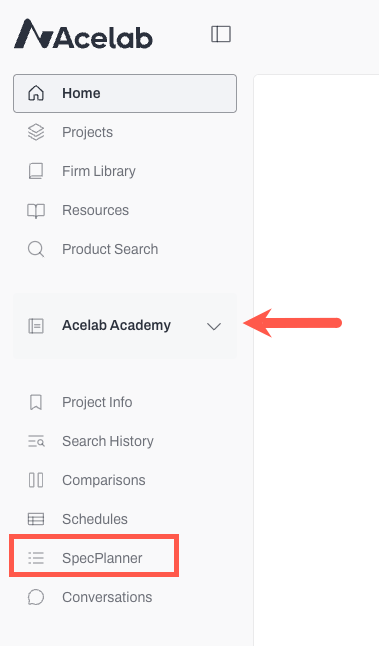
1. Open your project.
2. Click **SpecPlanner** in the left-side menu.
**Note:** The project you're working in is shown at the top of the left-side menu. To switch projects, use the dropdown next to the project name.
**Note:** The project you are creating specifications for is identified on the left-side menu. If you need to change to a different project, use the drop-down menu next to the project's name. If you need to create a new project first, check out [this article](/help-center/working-on-projects/project-setup-overview).
***
### Add MasterFormat Sections
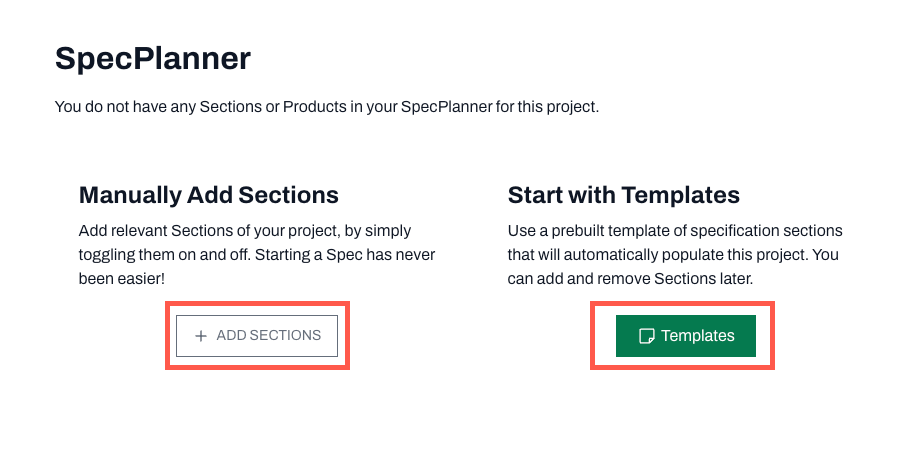
Before adding products, set up the sections your project needs. There are two ways:
**Option A — [Add sections manually](/help-center/working-on-projects/manually-add-remove-sections-specplanner)**
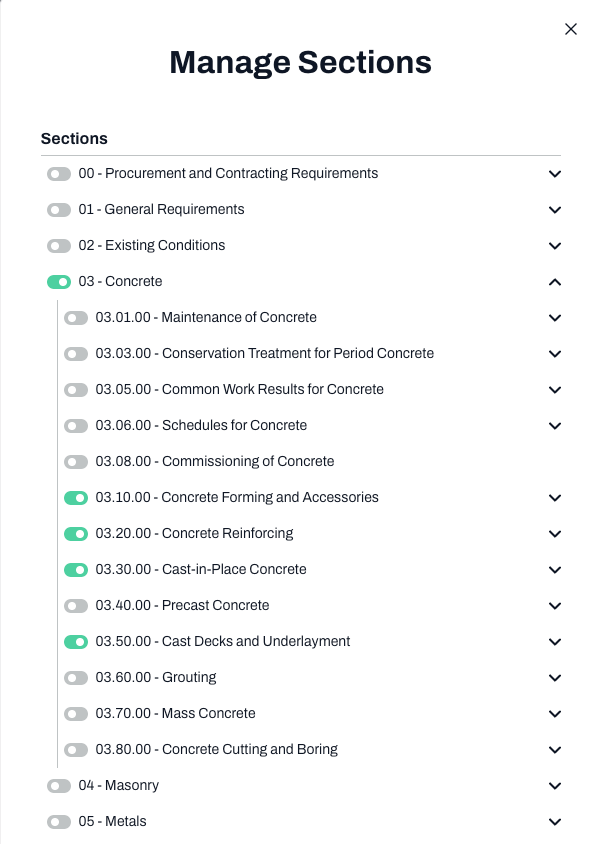
1. Click **Add Sections**.
2. Toggle on each section you need for this project.
3. Use the arrows to expand and toggle subsections.
4. Click **Save**. All selected sections appear in your SpecPlanner.
**Option B — [Apply a template](/help-center/working-on-projects/specplanner-templates-overview) (fastest)**
1. Click **Templates** in the top bar.
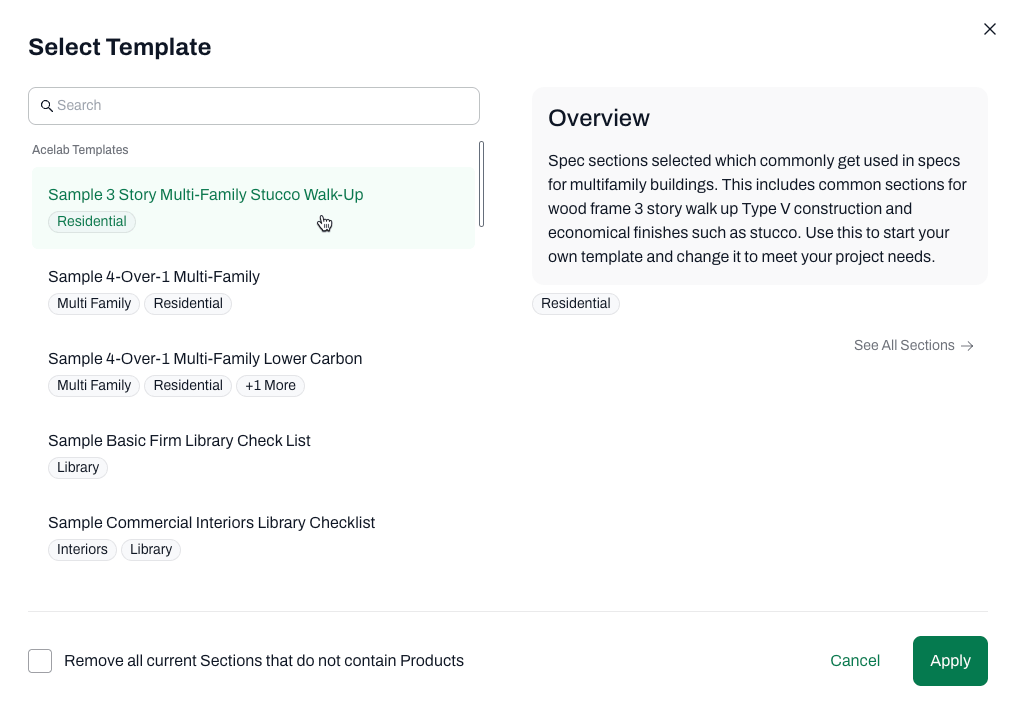
2. Browse Acelab, Firm, and User templates. Use tags to narrow your search.
3. Click a template to preview which sections it includes.
4. Click **Apply**.
**💡 Tip:** Review your project scope before adding sections so you don't need to go back and clean up later.
***
### Add Products
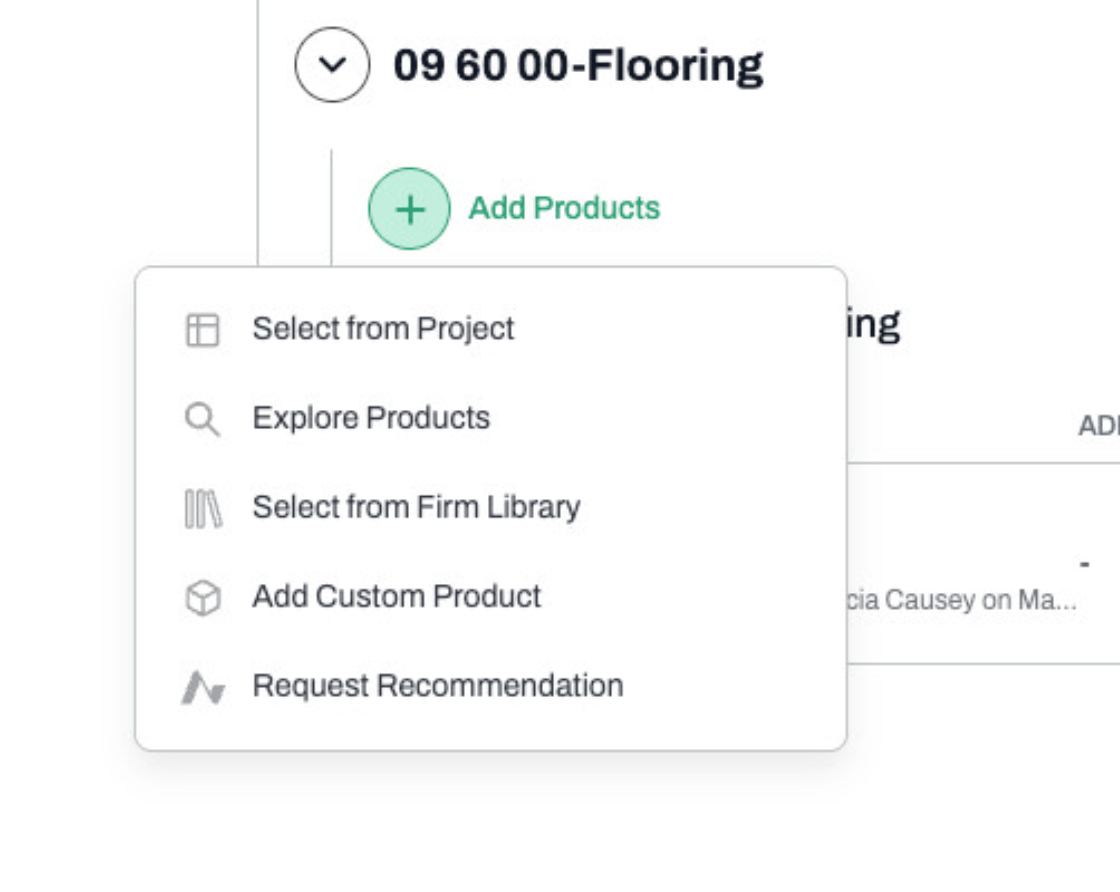
Click **Add Products** in any section. You'll see the following options:
* **Explore Products** — Search the full Acelab product catalog without leaving your project. Use keyword search, then filter by Category or Manufacturer. Multi-select products and add them all at once. If you can't find a match, you can add a Custom Product directly from the no-results state.
* **Explore Firm Library** — Browse and add products your firm has already saved to the Firm Library.
* **Search by Manufacturer** — Enter a manufacturer's name, browse their products, and select what you need. Add the manufacturer's name only if you're not ready to pick a specific product yet.
* **Add Custom Product** — Add a product that isn't in the Acelab database. Enter a name, category, and any optional details (URL, image, notes).
* **Request Recommendation** — Describe what you're looking for and an Acelab expert will follow up with suggestions by email.
You can also add products directly from **Schedules** — click the SpecPlanner icon to the left of any product image to send it to SpecPlanner in its default MasterFormat section.
For detailed instructions on how to add products to SpecPlanner, check out [Add Products to SpecPlanner](/help-center/working-on-projects/add-products-to-specplanner).
***
### Add or Manage Fields
Fields let you display additional product data alongside each item in your SpecPlanner.
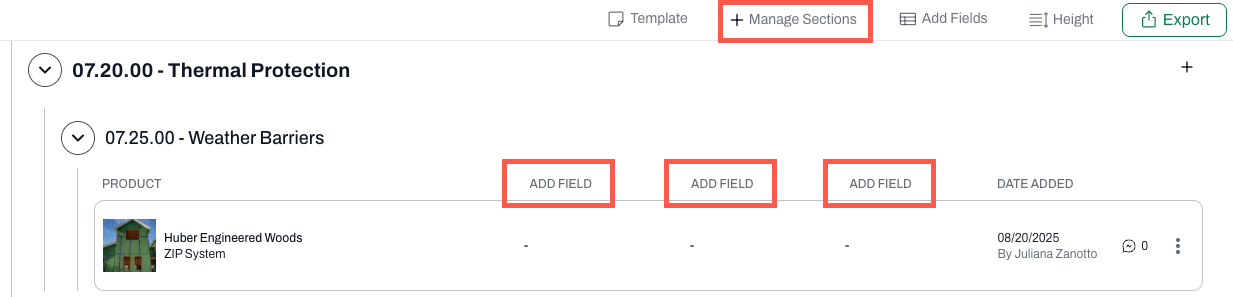
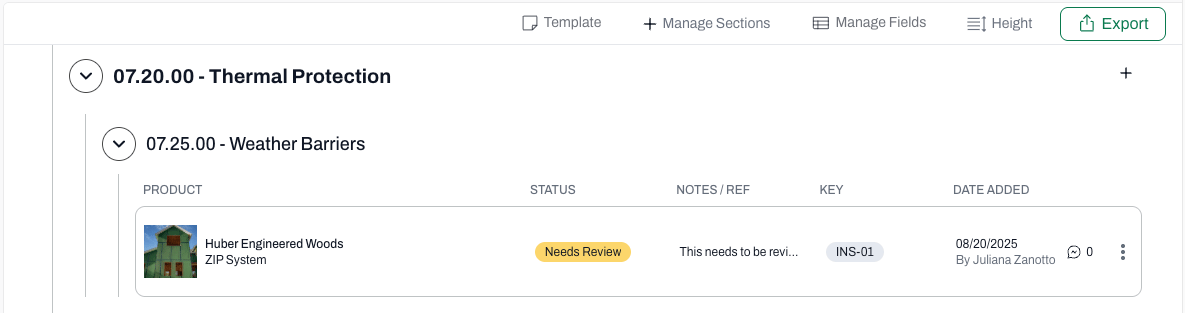
1. Click **Add Fields** or **Manage Fields** in the top bar (the label changes once fields are added), or click the **Add Field** header above any product column.
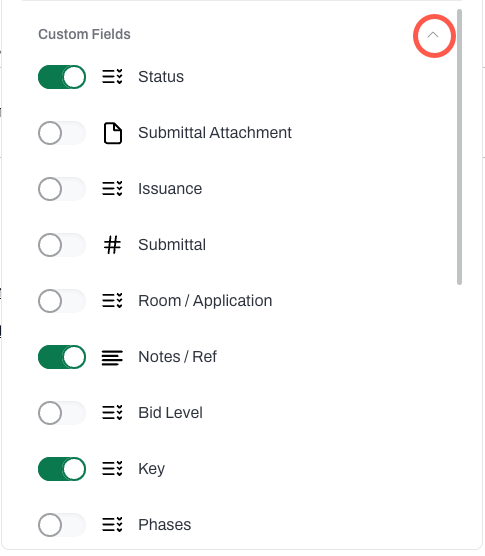
2. Select the fields you want to display. Select up to **three** Custom or Revit fields. Click on the down arrow to expand the list of available fields.
⭐ **Premium feature:** On an AECO Pro plan, you can add unlimited fields and use the left/right navigation arrows in the header to scroll through all your columns. Non-Premium users will see Acelab and Company Fields in the picker but cannot add them — hover to see upgrade options.
3. Data from Schedules will be automatically added to the fields in SpecPlanner
***
### Move Products Between Sections
If a product ends up in the wrong section, you have two options:
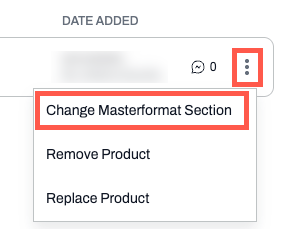
1. **Three-dot menu:** Click **⋮** to the right of the product → **Change MasterFormat Section** → select a new section.
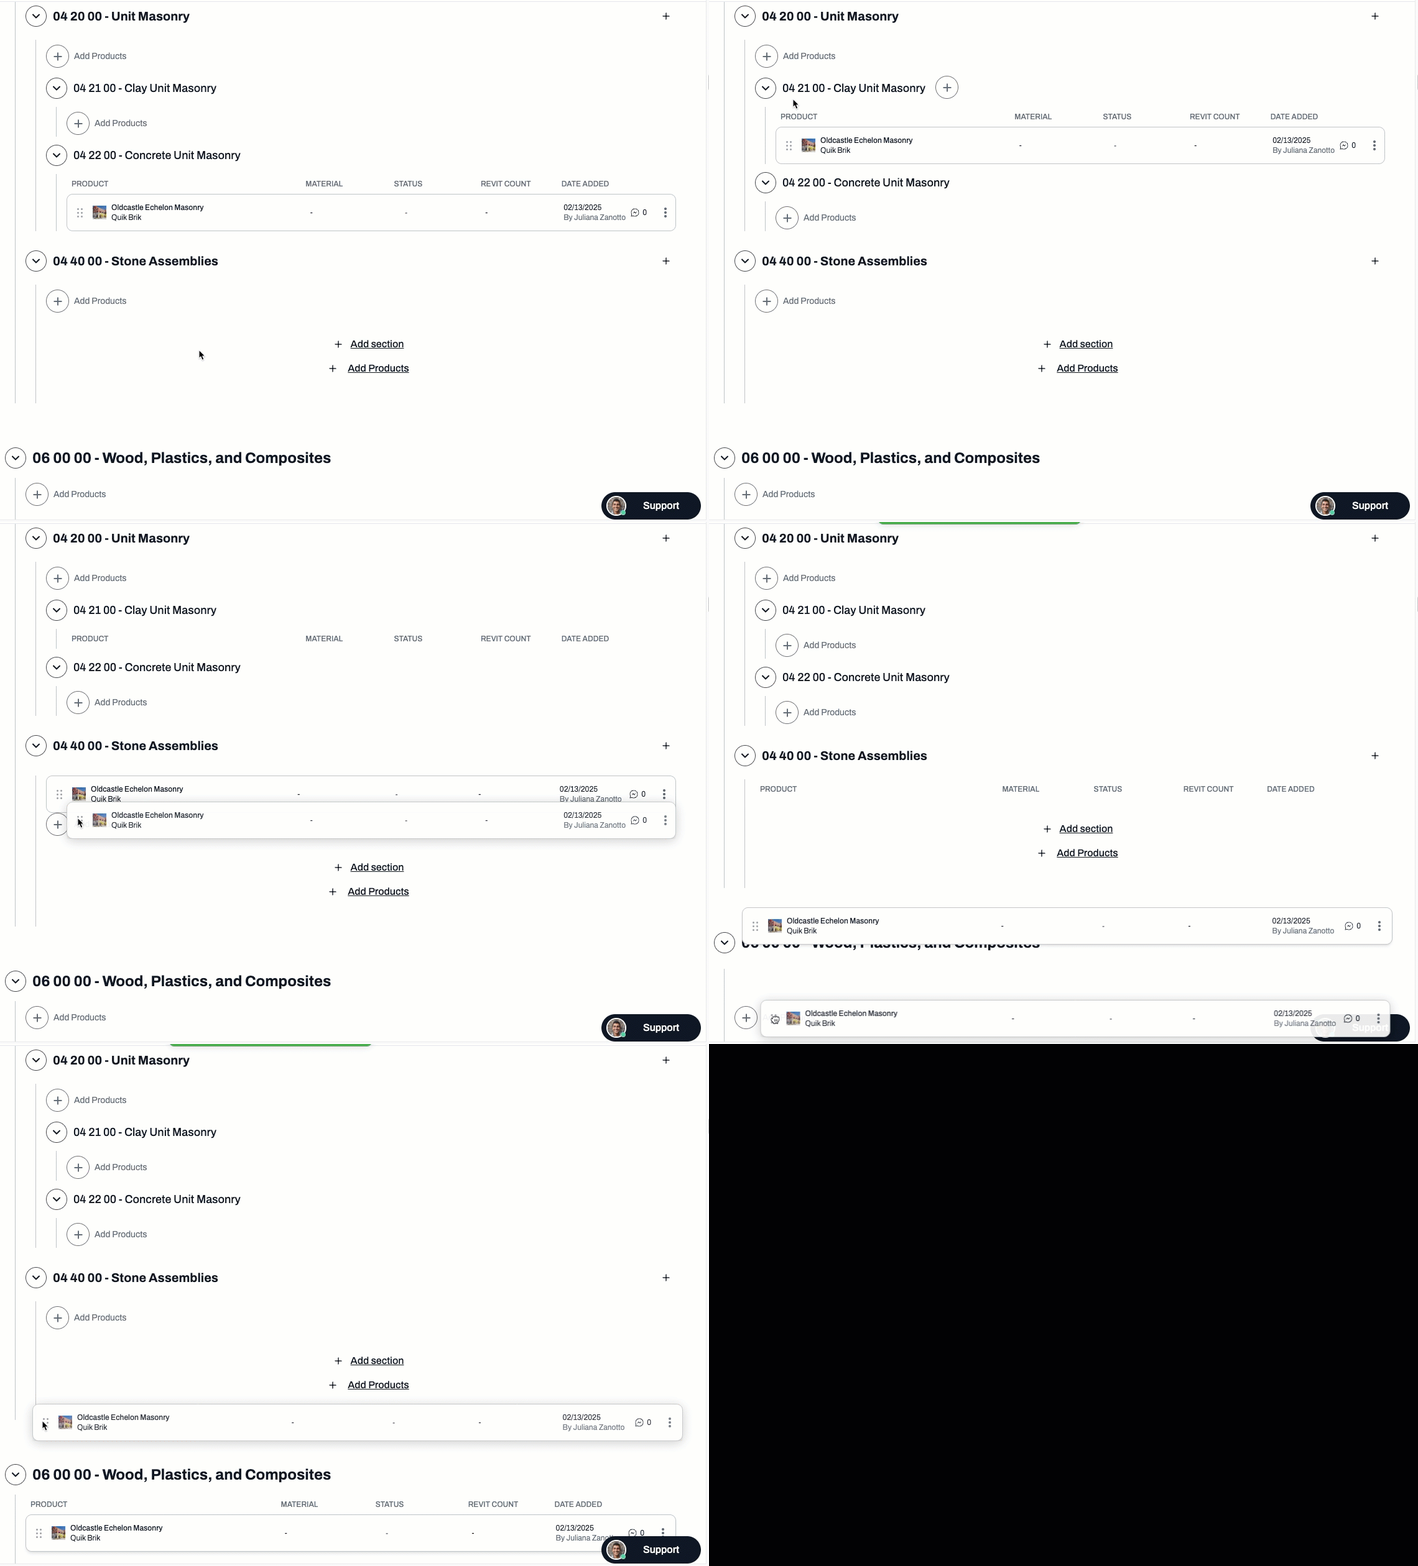
2. **Drag and drop:** Click and hold the six-dot handle to the left of the product image and drag it to a different section or sub-section. You can also reorder products within the same section this way.
**💡Note:** When you change a product's section in SpecPlanner, the MasterFormat section field updates automatically in Schedules too.
***
### Remove a Product
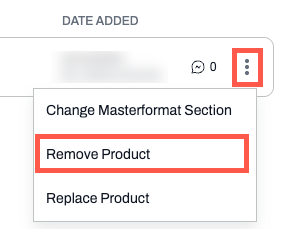
1. Click **⋮** to the right of the product.
2. Select **Remove Product**.
The product is removed from SpecPlanner but stays in your Schedules. To re-add it, go to Schedules and click the SpecPlanner icon next to the product.
***
### Replace a Product
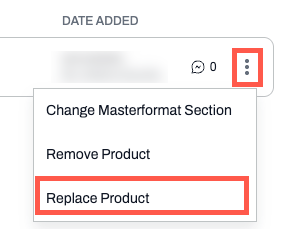
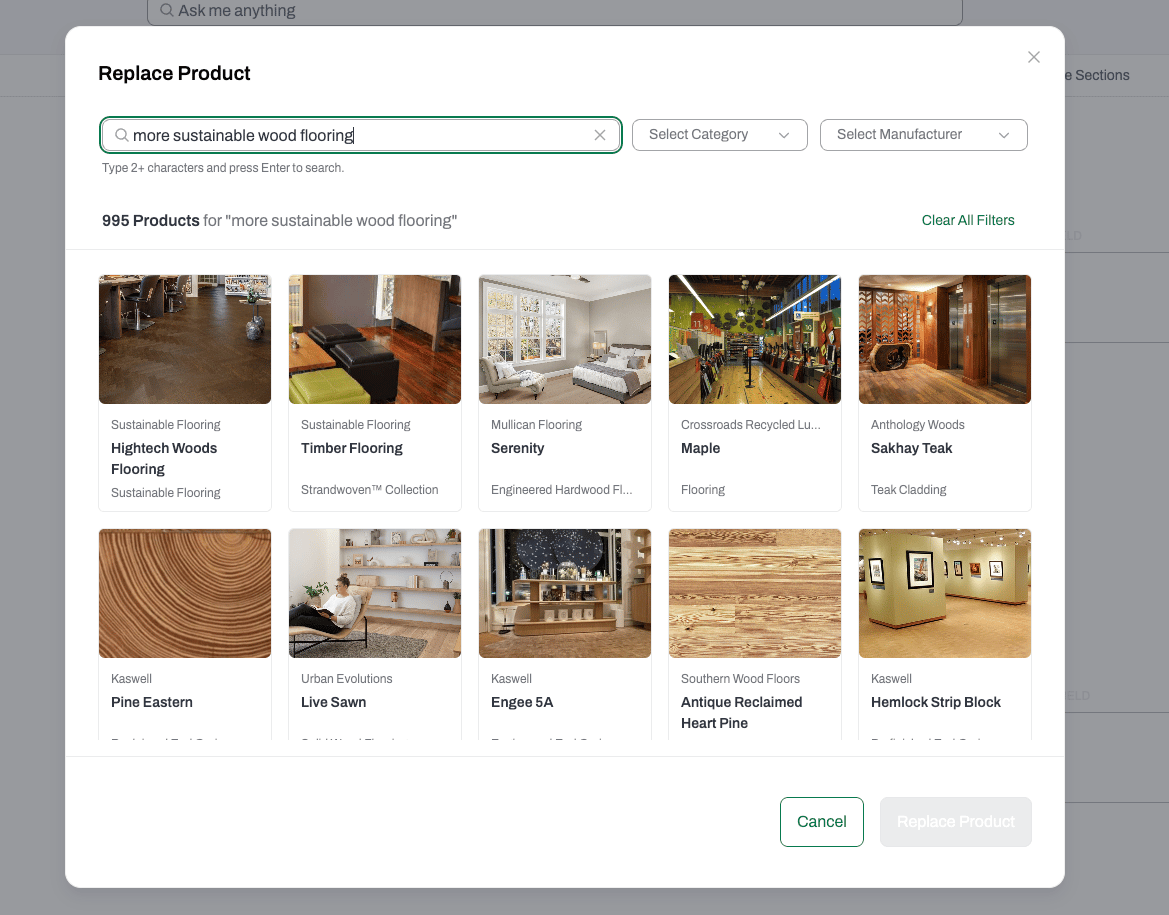
1. Click **⋮** to the right of the product. Select **Replace Product**.
2. The **Explore Products** modal opens in Replace mode. Search and filter to find the replacement.
3. Select the product and click **Replace Product** to confirm.
The replacement is in-place — the row stays in its current position and all custom field values, notes, and quantities are preserved.
***
### Adjust Row Height
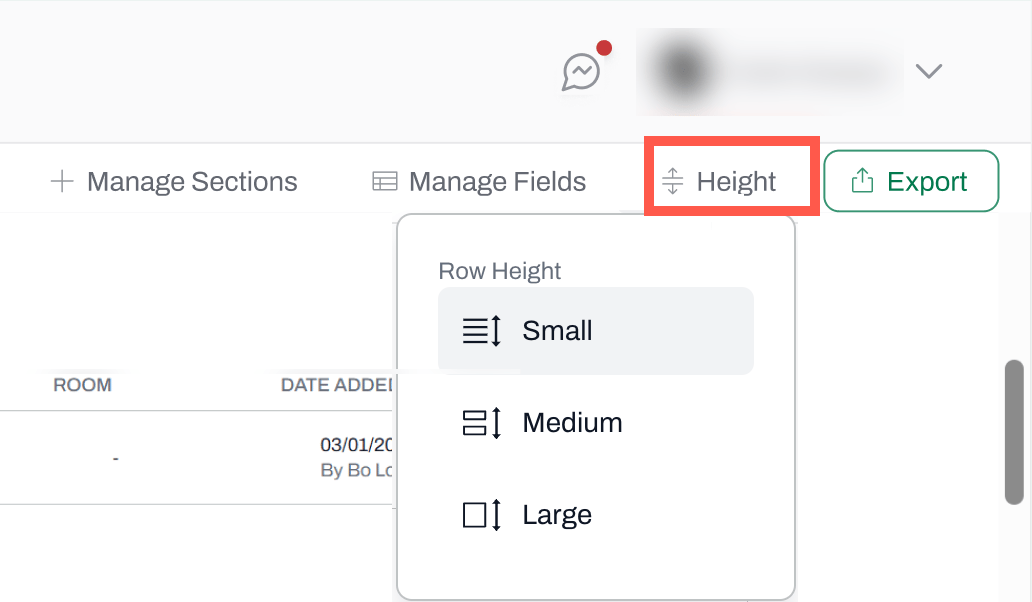
Click the **Height** button in the top bar and choose **Small**, **Medium**, or **Large**.
* **Small** — best for large product lists where you want to see as much as possible at once
* **Large** — best when product images are an important part of the review
***
### Save as a Template
If the sections you've set up would be useful on future projects, save them as a template.
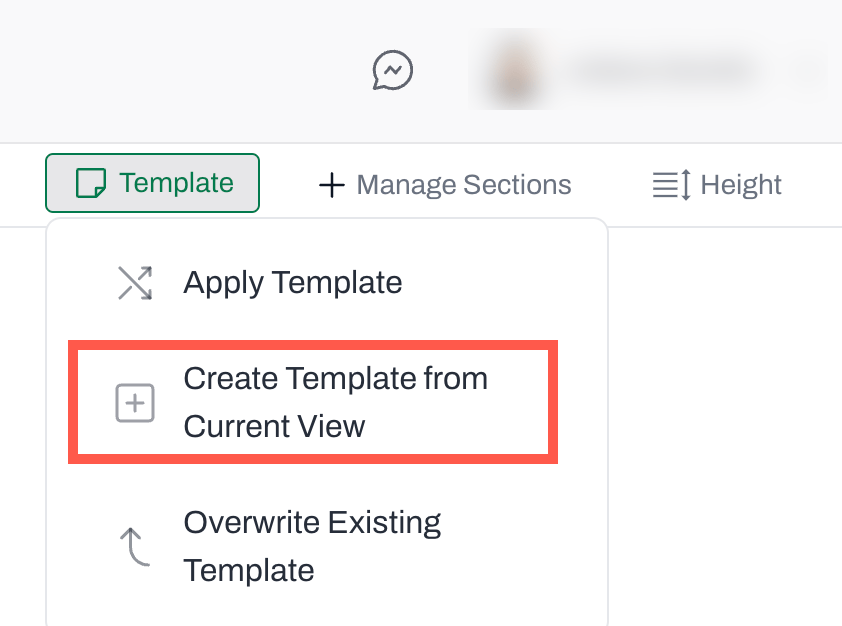
1. Click **Templates** in the top bar.
2. Select **Create Template from the Current View**.
3. Name your template, add a description and tags, and save.
Your template will be available under **User Templates** for your own use, or **Firm Templates** if you choose to share it with your firm.
***
### Export Your Specifications
When you're ready to share:
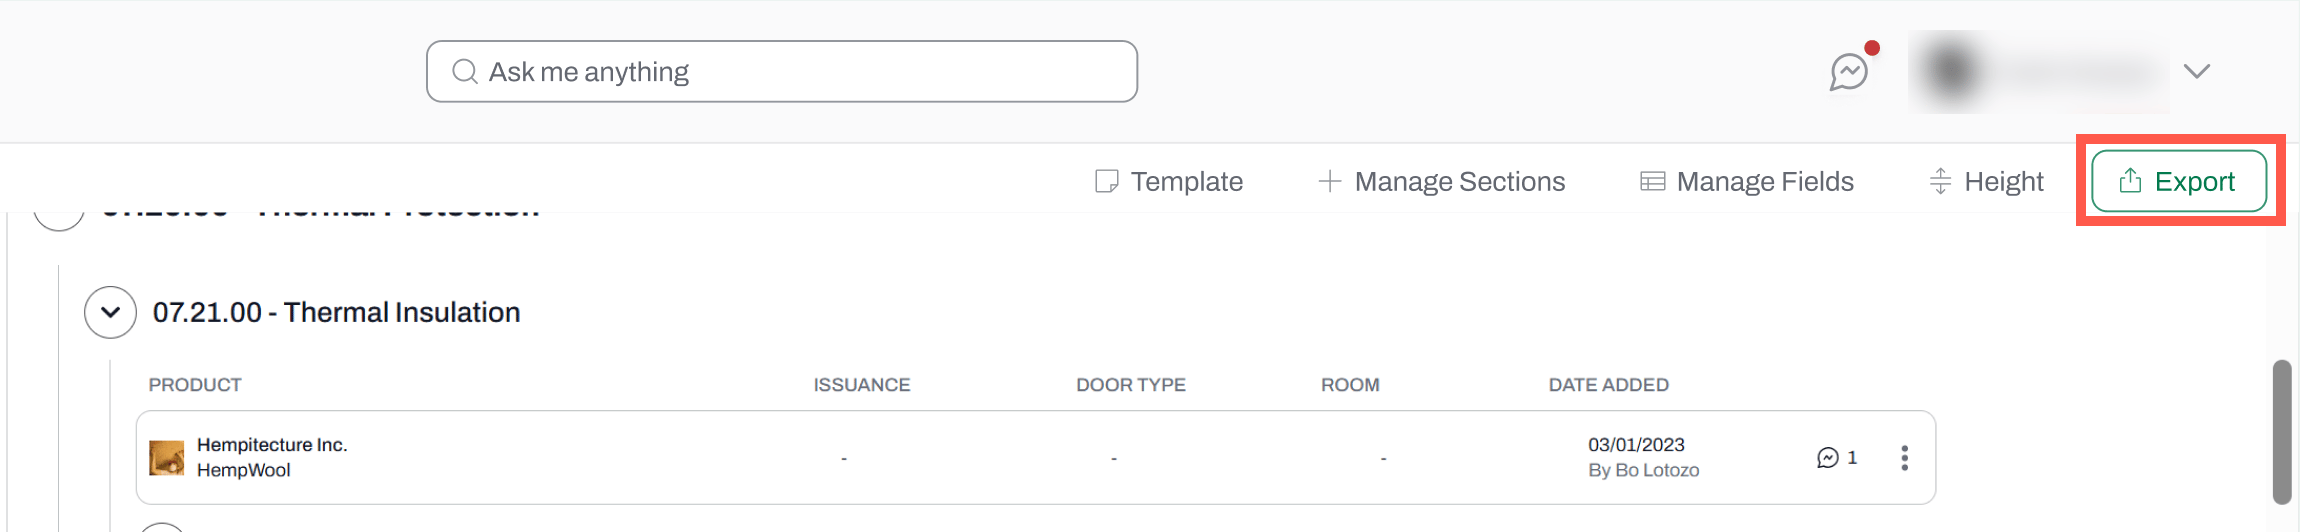
1. Click the **Export** button in the top bar.
2. Choose **Export as .doc** or **Export as .txt**.
The exported file includes a cover page with project information, a table of contents (only sections with products are listed), all fields and their data, and the name of the collaborator who added each product. Product images are not included.
[Click here to see an examples of an exported document.](https://drive.google.com/file/d/1ZkctqPVc7tOHRRxUH_HWykbe2c2lLzbX/view?usp=drive_link)
***
📚 Keep Learning 📚
## Next: SpecPlanner Use Case
[Go to next article](/help-center/working-on-projects/specplanner-use-cases)
 3. Use the arrows to expand and toggle subsections.
4. Click **Save**. All selected sections appear in your SpecPlanner.
**Option B — [Apply a template](/help-center/working-on-projects/specplanner-templates-overview) (fastest)**
1. Click **Templates** in the top bar.
2. Browse Acelab, Firm, and User templates. Use tags to narrow your search.
3. Use the arrows to expand and toggle subsections.
4. Click **Save**. All selected sections appear in your SpecPlanner.
**Option B — [Apply a template](/help-center/working-on-projects/specplanner-templates-overview) (fastest)**
1. Click **Templates** in the top bar.
2. Browse Acelab, Firm, and User templates. Use tags to narrow your search.
 3. Click a template to preview which sections it includes.
4. Click **Apply**.
3. Click a template to preview which sections it includes.
4. Click **Apply**.
 2. Select the fields you want to display. Select up to **three** Custom or Revit fields. Click on the down arrow to expand the list of available fields.
 ⭐ **Premium feature:** On an AECO Pro plan, you can add unlimited fields and use the left/right navigation arrows in the header to scroll through all your columns. Non-Premium users will see Acelab and Company Fields in the picker but cannot add them — hover to see upgrade options.
3. Data from Schedules will be automatically added to the fields in SpecPlanner
⭐ **Premium feature:** On an AECO Pro plan, you can add unlimited fields and use the left/right navigation arrows in the header to scroll through all your columns. Non-Premium users will see Acelab and Company Fields in the picker but cannot add them — hover to see upgrade options.
3. Data from Schedules will be automatically added to the fields in SpecPlanner
 ***
### Move Products Between Sections
If a product ends up in the wrong section, you have two options:
1. **Three-dot menu:** Click **⋮** to the right of the product → **Change MasterFormat Section** → select a new section.
***
### Move Products Between Sections
If a product ends up in the wrong section, you have two options:
1. **Three-dot menu:** Click **⋮** to the right of the product → **Change MasterFormat Section** → select a new section.
 2. **Drag and drop:** Click and hold the six-dot handle to the left of the product image and drag it to a different section or sub-section. You can also reorder products within the same section this way.
 2. Select **Remove Product**.
The product is removed from SpecPlanner but stays in your Schedules. To re-add it, go to Schedules and click the SpecPlanner icon next to the product.
***
### Replace a Product
1. Click **⋮** to the right of the product. Select **Replace Product**.
2. Select **Remove Product**.
The product is removed from SpecPlanner but stays in your Schedules. To re-add it, go to Schedules and click the SpecPlanner icon next to the product.
***
### Replace a Product
1. Click **⋮** to the right of the product. Select **Replace Product**.
 2. The **Explore Products** modal opens in Replace mode. Search and filter to find the replacement.
 3. Select the product and click **Replace Product** to confirm.
The replacement is in-place — the row stays in its current position and all custom field values, notes, and quantities are preserved.
***
### Adjust Row Height
Click the **Height** button in the top bar and choose **Small**, **Medium**, or **Large**.
3. Select the product and click **Replace Product** to confirm.
The replacement is in-place — the row stays in its current position and all custom field values, notes, and quantities are preserved.
***
### Adjust Row Height
Click the **Height** button in the top bar and choose **Small**, **Medium**, or **Large**.
 * **Small** — best for large product lists where you want to see as much as possible at once
* **Large** — best when product images are an important part of the review
***
### Save as a Template
If the sections you've set up would be useful on future projects, save them as a template.
1. Click **Templates** in the top bar.
2. Select **Create Template from the Current View**.
* **Small** — best for large product lists where you want to see as much as possible at once
* **Large** — best when product images are an important part of the review
***
### Save as a Template
If the sections you've set up would be useful on future projects, save them as a template.
1. Click **Templates** in the top bar.
2. Select **Create Template from the Current View**.
 3. Name your template, add a description and tags, and save.
Your template will be available under **User Templates** for your own use, or **Firm Templates** if you choose to share it with your firm.
***
### Export Your Specifications
When you're ready to share:
1. Click the **Export** button in the top bar.
3. Name your template, add a description and tags, and save.
Your template will be available under **User Templates** for your own use, or **Firm Templates** if you choose to share it with your firm.
***
### Export Your Specifications
When you're ready to share:
1. Click the **Export** button in the top bar.
 2. Choose **Export as .doc** or **Export as .txt**.
The exported file includes a cover page with project information, a table of contents (only sections with products are listed), all fields and their data, and the name of the collaborator who added each product. Product images are not included.
[Click here to see an examples of an exported document.](https://drive.google.com/file/d/1ZkctqPVc7tOHRRxUH_HWykbe2c2lLzbX/view?usp=drive_link)
***
📚 Keep Learning 📚
## Next: SpecPlanner Use Case
[Go to next article](/help-center/working-on-projects/specplanner-use-cases)
2. Choose **Export as .doc** or **Export as .txt**.
The exported file includes a cover page with project information, a table of contents (only sections with products are listed), all fields and their data, and the name of the collaborator who added each product. Product images are not included.
[Click here to see an examples of an exported document.](https://drive.google.com/file/d/1ZkctqPVc7tOHRRxUH_HWykbe2c2lLzbX/view?usp=drive_link)
***
📚 Keep Learning 📚
## Next: SpecPlanner Use Case
[Go to next article](/help-center/working-on-projects/specplanner-use-cases)