> ## Documentation Index
> Fetch the complete documentation index at: https://docs.acelabusa.com/llms.txt
> Use this file to discover all available pages before exploring further.
# How to Create a Sheet Spec in SpecPlanner
> Build a concise, drawing-ready specification directly inside your Acelab project — no separate spec manual required.
*Written by Patricia Causey · Updated March 3, 2026*
## What Is a Sheet Spec?
A **Sheet Spec** (also called a spec sheet) places essential project specifications directly on the drawing sheets, rather than in a separate bound document. Instead of maintaining a standalone specification manual, the critical information — standards, code compliance requirements, and material characteristics — travels with the drawings themselves.
A well-crafted Sheet Spec helps:
* **Coordinate construction documents** by establishing consistent standards across drawings, reducing the chance of conflicts between specs and drawings
* **Streamline the design process** by keeping key requirements visible alongside the relevant details
* **Improve project efficiency** by making specifications immediately accessible to everyone working from the drawings — contractors, consultants, and reviewers alike
Sheet Specs are particularly common for renovation projects, limited-scope construction, or fast-paced jobs where a full project manual isn't warranted. But the format isn't just a shortcut — it's a deliberate coordination tool that makes specifications easier to navigate and act on.
***
## Before You Begin
* You must have an active Acelab project.
* Some features in this workflow require a **Premium plan**. See the table below.
| **Feature** | **Plan Required** |
| ------------------------------------------------------------------- | ----------------- |
| Rename MasterFormat sections | All plans |
| Revert section names to Acelab default | All plans |
| Custom fields (up to 3) | All plans |
| Revit fields access in SpecPlanner | All plans |
| Acelab Fields, Company Fields, Special Fields access in SpecPlanner | Premium |
| Unlimited fields + horizontal navigation | Premium |
💡 Not sure which plan your firm has? Contact your Acelab account admin or reach out to Acelab support.
***
## Step 1: Open SpecPlanner
1. Navigate to your project in the Materials Hub.
2. In the left-side menu, click **SpecPlanner**.
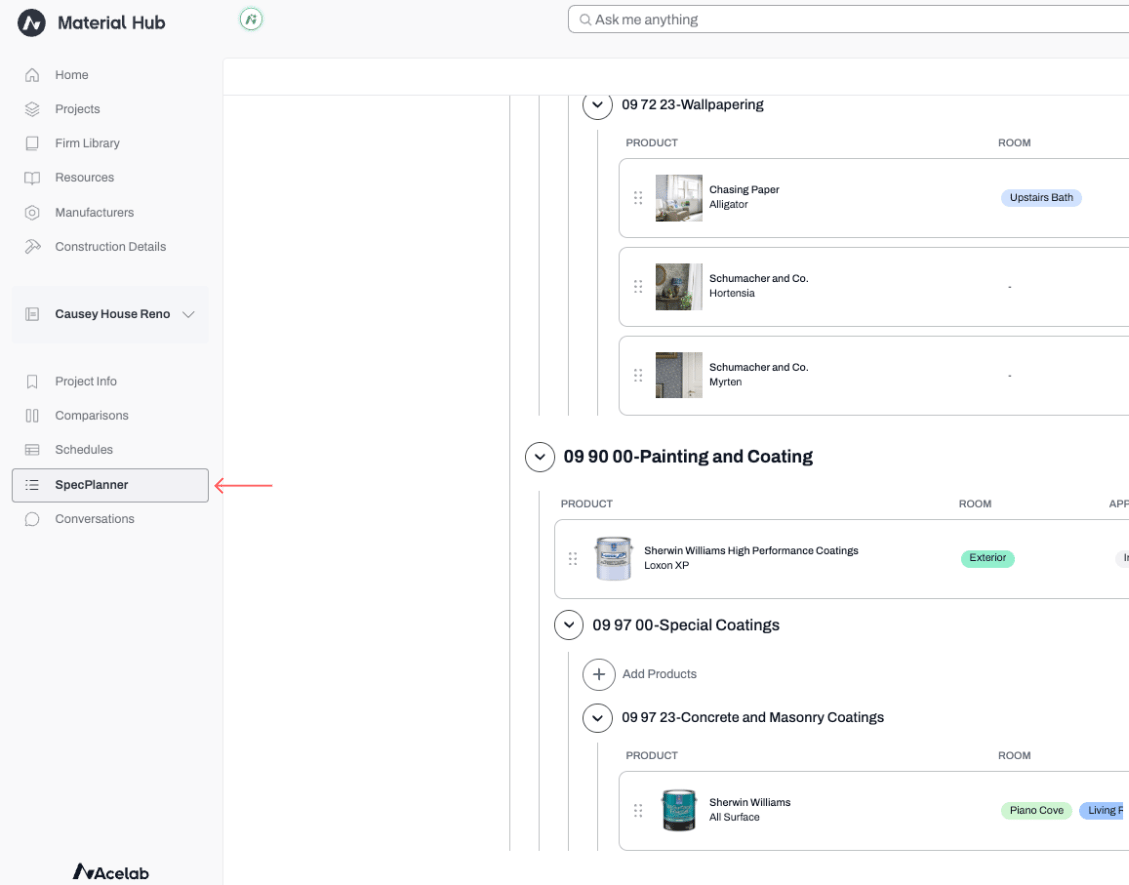 If your project does not have a spec set up yet, you'll see a welcome screen with two starting options. If you already have sections in place, skip to Step 3.
***
## Step 2: Set Up Your Initial Sections
You have two ways to populate SpecPlanner for the first time.
#### Option A: Start with a Template (Recommended)
**[Templates](/help-center/working-on-projects/specplanner-templates-overview)** give you a pre-built set of MasterFormat sections in seconds. Three types are available:
* **Acelab Templates** — ready-made, read-only starting points for common project types
* **Firm Templates** — your organization's standardized section sets (created and managed by Admins or Creators)
* **User Templates** — private templates you've built for your own workflows
To apply a template:
1. From the welcome screen, click **Start with Templates**, or click the **Template** dropdown in the SpecPlanner header.
If your project does not have a spec set up yet, you'll see a welcome screen with two starting options. If you already have sections in place, skip to Step 3.
***
## Step 2: Set Up Your Initial Sections
You have two ways to populate SpecPlanner for the first time.
#### Option A: Start with a Template (Recommended)
**[Templates](/help-center/working-on-projects/specplanner-templates-overview)** give you a pre-built set of MasterFormat sections in seconds. Three types are available:
* **Acelab Templates** — ready-made, read-only starting points for common project types
* **Firm Templates** — your organization's standardized section sets (created and managed by Admins or Creators)
* **User Templates** — private templates you've built for your own workflows
To apply a template:
1. From the welcome screen, click **Start with Templates**, or click the **Template** dropdown in the SpecPlanner header.
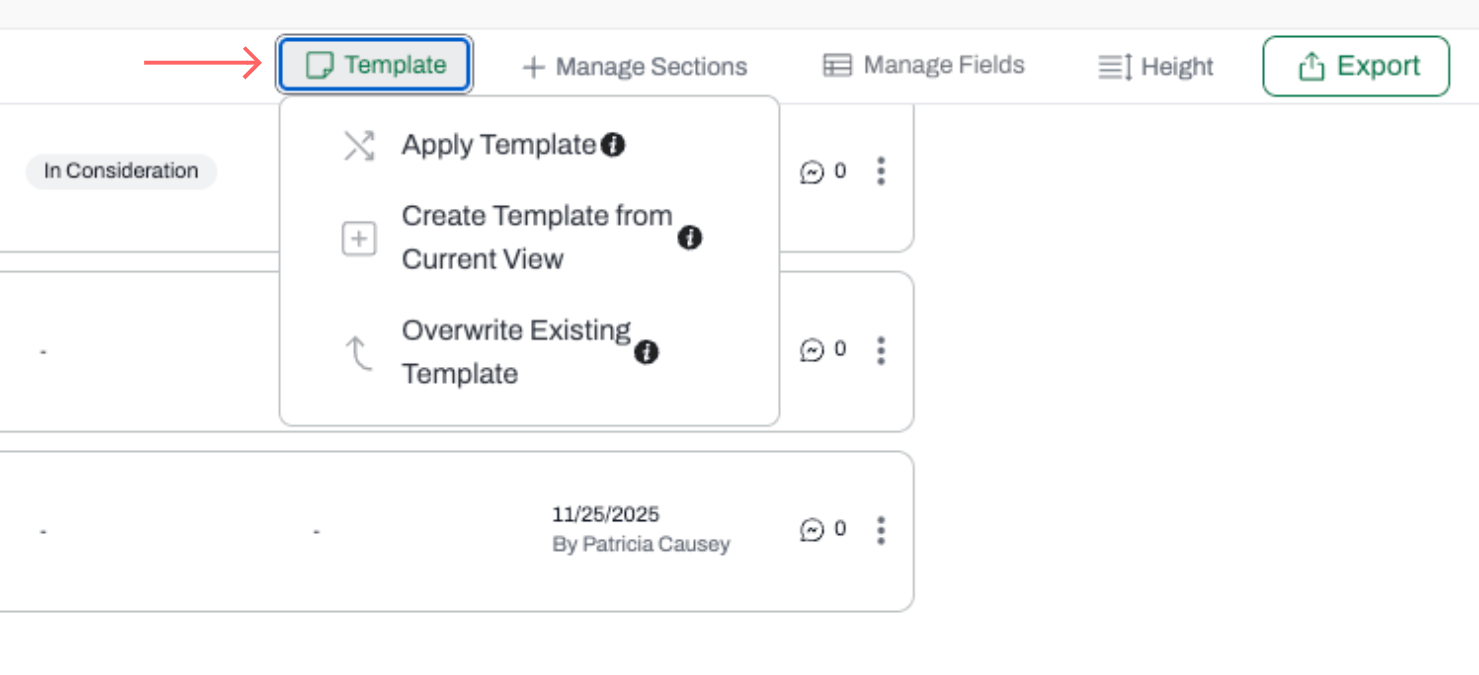 2. Select **Apply Template**. Browse the template library and select a template to preview its sections.
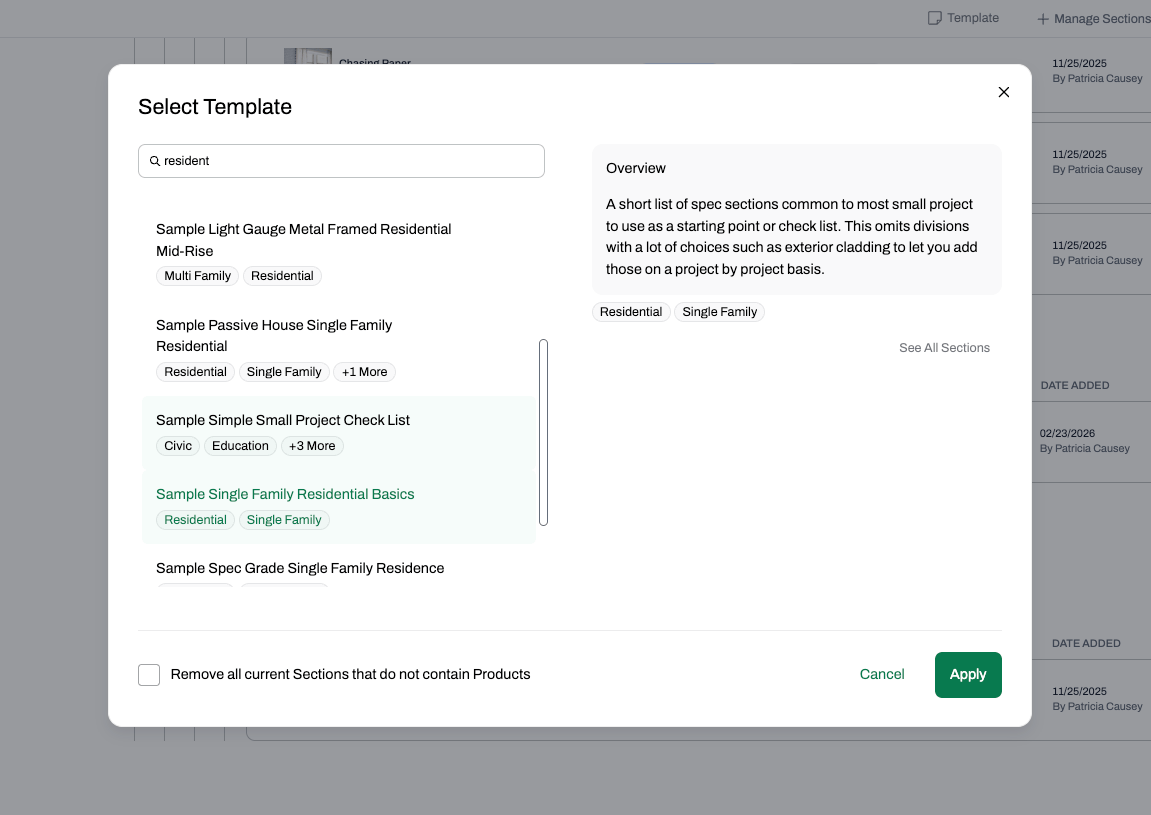 3. Click **Apply**. You'll have the option to remove any existing empty sections before the template loads.
You can save your current SpecPlanner layout as a new template at any time using the **Templates** menu > **Create from Current View**. Learn more in [Creating and Overwriting SpecPlanner Templates](/help-center/working-on-projects/creating-and-overwriting-specplanner-templates).
#### Option B: Add Sections Manually
1. From the welcome screen, click **Manually Add Sections**, or click **Manage Sections** in the SpecPlanner header.
3. Click **Apply**. You'll have the option to remove any existing empty sections before the template loads.
You can save your current SpecPlanner layout as a new template at any time using the **Templates** menu > **Create from Current View**. Learn more in [Creating and Overwriting SpecPlanner Templates](/help-center/working-on-projects/creating-and-overwriting-specplanner-templates).
#### Option B: Add Sections Manually
1. From the welcome screen, click **Manually Add Sections**, or click **Manage Sections** in the SpecPlanner header.
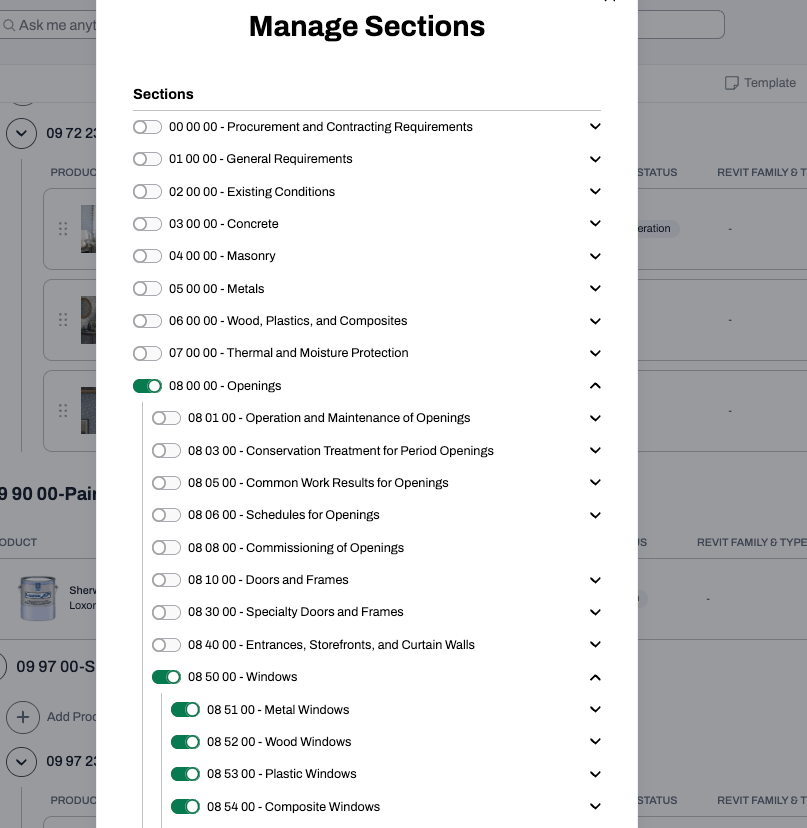
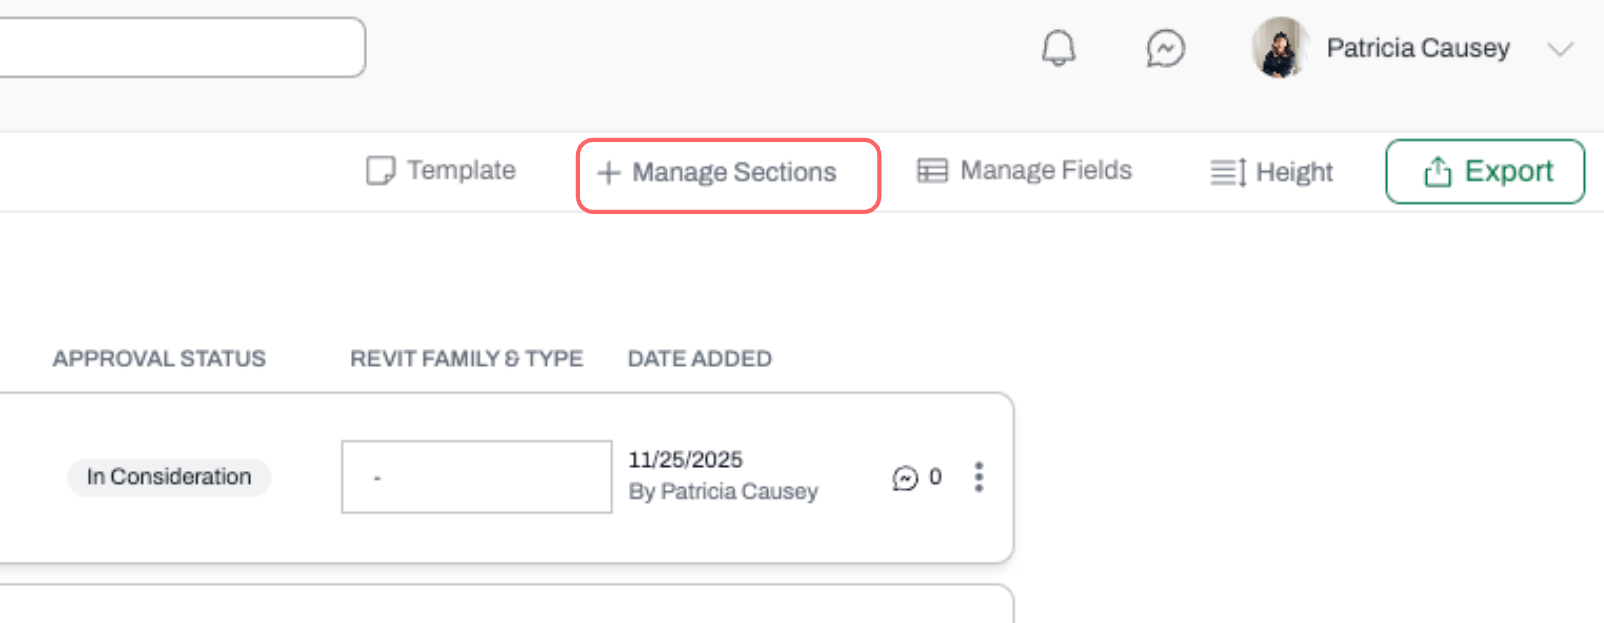 2. In the Manage Section modal, toggle sections on to add them to your planner.
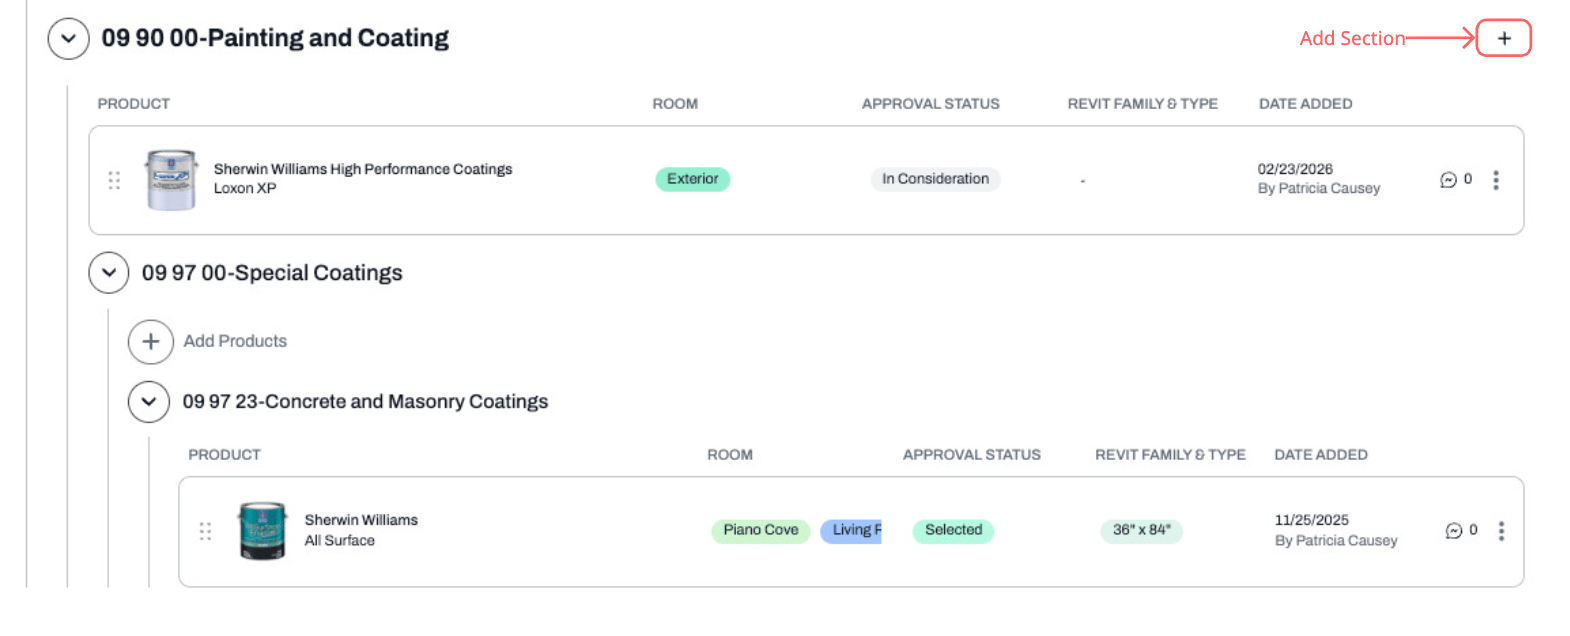
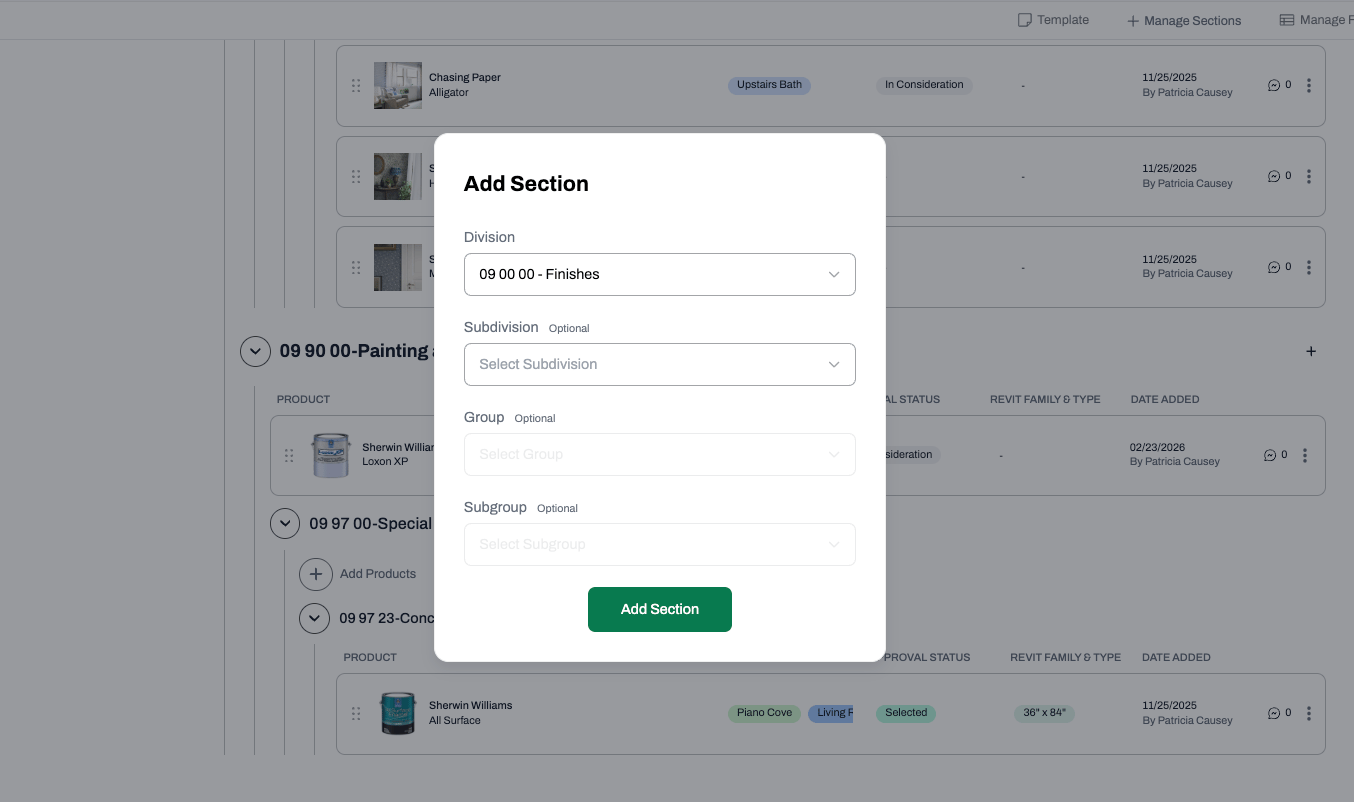
 3. To add a more specific section (Subdivision, Group, or Subgroup), click **+ Add Section** and use the cascading dropdowns to select the exact level you need.
 A section containing products cannot be hidden until all products are removed or moved.
***
## Step 3: Rename Sections to Match Your Drawings (Optional)
Sheet Specs work best when section names match the terminology on your drawing sheets. You can [rename any MasterFormat section](/help-center/working-on-projects/customizing-your-specplanner) to use your firm's preferred language.
1. Hover over a MasterFormat section name — an **edit icon** will appear.
2. Click the edit icon and type your preferred name.
3. Press **Save**.
The renamed section updates automatically in your project's **Schedules** view as well, keeping everything in sync.
To restore the original name at any time, hover over the section, click the edit icon, and select **Revert to Acelab Default**.
***
## Step 4: Add Products to Each Section
Products can be added from multiple sources. Inside any section, click **+ Add Products** to see the options:
| Source | When to Use |
| ---------------------------- | --------------------------------------------------------------------------------------- |
| **Search by Manufacturer** | Find a specific product from Acelab's catalog |
| **Select from Project** | Pull in products already in your project's schedules |
| **Select from Firm Library** | Use preferred products your firm has curated |
| **Add a Custom Product** | Add an item not yet finalized (enter manufacturer, product name, SKU, and URL manually) |
| **Request a Recommendation** | Initiate a recommendation request from Acelab |
## Organizing Products
Once products are in a section, you can:
* **Drag and drop** to reorder products within a section, or move them to a different section entirely
* **Change section** from a product's action menu (the three-dot icon) to reassign it manually
* **Revert section** if a product's MasterFormat assignment was manually changed and you want to restore the original classification
* **Replace** a product row with a different product
* **Remove** a product from the section
***
## Step 5: Add Fields to Capture the Right Data
Fields appear as columns alongside your products in the planner. Add the fields most relevant to your Sheet Spec — things like fire rating, dimensions, material type, or approval status.
The SpecPlanner shows up to **three fields at a time**. To add a field:
1. Click **+ Add Custom Field** in the SpecPlanner header (or click an empty column header labeled **ADD FIELD**).
2. Choose from available **Custom Fields** or **Revit Fields**.
3. The field appears as a column. Data can be edited directly in the planner grid.
To swap or remove a field, click an existing column header and choose **Change Field** or **Remove Field**.
### Expanded Field Types and Unlimited Fields
⭐ ***Premium feature.*** *Acelab Fields, Company Fields, and Special Fields require a Premium plan. Unlimited fields and horizontal navigation also require Premium.*
Premium users can pull in additional field types without manual re-entry:
* **Acelab Fields** — catalog attributes like fire rating, material type, and dimensions (auto-populated for Acelab products)
* **Company Fields** — firm-wide fields already configured for consistent tracking across all projects
* **Special Fields** — project-level context like product category, where a product is used, or manufacturer rep information
**Unlimited fields with horizontal navigation:** Once more than four fields are added, left and right arrow buttons appear in the SpecPlanner header so you can scroll across all columns. A field counter (e.g., "Manage Fields (7)") shows how many fields are active. All fields — visible or not — are included in exports.
***
## Step 6: Adjust Row Height (Optional)
To show more or less product detail in your planner view, click **Product Height** in the SpecPlanner header and choose:
| **Setting** | **Best For** |
| ----------- | ------------------------------------- |
| Small | Dense overview, quick scanning |
| Medium | Default balance of detail and density |
| Large | Reviewing full product information |
This is a display preference only and does not affect exports.
***
## Step 7: Export Your Sheet Spec
When your sections, products, and fields are ready:
1. Click **[Export Sections](/help-center/working-on-projects/exporting-your-specplanner)** in the SpecPlanner header.
2. Choose your format:
* **Word (.docx)** — formatted specification document, ready for further editing
* **Text (.txt)** — plain text, useful for pasting into other tools
3. The file downloads automatically, named `ProjectName-YYYY-MM-DD`.
All active fields are included in the export, regardless of which columns are currently visible on screen.
***
## What to Expect
After completing these steps, you'll have a SpecPlanner view organized by your firm's section naming, populated with products and the attributes most relevant to your project scope — ready to export and place on your drawing sheets.
A section containing products cannot be hidden until all products are removed or moved.
***
## Step 3: Rename Sections to Match Your Drawings (Optional)
Sheet Specs work best when section names match the terminology on your drawing sheets. You can [rename any MasterFormat section](/help-center/working-on-projects/customizing-your-specplanner) to use your firm's preferred language.
1. Hover over a MasterFormat section name — an **edit icon** will appear.
2. Click the edit icon and type your preferred name.
3. Press **Save**.
The renamed section updates automatically in your project's **Schedules** view as well, keeping everything in sync.
To restore the original name at any time, hover over the section, click the edit icon, and select **Revert to Acelab Default**.
***
## Step 4: Add Products to Each Section
Products can be added from multiple sources. Inside any section, click **+ Add Products** to see the options:
| Source | When to Use |
| ---------------------------- | --------------------------------------------------------------------------------------- |
| **Search by Manufacturer** | Find a specific product from Acelab's catalog |
| **Select from Project** | Pull in products already in your project's schedules |
| **Select from Firm Library** | Use preferred products your firm has curated |
| **Add a Custom Product** | Add an item not yet finalized (enter manufacturer, product name, SKU, and URL manually) |
| **Request a Recommendation** | Initiate a recommendation request from Acelab |
## Organizing Products
Once products are in a section, you can:
* **Drag and drop** to reorder products within a section, or move them to a different section entirely
* **Change section** from a product's action menu (the three-dot icon) to reassign it manually
* **Revert section** if a product's MasterFormat assignment was manually changed and you want to restore the original classification
* **Replace** a product row with a different product
* **Remove** a product from the section
***
## Step 5: Add Fields to Capture the Right Data
Fields appear as columns alongside your products in the planner. Add the fields most relevant to your Sheet Spec — things like fire rating, dimensions, material type, or approval status.
The SpecPlanner shows up to **three fields at a time**. To add a field:
1. Click **+ Add Custom Field** in the SpecPlanner header (or click an empty column header labeled **ADD FIELD**).
2. Choose from available **Custom Fields** or **Revit Fields**.
3. The field appears as a column. Data can be edited directly in the planner grid.
To swap or remove a field, click an existing column header and choose **Change Field** or **Remove Field**.
### Expanded Field Types and Unlimited Fields
⭐ ***Premium feature.*** *Acelab Fields, Company Fields, and Special Fields require a Premium plan. Unlimited fields and horizontal navigation also require Premium.*
Premium users can pull in additional field types without manual re-entry:
* **Acelab Fields** — catalog attributes like fire rating, material type, and dimensions (auto-populated for Acelab products)
* **Company Fields** — firm-wide fields already configured for consistent tracking across all projects
* **Special Fields** — project-level context like product category, where a product is used, or manufacturer rep information
**Unlimited fields with horizontal navigation:** Once more than four fields are added, left and right arrow buttons appear in the SpecPlanner header so you can scroll across all columns. A field counter (e.g., "Manage Fields (7)") shows how many fields are active. All fields — visible or not — are included in exports.
***
## Step 6: Adjust Row Height (Optional)
To show more or less product detail in your planner view, click **Product Height** in the SpecPlanner header and choose:
| **Setting** | **Best For** |
| ----------- | ------------------------------------- |
| Small | Dense overview, quick scanning |
| Medium | Default balance of detail and density |
| Large | Reviewing full product information |
This is a display preference only and does not affect exports.
***
## Step 7: Export Your Sheet Spec
When your sections, products, and fields are ready:
1. Click **[Export Sections](/help-center/working-on-projects/exporting-your-specplanner)** in the SpecPlanner header.
2. Choose your format:
* **Word (.docx)** — formatted specification document, ready for further editing
* **Text (.txt)** — plain text, useful for pasting into other tools
3. The file downloads automatically, named `ProjectName-YYYY-MM-DD`.
All active fields are included in the export, regardless of which columns are currently visible on screen.
***
## What to Expect
After completing these steps, you'll have a SpecPlanner view organized by your firm's section naming, populated with products and the attributes most relevant to your project scope — ready to export and place on your drawing sheets.