> ## Documentation Index
> Fetch the complete documentation index at: https://docs.acelabusa.com/llms.txt
> Use this file to discover all available pages before exploring further.
# Navigating Smart Docs
> Understanding key features and functionalities of Smart Docs
Smart Docs is a canvas-based document editor built into your project. It reads directly from your Schedules so any product data, fields, and updates flow through automatically. This article covers where to find Smart Docs and how to work in the editor.
## Opening Smart Docs
There are two ways to open a Smart Doc from a project:
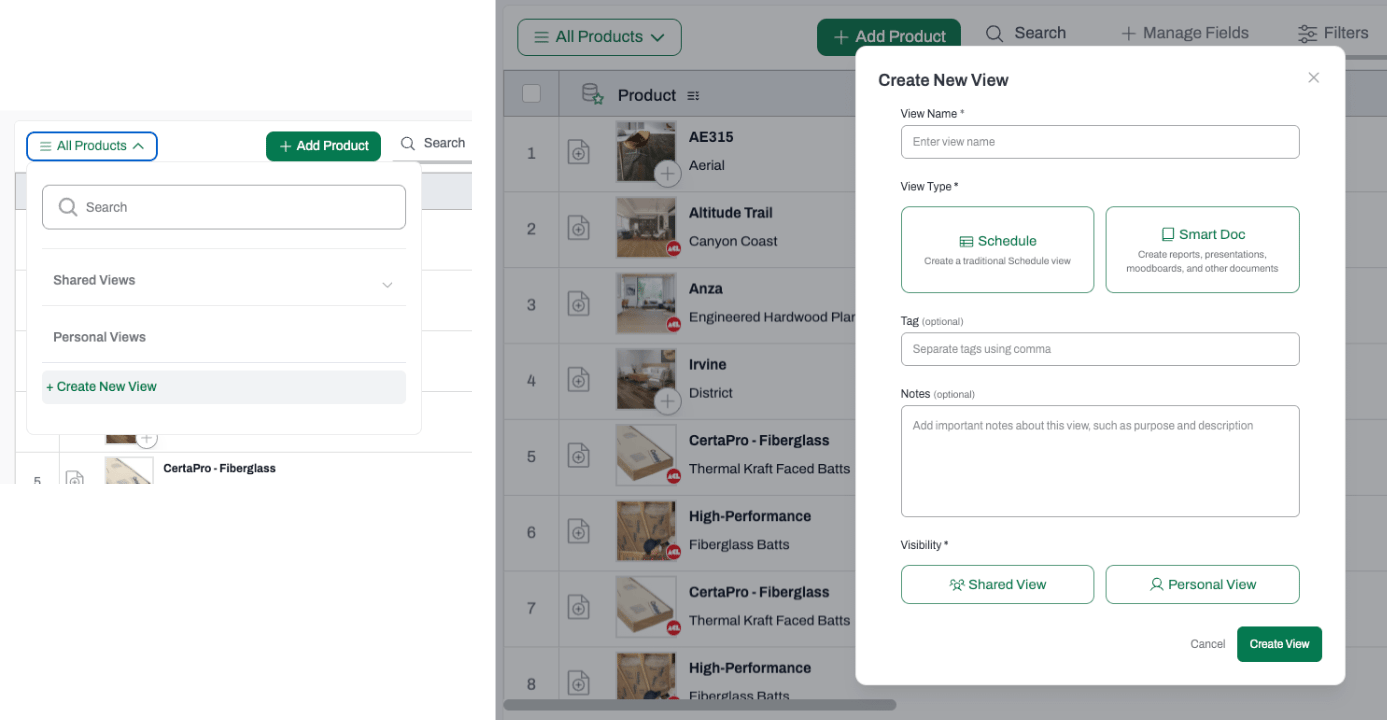
1. **From Schedules View.** Open your project's **Views** menu, click **Create New View**, then choose **Smart Doc** (instead of **Schedule**). Give it a name and set visibility to **Shared** or **Personal**, then click **Create View**.
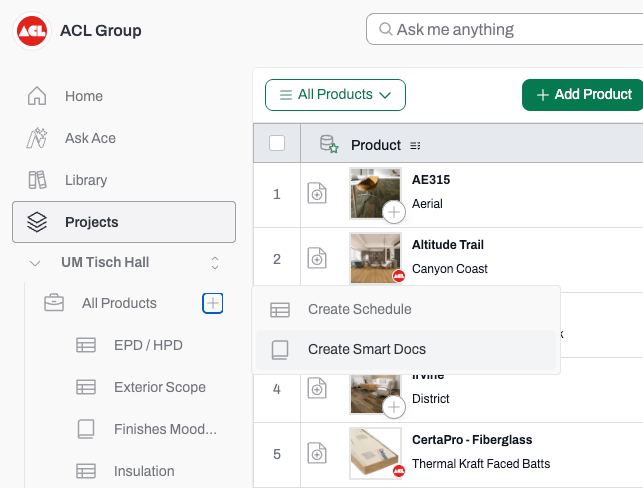
 2. **From the side navigation.** In the project side nav, open the project's menu (the **+** CTA), then click **Create Smart Docs**.
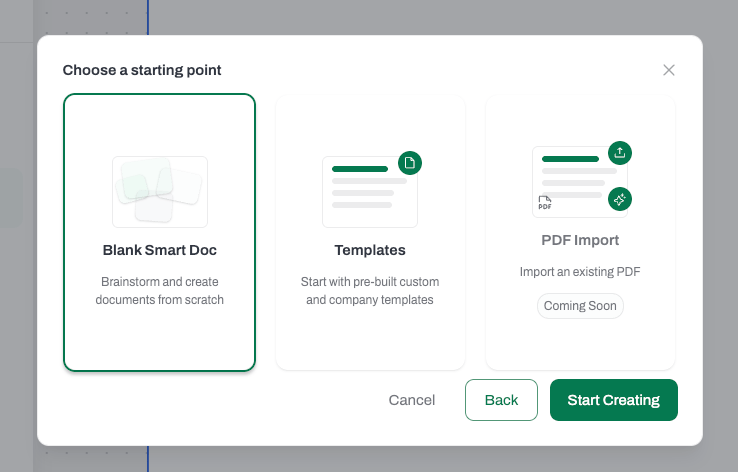
 Either entry point opens the Smart Docs editor and drops you into a **Choose a starting point** modal where you can select **Blank Smart Doc**, **Templates**, or **PDF Import** (Coming Soon).
 [Click here to learn how to create a document ***from scratch***](/help-center/working-on-projects/smart-docs-create-blank)
[Click here to learn how to create a document ***from templates***](/help-center/working-on-projects/smart-docs-create-from-template)
***
## Editor Layout
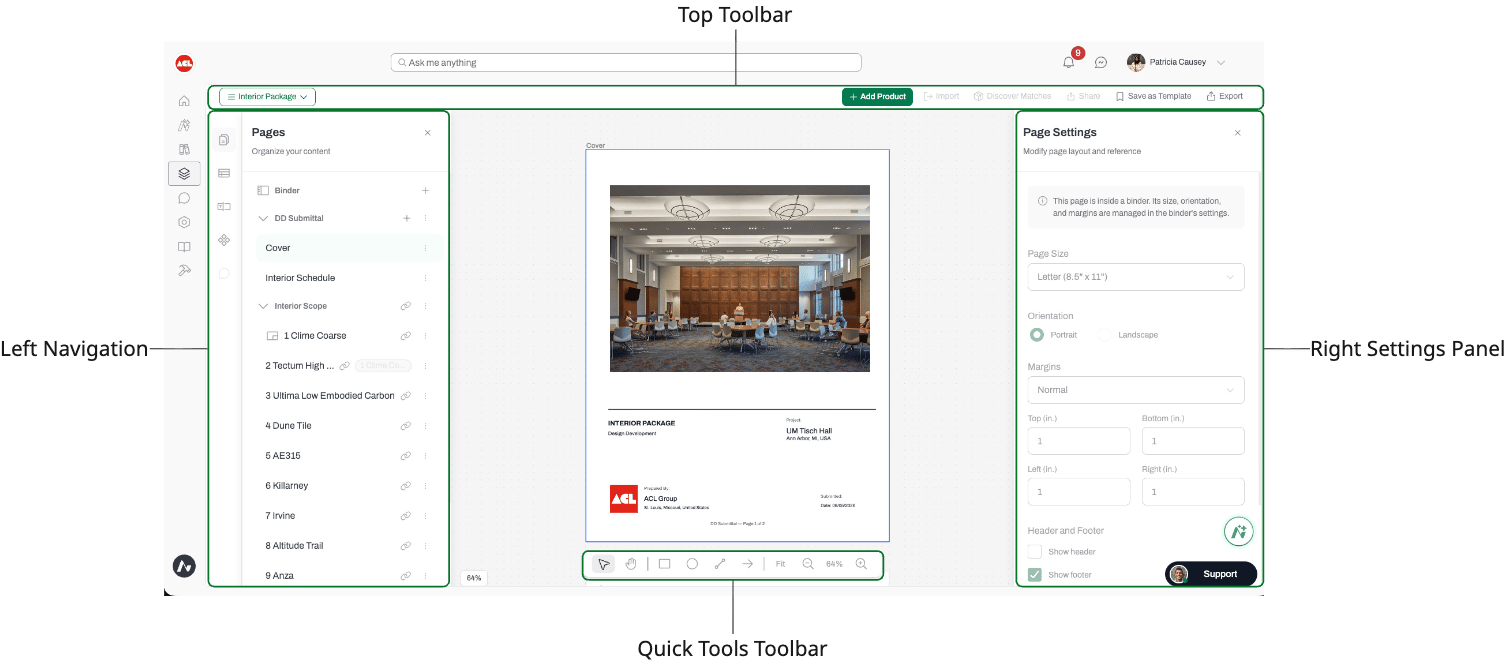
The editor has four main regions:
* **Left navigation** — the pages and content library rail.
* **Top toolbar** — document-level CTAs (Add Product, Save as Template, Export).
* **Quick Access toolbar** — the floating tool palette that sits over the canvas.
* **Right panel** — the inspector where you configure the selected page or element.
[Click here to learn how to create a document ***from scratch***](/help-center/working-on-projects/smart-docs-create-blank)
[Click here to learn how to create a document ***from templates***](/help-center/working-on-projects/smart-docs-create-from-template)
***
## Editor Layout
The editor has four main regions:
* **Left navigation** — the pages and content library rail.
* **Top toolbar** — document-level CTAs (Add Product, Save as Template, Export).
* **Quick Access toolbar** — the floating tool palette that sits over the canvas.
* **Right panel** — the inspector where you configure the selected page or element.
 ### Left Navigation
The far-left rail switches between four drawers. Only one is open at a time.
### Left Navigation
The far-left rail switches between four drawers. Only one is open at a time.
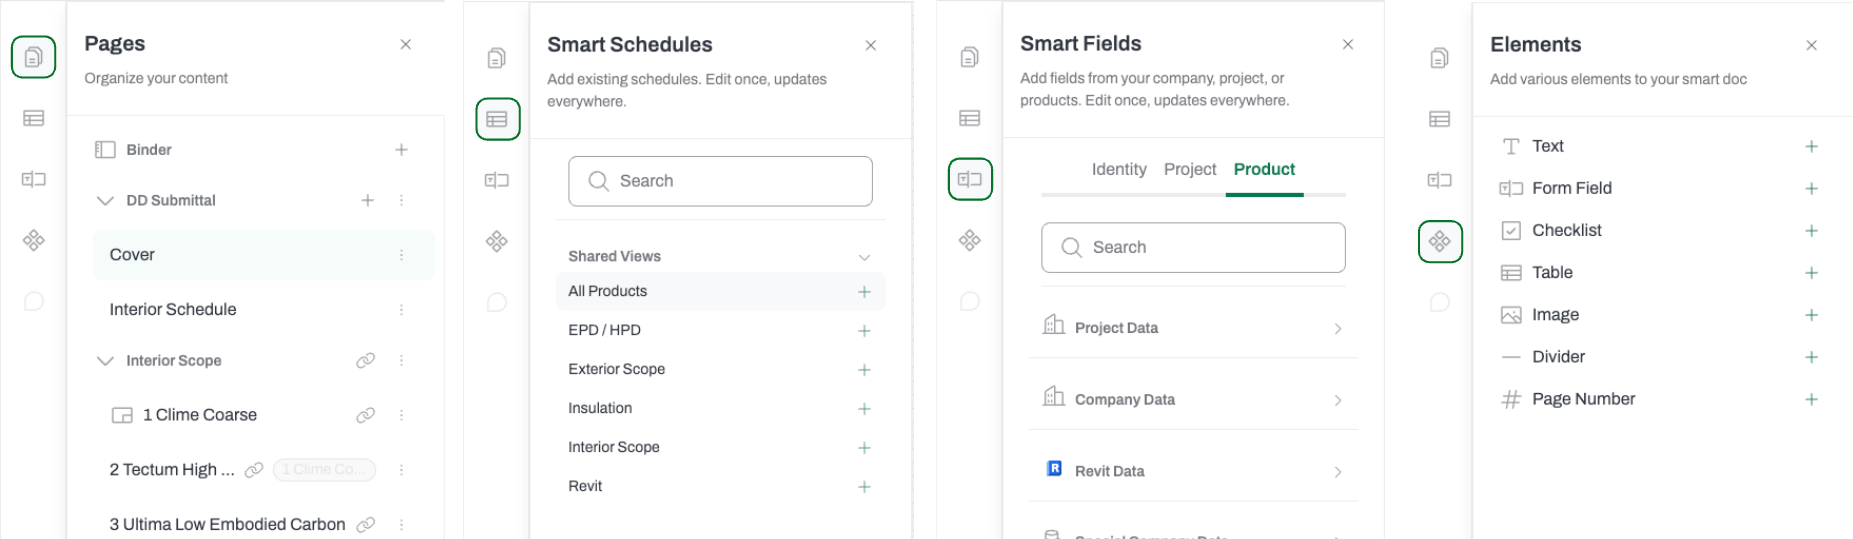 | Drawer | What it's for |
| ---------------------- | ---------------------------------------------------------------- |
| **Pages** | Organize binders and pages in your document. |
| **Smart Schedule** | Insert an existing project schedule as a table. |
| **Smart Fields** | Insert live data fields from your company, project, or products. |
| **Smart Doc Elements** | Insert text, images, tables, checklists, dividers, and more. |
| **Comments** | Coming Soon. |
### Top Toolbar
Runs along the top of the editor. From left to right:
| Drawer | What it's for |
| ---------------------- | ---------------------------------------------------------------- |
| **Pages** | Organize binders and pages in your document. |
| **Smart Schedule** | Insert an existing project schedule as a table. |
| **Smart Fields** | Insert live data fields from your company, project, or products. |
| **Smart Doc Elements** | Insert text, images, tables, checklists, dividers, and more. |
| **Comments** | Coming Soon. |
### Top Toolbar
Runs along the top of the editor. From left to right:
 * **View switcher** — jump between Schedule and Smart Doc views on the current project.
* **Add Product** — open the product picker and add products to the document.
* **Import** — Coming Soon.
* **Discover Matches** — Coming Soon.
* **Share** — Coming Soon.
* **Save as Template** — save the current document as a reusable template.
* **Export** — export the document to PDF.
### Quick Access Toolbar
A floating toolbar pinned to the bottom center of the canvas. Use it for:
* **View switcher** — jump between Schedule and Smart Doc views on the current project.
* **Add Product** — open the product picker and add products to the document.
* **Import** — Coming Soon.
* **Discover Matches** — Coming Soon.
* **Share** — Coming Soon.
* **Save as Template** — save the current document as a reusable template.
* **Export** — export the document to PDF.
### Quick Access Toolbar
A floating toolbar pinned to the bottom center of the canvas. Use it for:
 * **Cursor** / **Pan** tools.
* **Shapes** (rectangle, circle, line, arrow).
* **Zoom** (Fit, Zoom Out, Zoom In, current percentage).
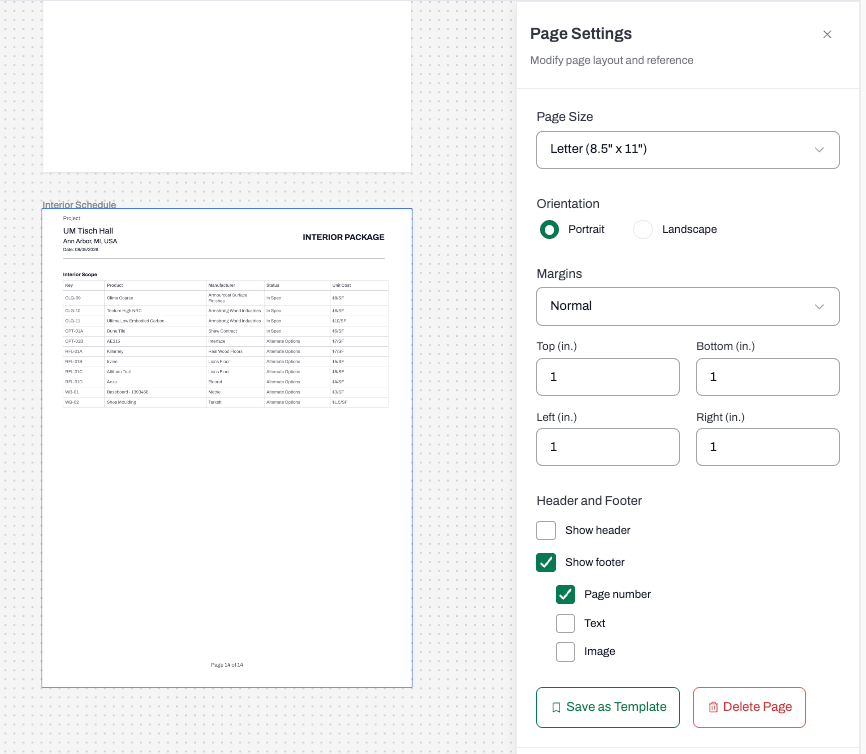
### Right Panel (Inspector)
Opens on the right when you select a page, binder, or element setting. It surfaces settings specific to what you selected (page size, background, element properties, table settings, and so on).
* **Cursor** / **Pan** tools.
* **Shapes** (rectangle, circle, line, arrow).
* **Zoom** (Fit, Zoom Out, Zoom In, current percentage).
### Right Panel (Inspector)
Opens on the right when you select a page, binder, or element setting. It surfaces settings specific to what you selected (page size, background, element properties, table settings, and so on).
 ***
## Working With Pages and Binders
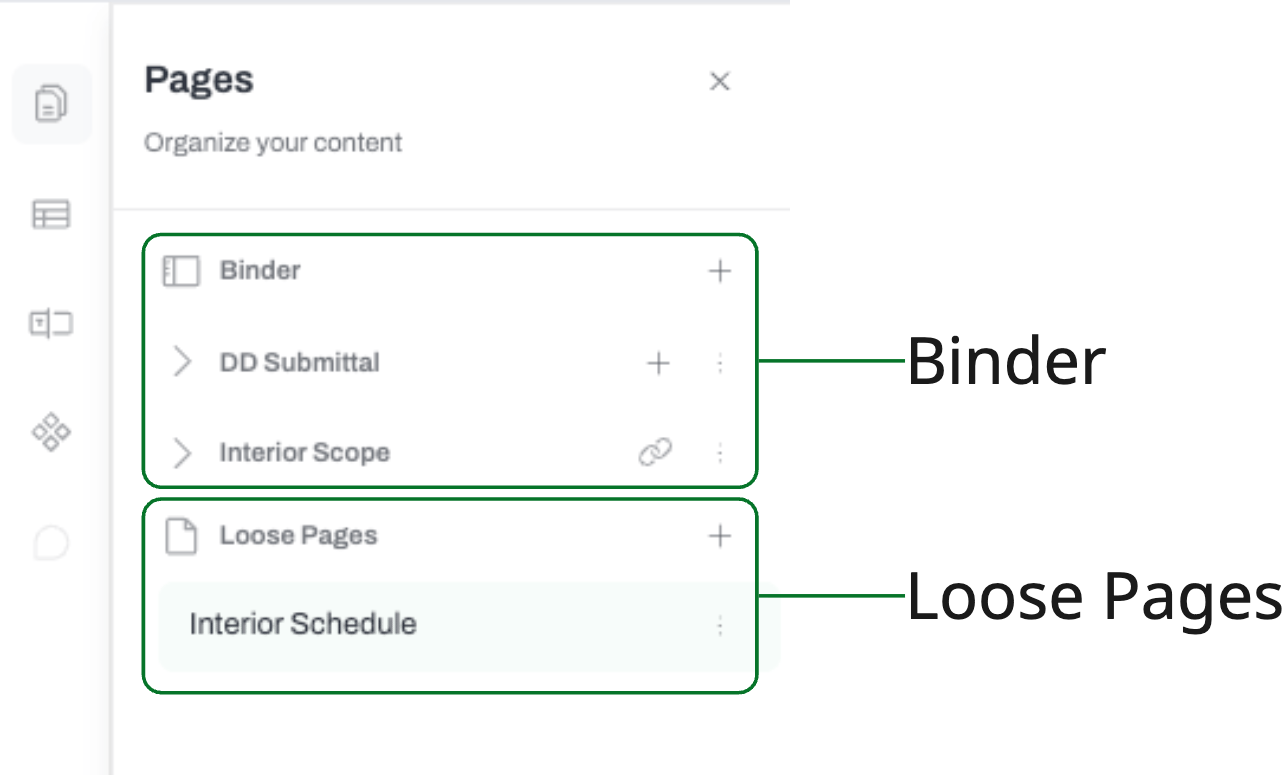
### Loose Pages vs. Binders
**Loose Pages** are standalone pages that live on their own, outside any group. **Binders** group multiple pages together into a section of your document.
Use a **Loose Page** when you need a single, one-off page (a cover sheet, a divider, a legend, a sign-off page). Use a **Binder** when you need a group of related pages that belong together, either because you want to organize a section by hand (**Custom Binder**) or because you want a page per product from a schedule (**Reference Binder**).
***
## Working With Pages and Binders
### Loose Pages vs. Binders
**Loose Pages** are standalone pages that live on their own, outside any group. **Binders** group multiple pages together into a section of your document.
Use a **Loose Page** when you need a single, one-off page (a cover sheet, a divider, a legend, a sign-off page). Use a **Binder** when you need a group of related pages that belong together, either because you want to organize a section by hand (**Custom Binder**) or because you want a page per product from a schedule (**Reference Binder**).
 ### Loose Pages
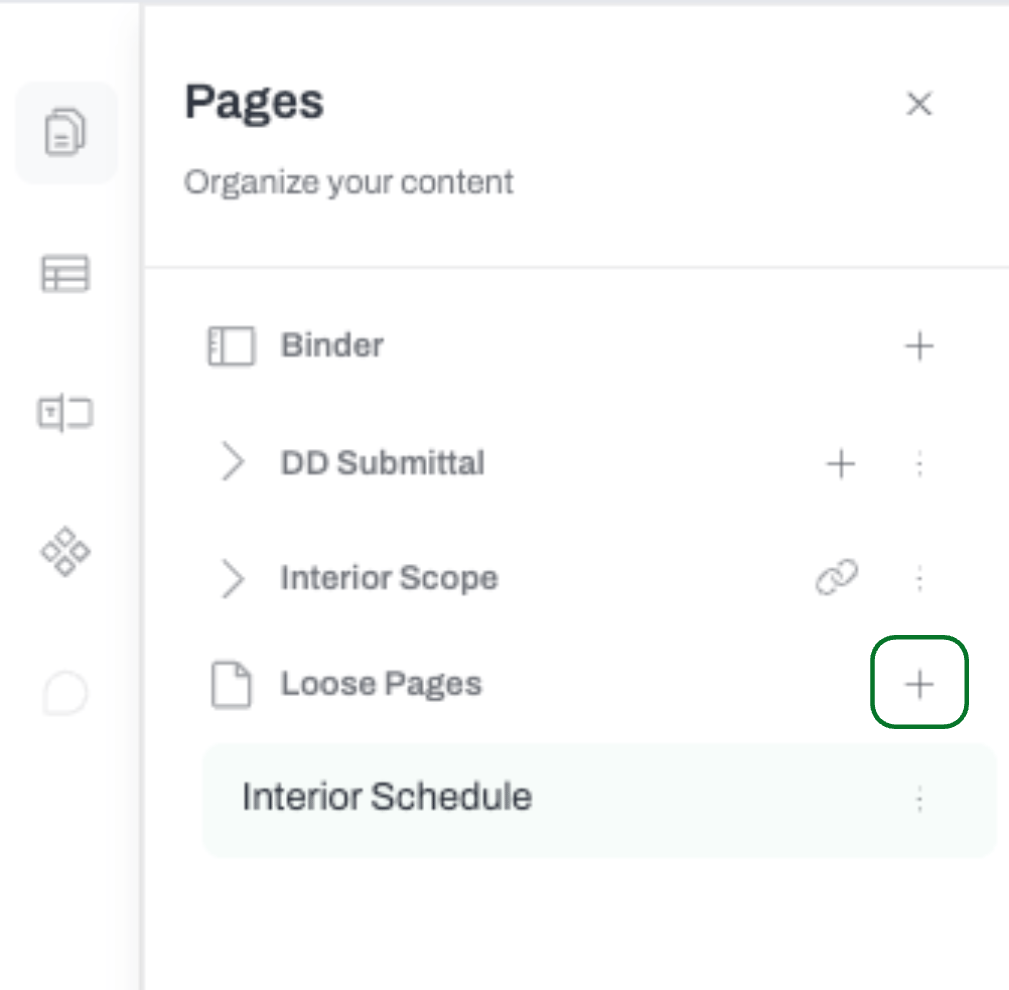
Open the **Pages** drawer from the left rail to organize your document.
Loose pages sit outside any binder. Click the **+** next to **Loose Pages** in the Pages drawer to add one. Use loose pages for cover sheets, dividers, or standalone content that doesn't belong in a binder
### Loose Pages
Open the **Pages** drawer from the left rail to organize your document.
Loose pages sit outside any binder. Click the **+** next to **Loose Pages** in the Pages drawer to add one. Use loose pages for cover sheets, dividers, or standalone content that doesn't belong in a binder
 [Learn more about using Loose Pages here](/help-center/working-on-projects/smart-docs-loose-pages)
### Custom Binders
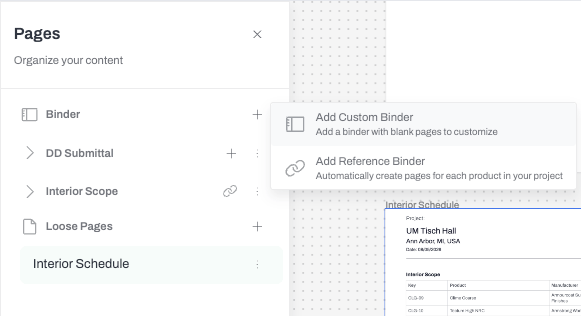
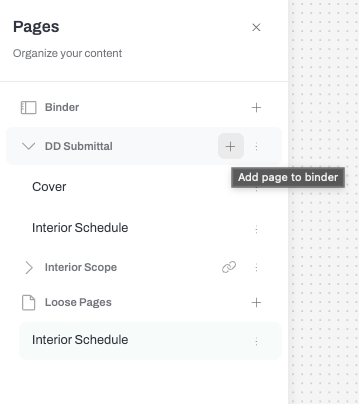
A **Custom Binder** groups blank pages you fully control. In the Pages drawer, click the **+** next to **Binder** and choose **Add Custom Binder**. Add pages inside the binder with the **+** on the binder header.
[Learn more about using Loose Pages here](/help-center/working-on-projects/smart-docs-loose-pages)
### Custom Binders
A **Custom Binder** groups blank pages you fully control. In the Pages drawer, click the **+** next to **Binder** and choose **Add Custom Binder**. Add pages inside the binder with the **+** on the binder header.
 [Learn more about using Custom Binders here](/help-center/working-on-projects/smart-docs-custom-binders)
### Reference Binders
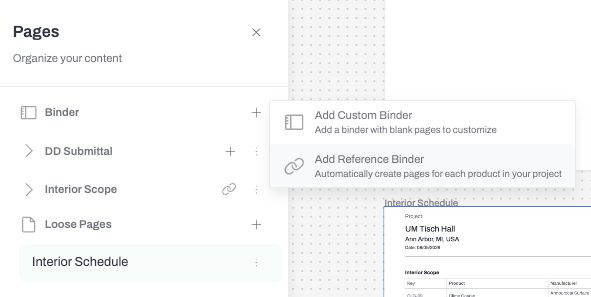
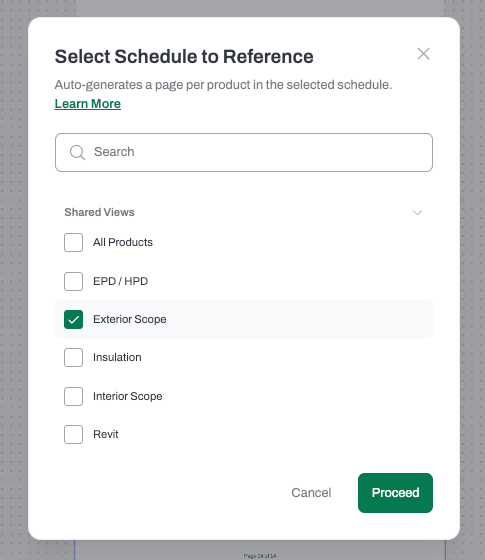
A **Reference Binder** auto-generates one page per product in a schedule you reference. Click the **+** next to **Binder**, choose **Add Reference Binder**, then pick the schedule to reference. Pages inside a reference binder map 1:1 to schedule rows and can't be added by hand, they stay in sync with the schedule.
[Learn more about using Custom Binders here](/help-center/working-on-projects/smart-docs-custom-binders)
### Reference Binders
A **Reference Binder** auto-generates one page per product in a schedule you reference. Click the **+** next to **Binder**, choose **Add Reference Binder**, then pick the schedule to reference. Pages inside a reference binder map 1:1 to schedule rows and can't be added by hand, they stay in sync with the schedule.
 [Learn more about using Reference Binders here](/help-center/working-on-projects/smart-docs-reference-binders)
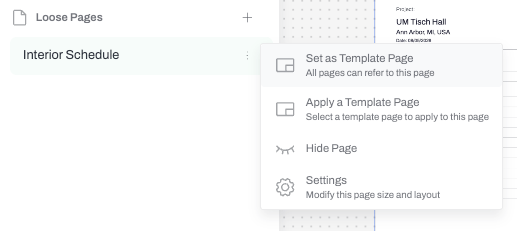
### Page Templates
Save any page layout as a template so you can reuse it. Open the page's action menu in the Pages drawer and choose **Save as Template**. Applying a page template drops the saved layout onto a new page.
[Learn more about using Reference Binders here](/help-center/working-on-projects/smart-docs-reference-binders)
### Page Templates
Save any page layout as a template so you can reuse it. Open the page's action menu in the Pages drawer and choose **Save as Template**. Applying a page template drops the saved layout onto a new page.
 [Learn more about Page Templates here](/help-center/working-on-projects/smart-docs-page-templates)
***
## Adding Content
### Add Product
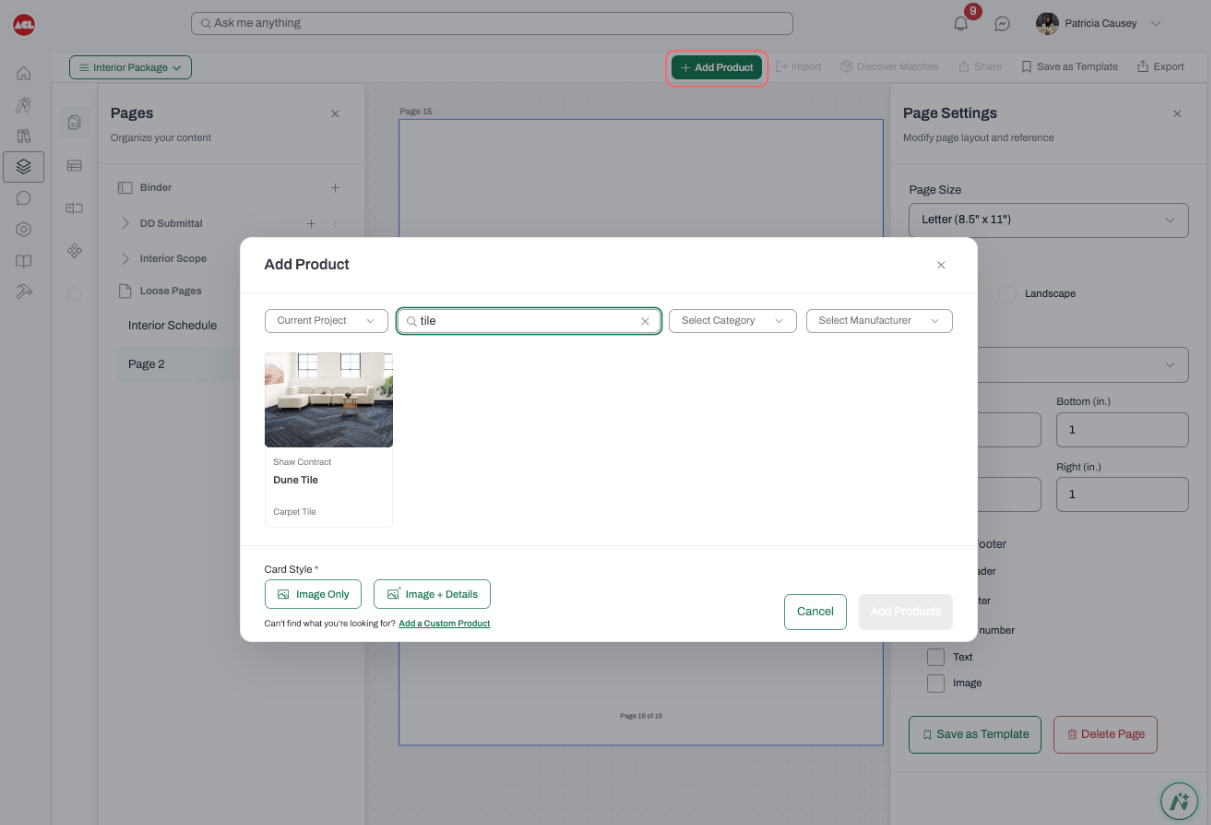
The **Add Product** CTA in the top toolbar opens the product picker so you can pull products from your project's Schedules into the current Smart Doc. Selected products get their own page inside the linked [Reference Binder](/help-center/working-on-projects/smart-docs-reference-binders), pre-populated with the product's data through Smart Fields.
Use **Add Product** when you want to:
* **Assemble a submittal or cutsheet package** by pulling in specific products from a schedule rather than including the entire schedule.
* **Add newly specified products** to an existing Smart Doc without rebuilding pages by hand.
* **Curate a subset of products** for a client presentation, bid set, or approval package.
* **Quickly generate product pages** using the layout defined in your Reference Binder, without touching the schedule directly.
**To add a product:**
1. Open the Smart Doc you want to add products to.
2. In the top toolbar, click **Add Product**.
3. In the product picker, select the **schedule** to pull products from.
4. Browse or search the schedule's products and check the ones you want to add.
5. Click **Add** to confirm your selection.
6. A page is generated for each selected product inside the linked Reference Binder, using its layout and Smart Fields.
[Learn more about Page Templates here](/help-center/working-on-projects/smart-docs-page-templates)
***
## Adding Content
### Add Product
The **Add Product** CTA in the top toolbar opens the product picker so you can pull products from your project's Schedules into the current Smart Doc. Selected products get their own page inside the linked [Reference Binder](/help-center/working-on-projects/smart-docs-reference-binders), pre-populated with the product's data through Smart Fields.
Use **Add Product** when you want to:
* **Assemble a submittal or cutsheet package** by pulling in specific products from a schedule rather than including the entire schedule.
* **Add newly specified products** to an existing Smart Doc without rebuilding pages by hand.
* **Curate a subset of products** for a client presentation, bid set, or approval package.
* **Quickly generate product pages** using the layout defined in your Reference Binder, without touching the schedule directly.
**To add a product:**
1. Open the Smart Doc you want to add products to.
2. In the top toolbar, click **Add Product**.
3. In the product picker, select the **schedule** to pull products from.
4. Browse or search the schedule's products and check the ones you want to add.
5. Click **Add** to confirm your selection.
6. A page is generated for each selected product inside the linked Reference Binder, using its layout and Smart Fields.
 ### Smart Schedules
Open the **Smart Schedule** drawer from the left rail. Search for an existing project schedule and click to insert it as a table on the canvas. The table stays connected to the schedule, so edits made in Schedules show up here.
[Learn more about Smart Schedules here](/help-center/working-on-projects/smart-docs-smart-schedule)
### Smart Fields
Open the **Smart Fields** drawer from the left rail. Fields are grouped by tab:
* **Identity** — company-level fields (default).
* **Project** — fields from the current project.
* **Product** — product data fields (per-product context).
Search or scroll for the field you want, then click **+** to insert it onto the active page. Smart Fields update automatically when the underlying data changes.
[Learn more about Smart Fields here](/help-center/working-on-projects/smart-docs-smart-fields)
### Document Elements
Open the **Smart Doc Elements** drawer from the left rail to insert standard building blocks:
* Text
* Form field
* Checklist
* Table
* Image
* Divider
* Page number
Click **+** next to an element to drop it onto the active page, then configure it in the right panel.
[Learn more about Document Elements here](/help-center/working-on-projects/smart-docs-document-elements)
***
## Saving as a Template
Click **Save as Template** in the top toolbar to save the current document. In the modal:
* **Template Name** and optional **Tag** / **Description**.
* Toggle **Company-wide** (admin only) to share the template across your firm. Templates saved without this toggle stay personal.
Saved templates appear in the **Template Library** on the **Choose a starting point** modal the next time you create a Smart Doc.
***
## Exporting
Click **Export** in the top toolbar to open the export modal. Choose your options and export the document to PDF.
### Smart Schedules
Open the **Smart Schedule** drawer from the left rail. Search for an existing project schedule and click to insert it as a table on the canvas. The table stays connected to the schedule, so edits made in Schedules show up here.
[Learn more about Smart Schedules here](/help-center/working-on-projects/smart-docs-smart-schedule)
### Smart Fields
Open the **Smart Fields** drawer from the left rail. Fields are grouped by tab:
* **Identity** — company-level fields (default).
* **Project** — fields from the current project.
* **Product** — product data fields (per-product context).
Search or scroll for the field you want, then click **+** to insert it onto the active page. Smart Fields update automatically when the underlying data changes.
[Learn more about Smart Fields here](/help-center/working-on-projects/smart-docs-smart-fields)
### Document Elements
Open the **Smart Doc Elements** drawer from the left rail to insert standard building blocks:
* Text
* Form field
* Checklist
* Table
* Image
* Divider
* Page number
Click **+** next to an element to drop it onto the active page, then configure it in the right panel.
[Learn more about Document Elements here](/help-center/working-on-projects/smart-docs-document-elements)
***
## Saving as a Template
Click **Save as Template** in the top toolbar to save the current document. In the modal:
* **Template Name** and optional **Tag** / **Description**.
* Toggle **Company-wide** (admin only) to share the template across your firm. Templates saved without this toggle stay personal.
Saved templates appear in the **Template Library** on the **Choose a starting point** modal the next time you create a Smart Doc.
***
## Exporting
Click **Export** in the top toolbar to open the export modal. Choose your options and export the document to PDF.