> ## Documentation Index
> Fetch the complete documentation index at: https://docs.acelabusa.com/llms.txt
> Use this file to discover all available pages before exploring further.
# PDF Export from Schedules
> Export your Schedule to a print-ready PDF
*Written by Patricia Causey · Updated March 19, 2026*
The PDF Export feature lets you generate a polished, print-ready document directly from any Schedule view in Material Hub. Before downloading, you can customize headers, footers, page layout, and table formatting—and see exactly what the final document will look like.
***
## Before You Begin
* You must have a Schedule open in your project.
* You need **Admin**, **Creator**, or **Editor** permissions on the project.
***
## How to Open the PDF Export Preview
1. Open the project and navigate to **Schedules**.
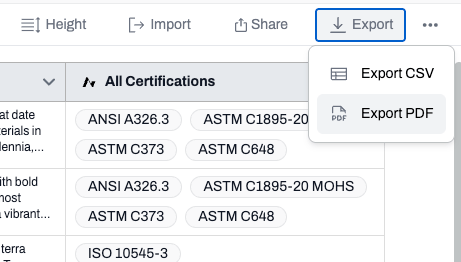
2. In the Schedule toolbar, click **Export**.
3. From the dropdown, select **Export PDF**.
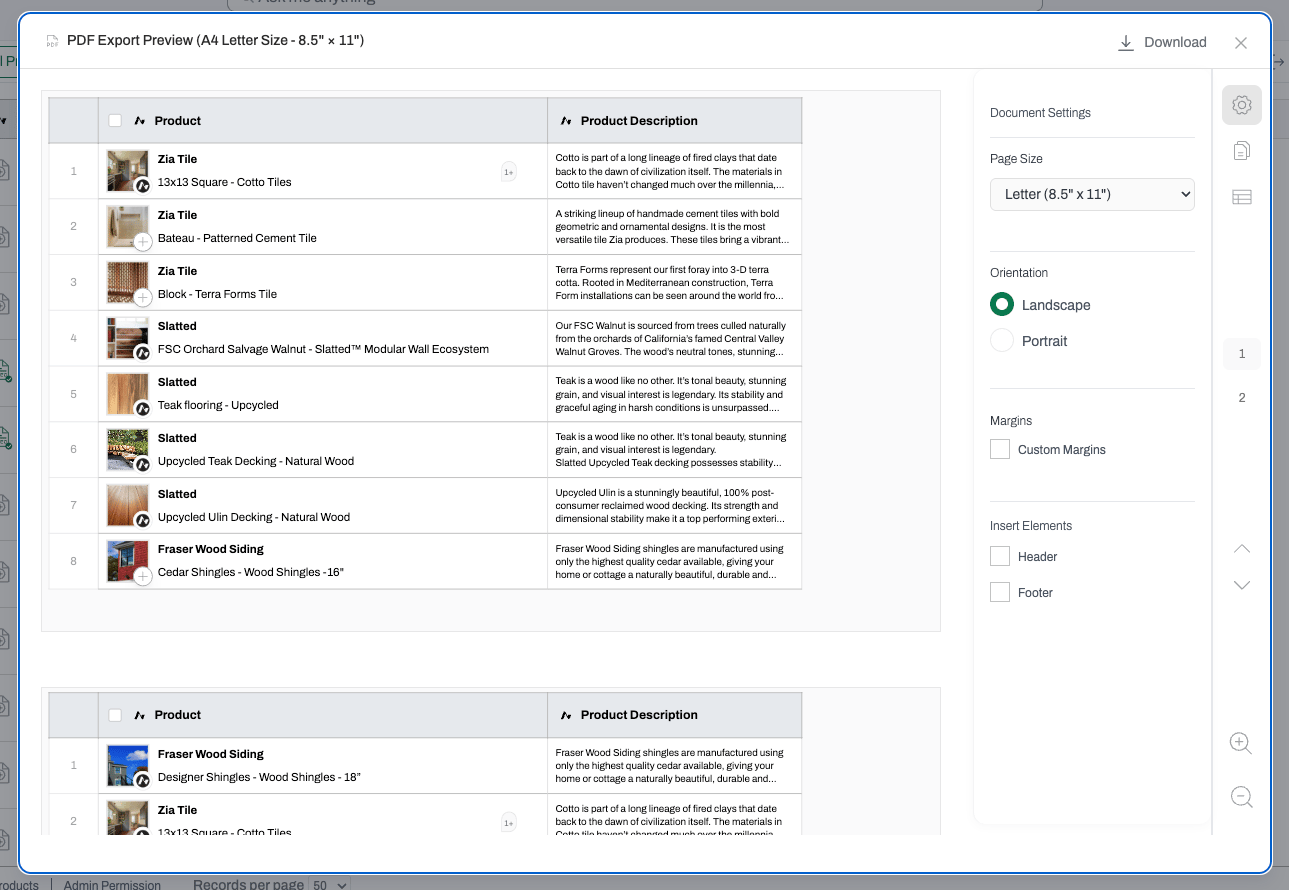
The **PDF Export Preview** modal opens. Your schedule data is automatically loaded into the preview.
 **📍 Note:** Selecting **Export CSV** continues to download a CSV file, as before. These two options are independent.
***
## The PDF Export Preview Modal
Think of the modal as a mini document editor. It has three main areas:
**📍 Note:** Selecting **Export CSV** continues to download a CSV file, as before. These two options are independent.
***
## The PDF Export Preview Modal
Think of the modal as a mini document editor. It has three main areas:
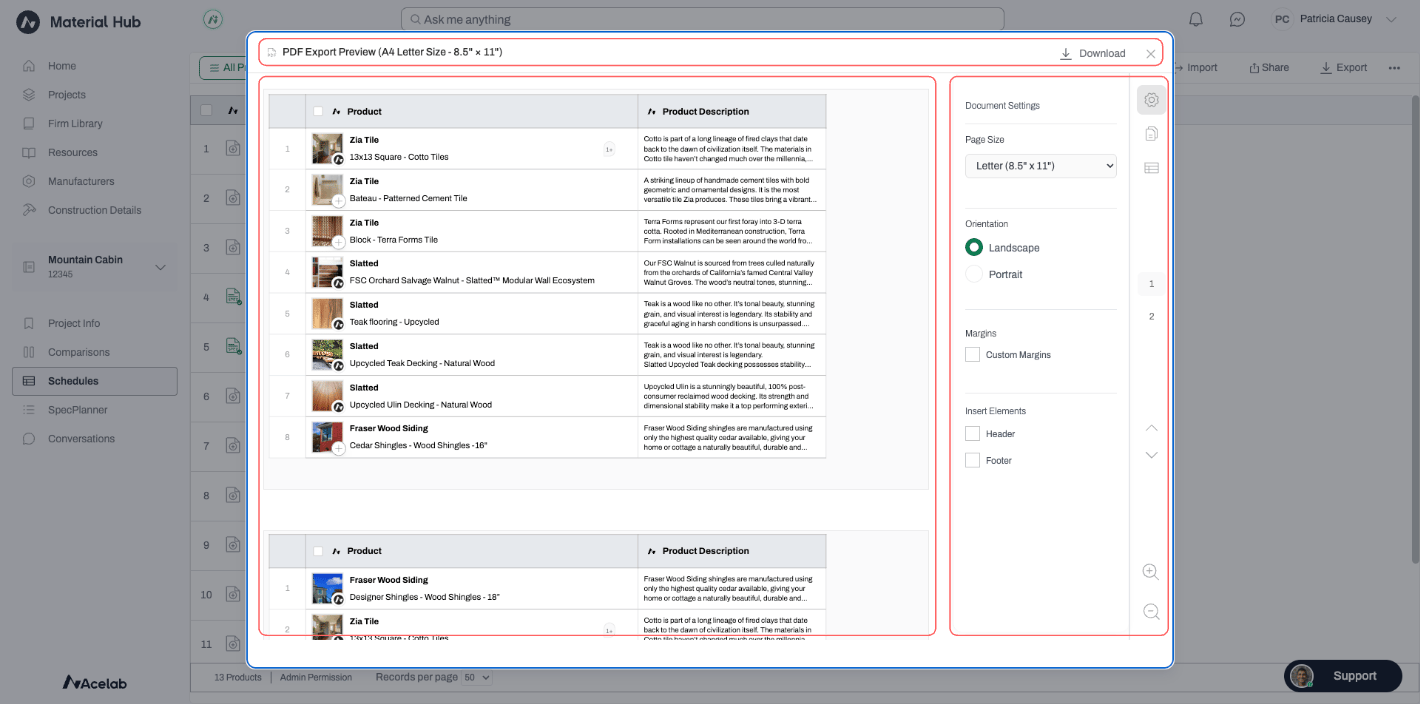 * **Preview Area** (center) — shows your document page by page, including any headers, footers, and your table data.
* **Right Sidebar** — icon-based access to the Document Settings, Page Navigation, and Table Options panels.
* **Top Bar** — displays the title (**PDF Export Preview** with the current page size), a **Download** button to generate the PDF, and an **X** icon to close the modal.
***
## Navigating and Zooming
Use the controls in the right sidebar to move through your document:
* **Preview Area** (center) — shows your document page by page, including any headers, footers, and your table data.
* **Right Sidebar** — icon-based access to the Document Settings, Page Navigation, and Table Options panels.
* **Top Bar** — displays the title (**PDF Export Preview** with the current page size), a **Download** button to generate the PDF, and an **X** icon to close the modal.
***
## Navigating and Zooming
Use the controls in the right sidebar to move through your document:
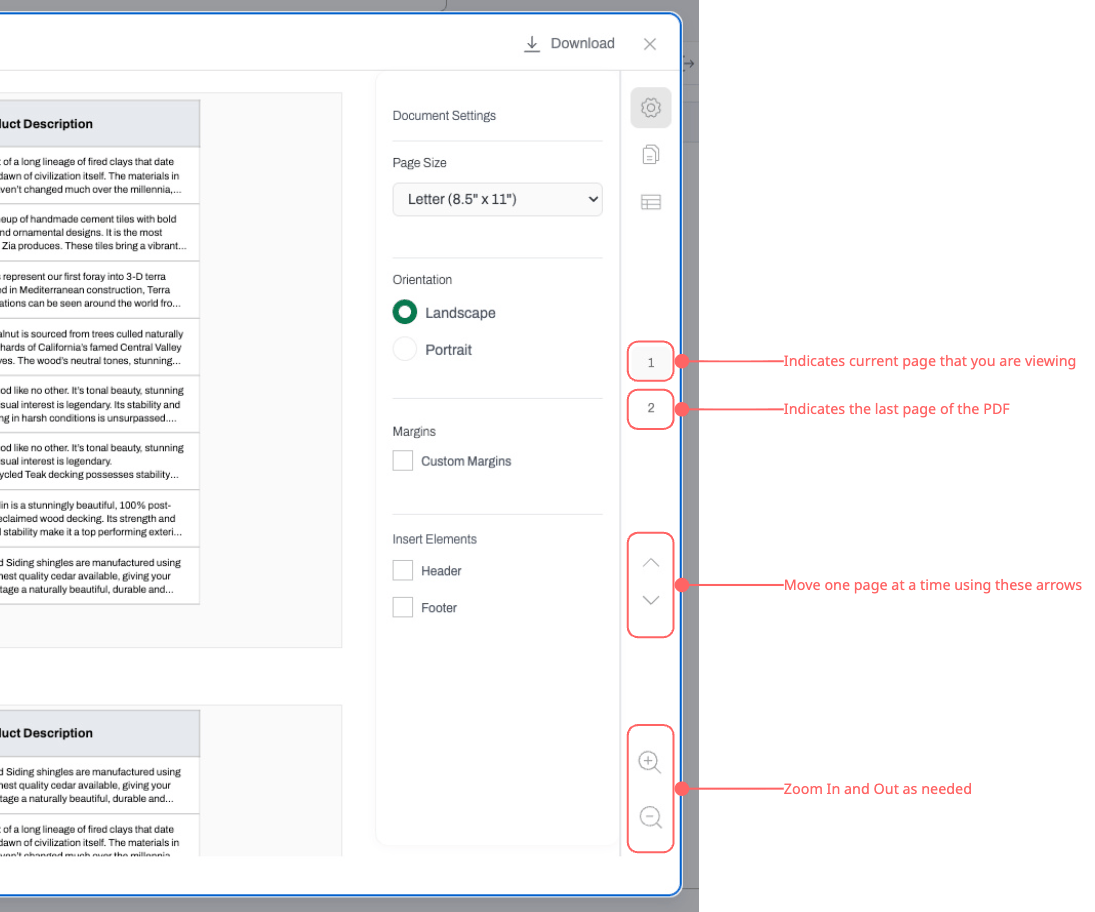 * **Current Page indicator** — type a page number to jump directly to it, or use the **Up/Down arrows** to move one page at a time.
* **Last Page indicator** — shows the total page count (read-only).
* **Zoom controls** — zoom in or out using preset levels (50%, 75%, 100%, 125%, 150%, 200%). The default zoom fits the full page in view. Scroll bars appear when the page is zoomed beyond the viewport.
***
## Adjusting Document Settings
Click the **Document Settings** icon (gear icon) in the right sidebar to open the Document Settings panel.
* **Current Page indicator** — type a page number to jump directly to it, or use the **Up/Down arrows** to move one page at a time.
* **Last Page indicator** — shows the total page count (read-only).
* **Zoom controls** — zoom in or out using preset levels (50%, 75%, 100%, 125%, 150%, 200%). The default zoom fits the full page in view. Scroll bars appear when the page is zoomed beyond the viewport.
***
## Adjusting Document Settings
Click the **Document Settings** icon (gear icon) in the right sidebar to open the Document Settings panel.
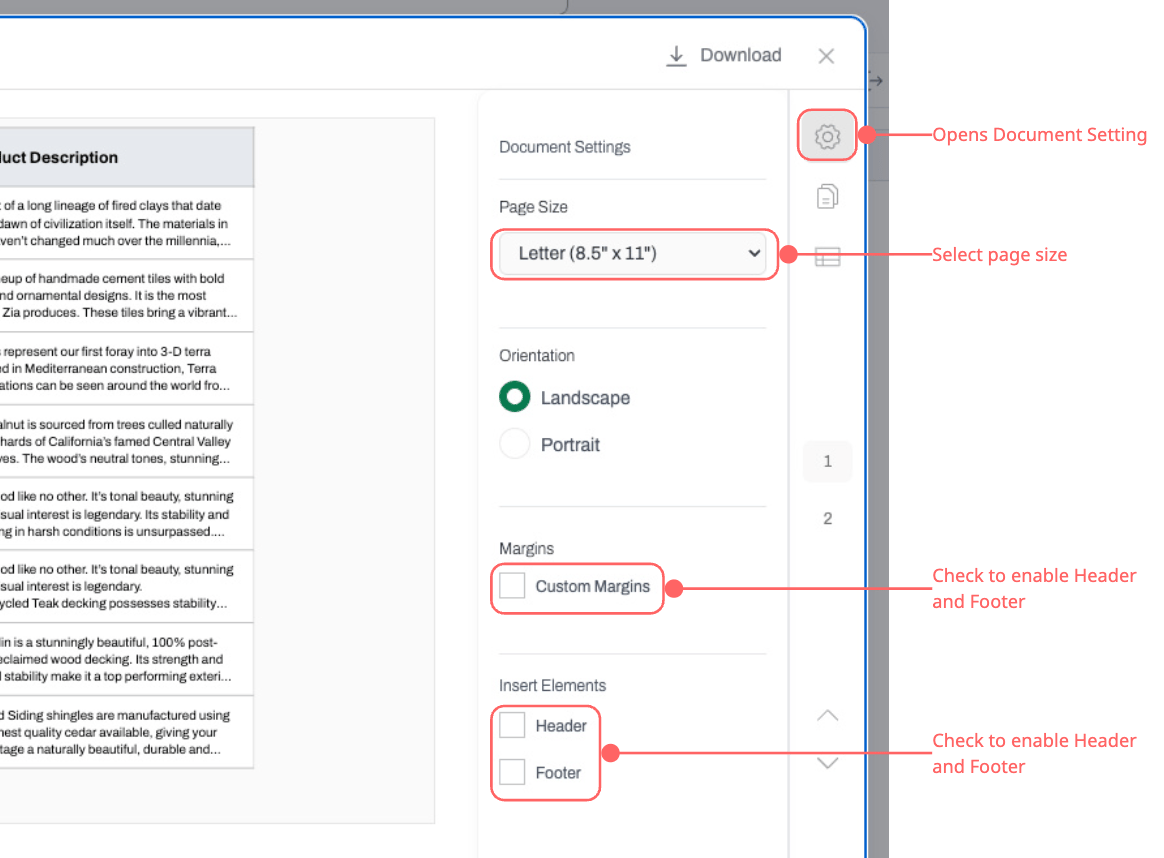 | **Setting** | **Options** |
| --------------- | --------------------------------------------------------------------------------------------------------------- |
| **Page Size** | Select from standard sizes (Letter, Legal, A4, etc.) |
| **Orientation** | Portrait or Landscape |
| **Margins** | Select a predefined margin, or check **Custom Margins** to set Top, Right, Bottom, and Left values individually |
| **Add Header** | Adds a header section of default height |
| **Add Footer** | Adds a footer section of default height |
All changes update the preview in real time.
***
## Adding a Header or Footer
Headers and footers can contain three types of components: **Image**, **Text**, and **Page Number**.
**To add a header or footer:**
1. In the Document Settings panel, click **Add Header** or **Add Footer**.
| **Setting** | **Options** |
| --------------- | --------------------------------------------------------------------------------------------------------------- |
| **Page Size** | Select from standard sizes (Letter, Legal, A4, etc.) |
| **Orientation** | Portrait or Landscape |
| **Margins** | Select a predefined margin, or check **Custom Margins** to set Top, Right, Bottom, and Left values individually |
| **Add Header** | Adds a header section of default height |
| **Add Footer** | Adds a footer section of default height |
All changes update the preview in real time.
***
## Adding a Header or Footer
Headers and footers can contain three types of components: **Image**, **Text**, and **Page Number**.
**To add a header or footer:**
1. In the Document Settings panel, click **Add Header** or **Add Footer**.
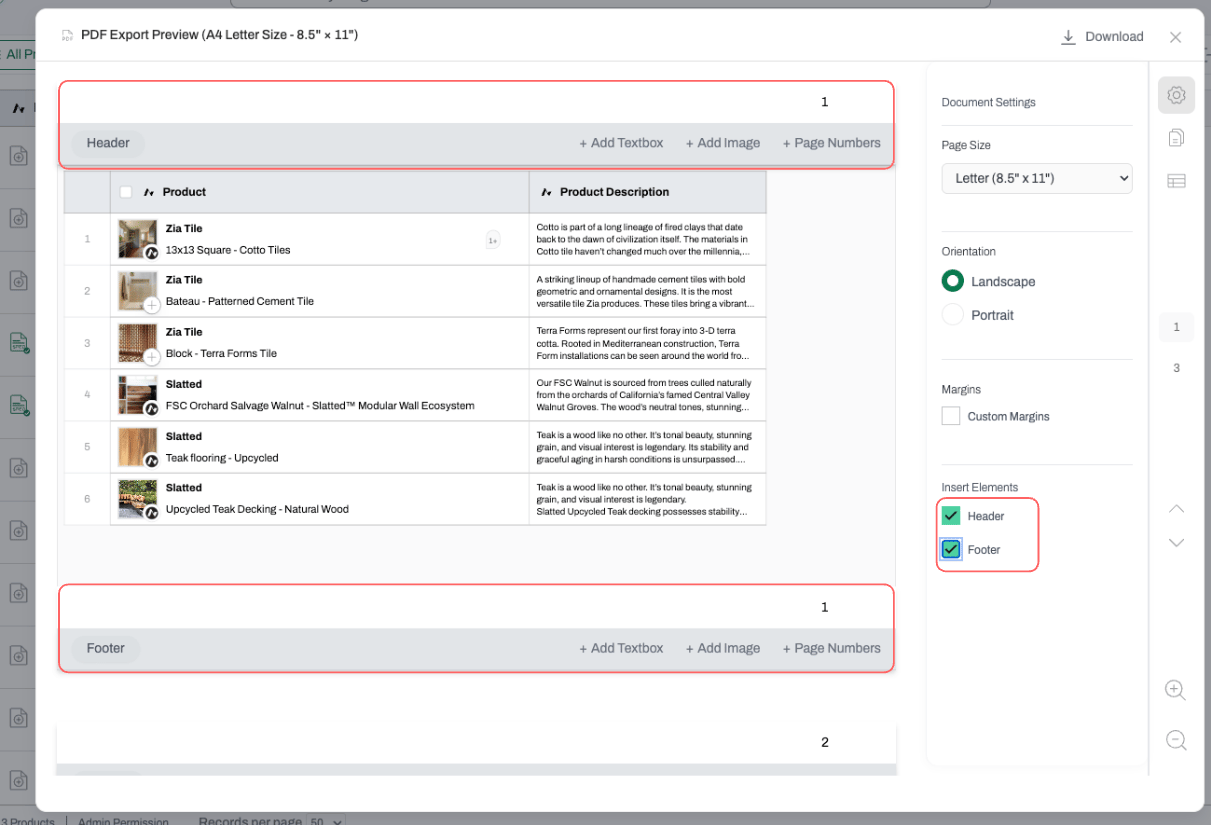 2. The **Action Bar** appears at the bottom of each header and footer section with options to add components.
## Image Component
1. Click **Add Image** in the Action Bar.
2. In the upload modal, drag and drop a file or click to browse.
2. The **Action Bar** appears at the bottom of each header and footer section with options to add components.
## Image Component
1. Click **Add Image** in the Action Bar.
2. In the upload modal, drag and drop a file or click to browse.
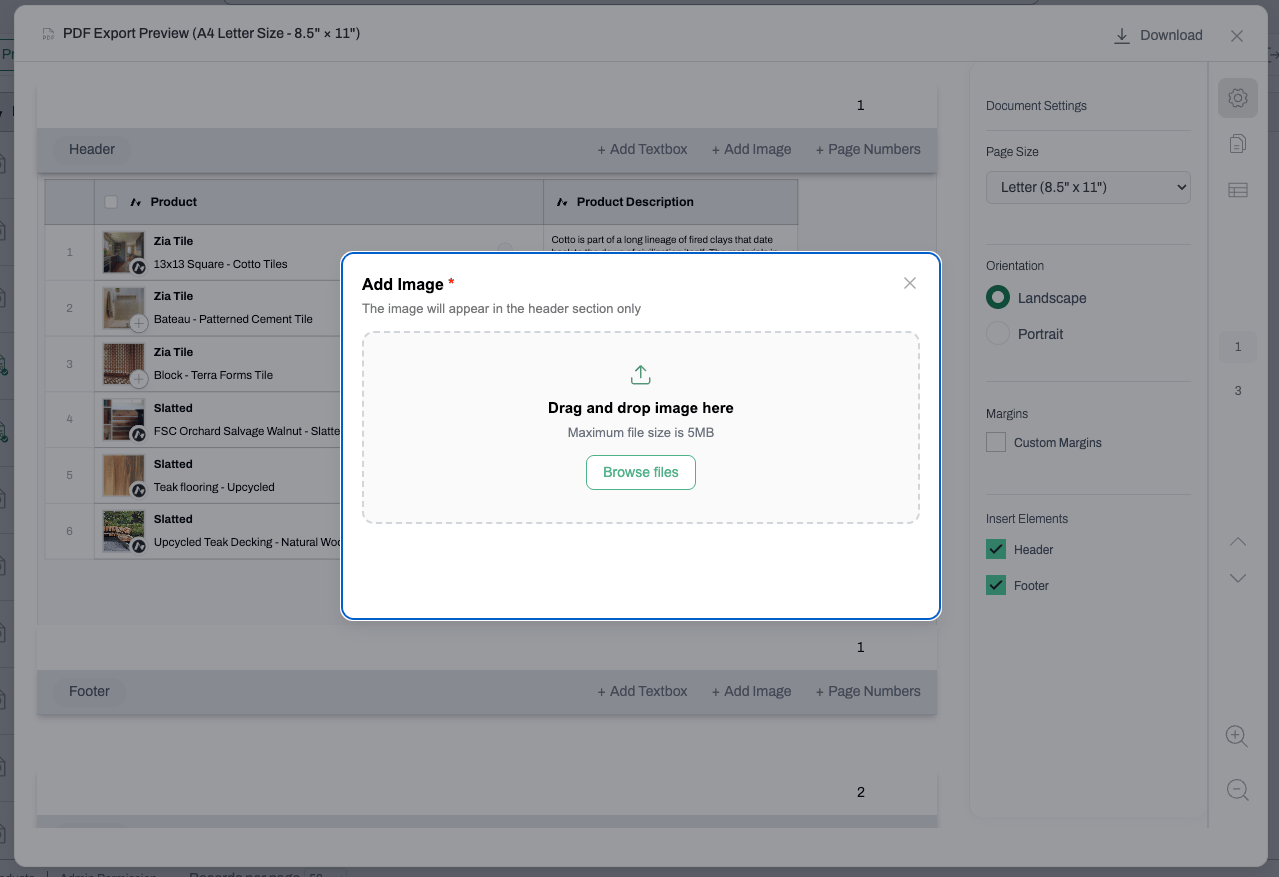 3. The image appears in the header/footer, sized to fit the section height while maintaining proportions.
 ## Text Component
1. Click **Add Text** in the Action Bar.
2. A text frame appears at the default position. Start typing.
## Text Component
1. Click **Add Text** in the Action Bar.
2. A text frame appears at the default position. Start typing.
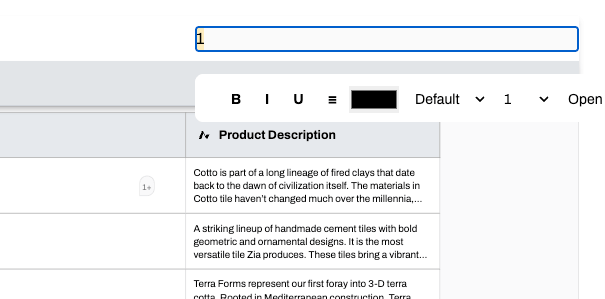
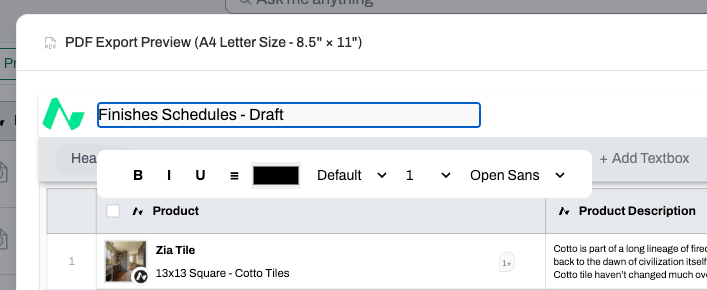 3. Click the frame to reveal grips and a floating menu with formatting options: **Bold**, **Italic**, **Underline**, font size, font type, line spacing, and font color.
4. Double-click the frame to edit the text again.
**💡 Tip:** If you add a text component but don't type anything and click away, no component is added.
## Page Number Component
Page numbers are automatically added on each page. You can edit the page number by clicking on Add Page Number in the Action Bar.
***
## Working With the Table
Your schedule table is automatically built from the current state of your schedule when the preview opens. Here's how it behaves:
* **Column headers repeat** on every page.
3. Click the frame to reveal grips and a floating menu with formatting options: **Bold**, **Italic**, **Underline**, font size, font type, line spacing, and font color.
4. Double-click the frame to edit the text again.
**💡 Tip:** If you add a text component but don't type anything and click away, no component is added.
## Page Number Component
Page numbers are automatically added on each page. You can edit the page number by clicking on Add Page Number in the Action Bar.
***
## Working With the Table
Your schedule table is automatically built from the current state of your schedule when the preview opens. Here's how it behaves:
* **Column headers repeat** on every page.
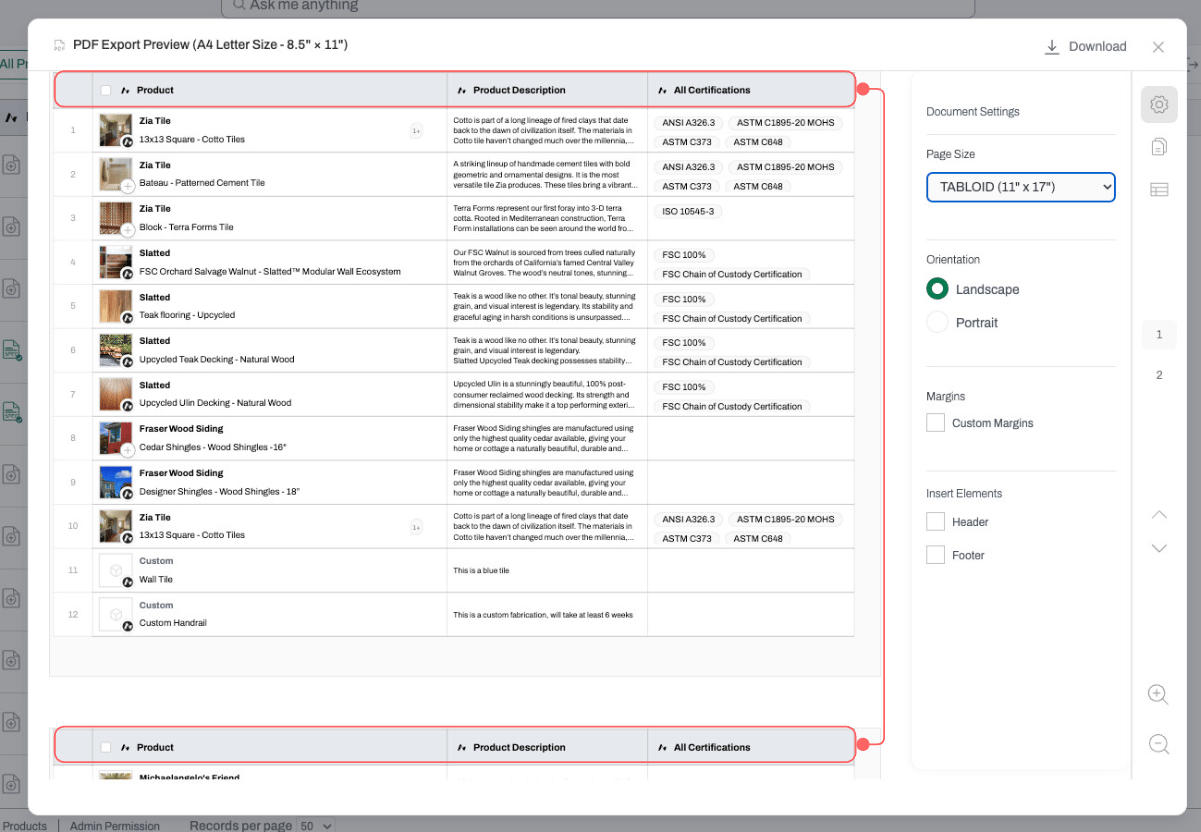 * **Product data continues** from where it left off on the previous page.
* **Row height** adjusts automatically to fit the tallest cell in each row.
* **Columns or rows that don't fully fit** within the printable area are cut off. Partially visible columns are not shown.
**To adjust column widths:**
* Click and drag a column edge directly in the Schedules itself. Row heights will update automatically to fit the new width.
* If widening a column cuts off the next column, or narrowing one creates room for a previously hidden column, the table updates accordingly.
***
## Navigating Pages
Click the **Navigation Panel** icon (page/file icon) in the right sidebar to open the Page Navigation panel.
* **Product data continues** from where it left off on the previous page.
* **Row height** adjusts automatically to fit the tallest cell in each row.
* **Columns or rows that don't fully fit** within the printable area are cut off. Partially visible columns are not shown.
**To adjust column widths:**
* Click and drag a column edge directly in the Schedules itself. Row heights will update automatically to fit the new width.
* If widening a column cuts off the next column, or narrowing one creates room for a previously hidden column, the table updates accordingly.
***
## Navigating Pages
Click the **Navigation Panel** icon (page/file icon) in the right sidebar to open the Page Navigation panel.
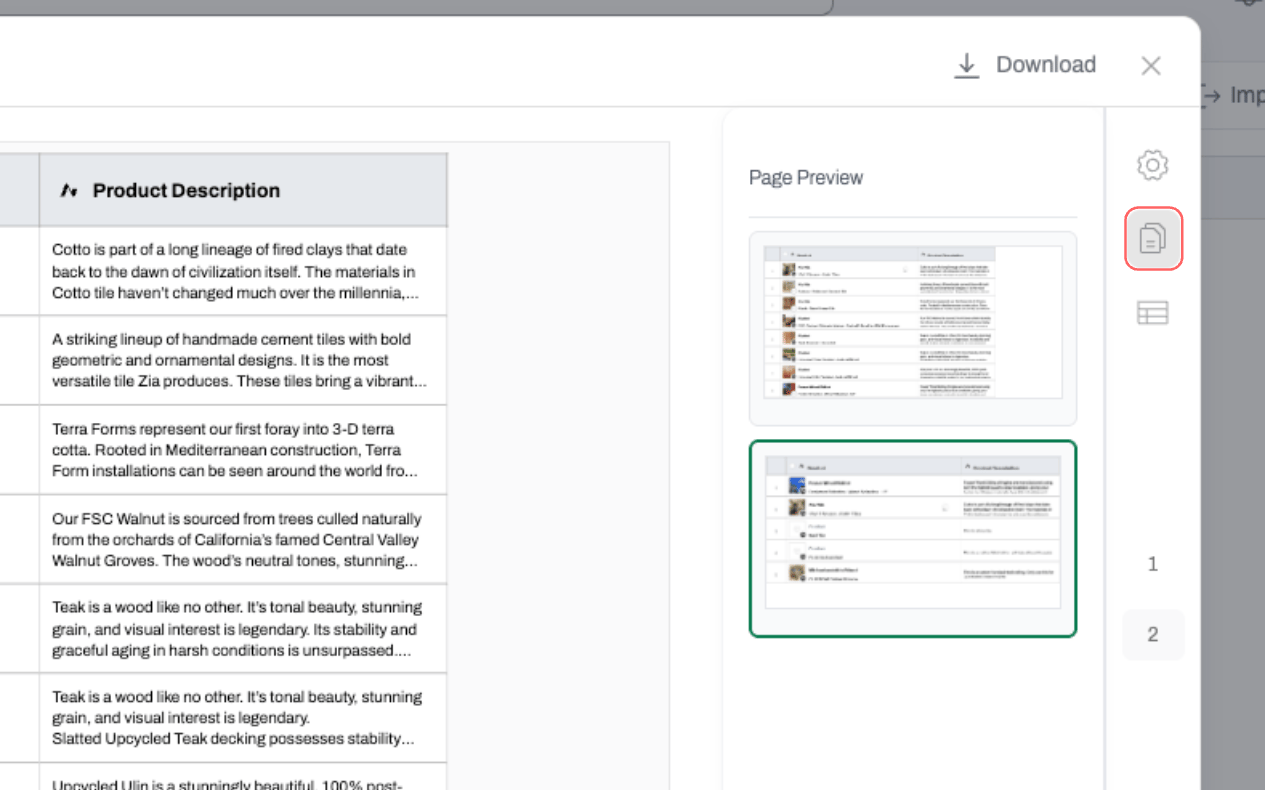 * Thumbnail previews of all pages are shown.
* The current page is highlighted.
* Click any thumbnail to jump to that page. The Current Page indicator updates to match.
***
## Downloading the PDF
When your layout looks right:
1. Click the **Download** button in the top bar of the modal.
* Thumbnail previews of all pages are shown.
* The current page is highlighted.
* Click any thumbnail to jump to that page. The Current Page indicator updates to match.
***
## Downloading the PDF
When your layout looks right:
1. Click the **Download** button in the top bar of the modal.
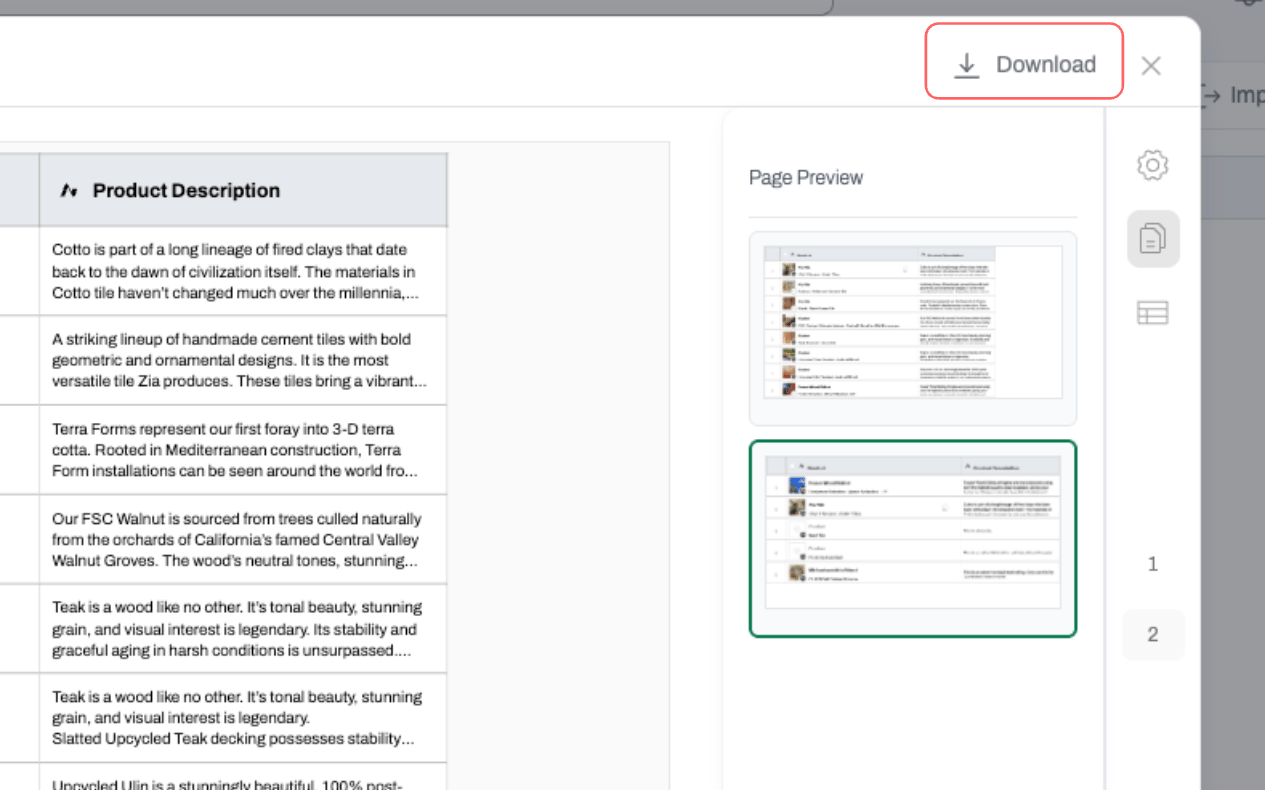 2. Your PDF is generated and downloaded.
***
## Closing the Preview
Click the **X** icon in the top bar. A confirmation prompt will appear before the modal closes, so you won't lose your layout accidentally.
***
## Outcome
After downloading, you'll have a formatted PDF of your schedule with your custom header, footer, and page settings applied — ready to share with clients, consultants, or contractors without any additional reformatting.
2. Your PDF is generated and downloaded.
***
## Closing the Preview
Click the **X** icon in the top bar. A confirmation prompt will appear before the modal closes, so you won't lose your layout accidentally.
***
## Outcome
After downloading, you'll have a formatted PDF of your schedule with your custom header, footer, and page settings applied — ready to share with clients, consultants, or contractors without any additional reformatting.