> ## Documentation Index
> Fetch the complete documentation index at: https://docs.acelabusa.com/llms.txt
> Use this file to discover all available pages before exploring further.
# Project Setup Overview
> Capture project context, location, building type, sustainability goals, and team details so Material Hub can work smarter from day one.
*Written by Armaan Shah · Updated March 19, 2026*
## Before You Begin
* You must be signed into Acelab.
* You need **Admin**, **Creator**, or **Editor** permissions to create a project.
* Only the **Basic Information** tab is required to get started. Everything else can be completed later from the Project Info Page.
***
### Start a New Project
1. Click **+ New Project** from the **Home Page** or **Projects Page**.
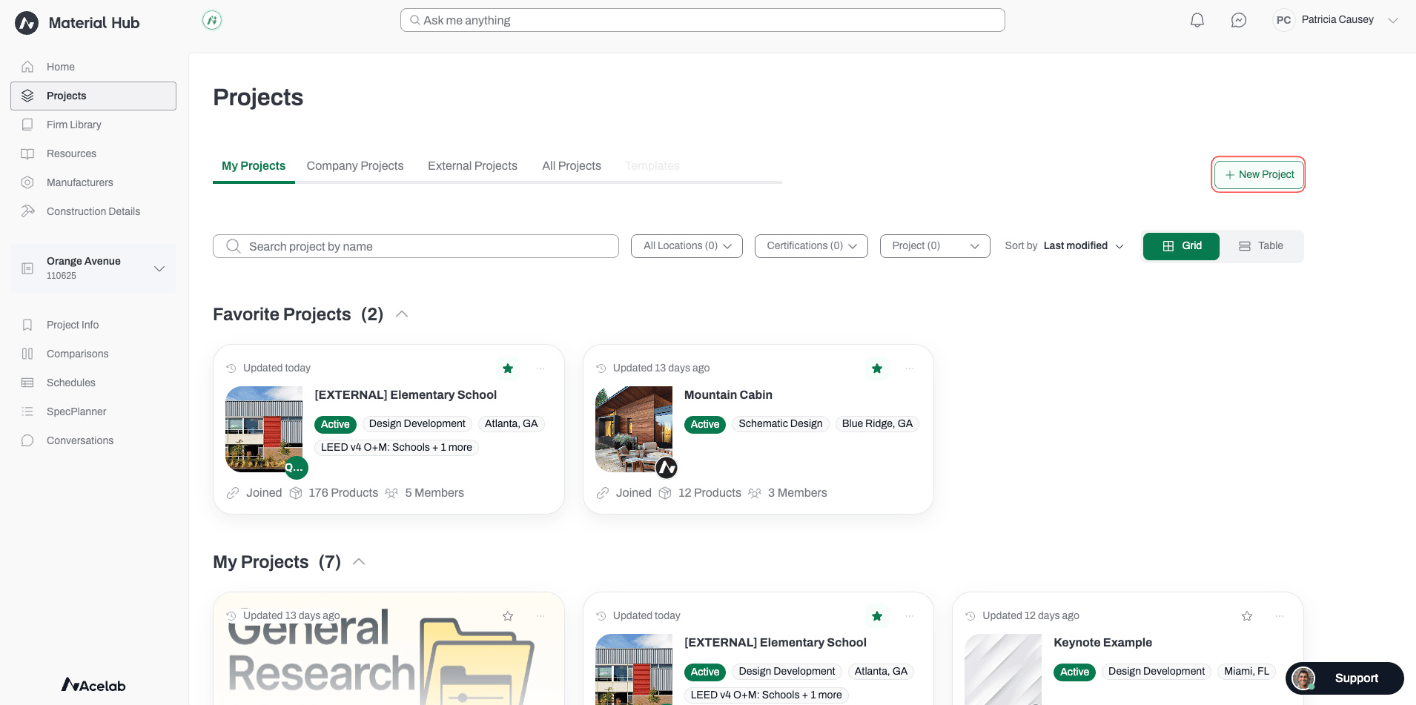 In the modal that appears, choose an option:
* **Create a Blank Project** — build from scratch using the guided setup flow.
* **Start From a Template** — use an existing project as a starting point, with the option to carry over saved products.
In the modal that appears, choose an option:
* **Create a Blank Project** — build from scratch using the guided setup flow.
* **Start From a Template** — use an existing project as a starting point, with the option to carry over saved products.
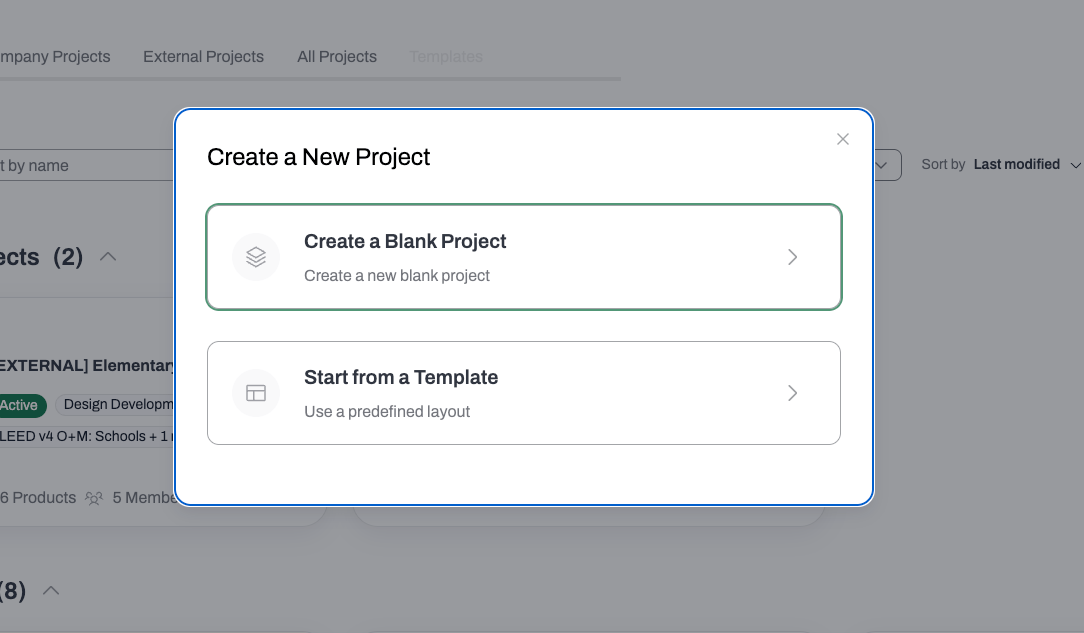 Let's begin with **Create a Blank Project**. To start a project from a template, [refer to this article.](/help-center/working-on-projects/create-project-from-template)
***
### Complete the Setup Tabs
The setup flow has four tabs: **Basic Information**, **Detailed Information**, **Documents**, and **Team**. You can move forward using **Next**, go back using **Back**, or click any tab directly once the required fields on Basic Information are filled in.
Let's begin with **Create a Blank Project**. To start a project from a template, [refer to this article.](/help-center/working-on-projects/create-project-from-template)
***
### Complete the Setup Tabs
The setup flow has four tabs: **Basic Information**, **Detailed Information**, **Documents**, and **Team**. You can move forward using **Next**, go back using **Back**, or click any tab directly once the required fields on Basic Information are filled in.
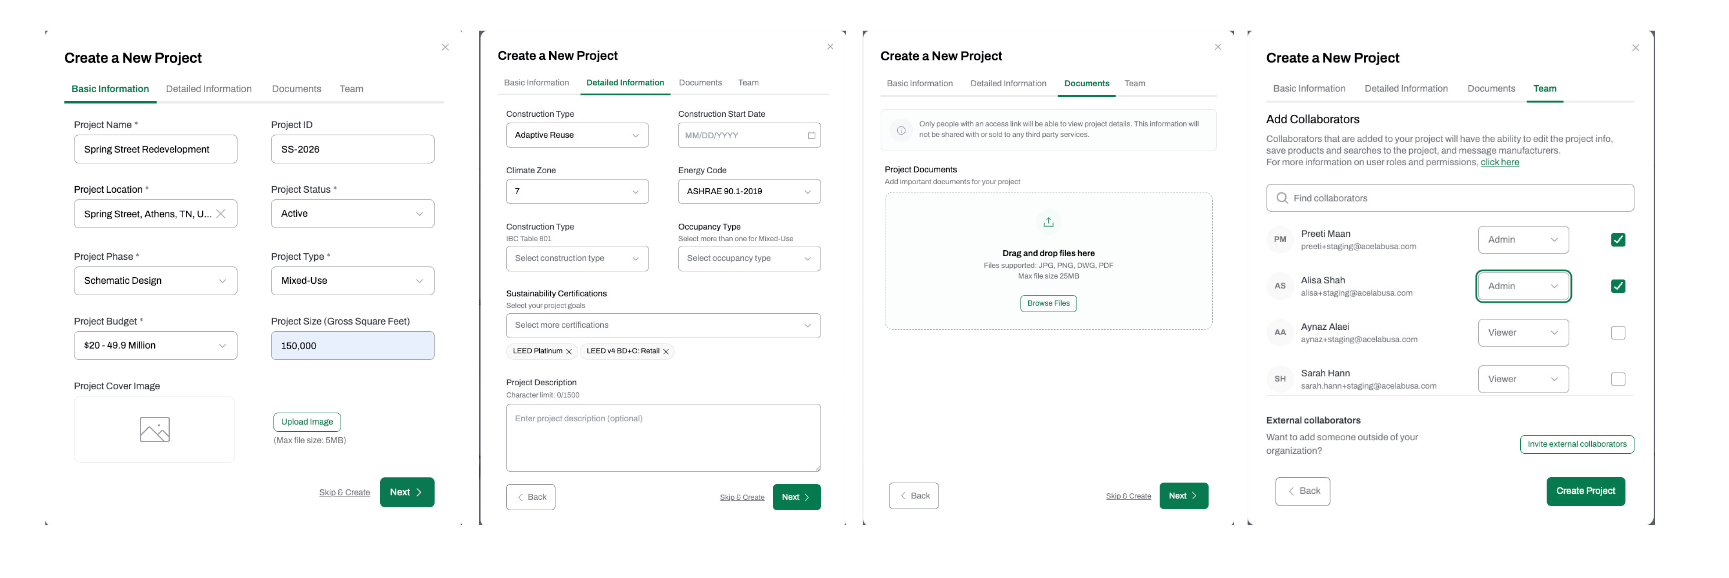 **Tip:** After completing Basic Information, you can click **Skip & Create** at any point to create your project immediately and fill in the rest from the Project Info Page.
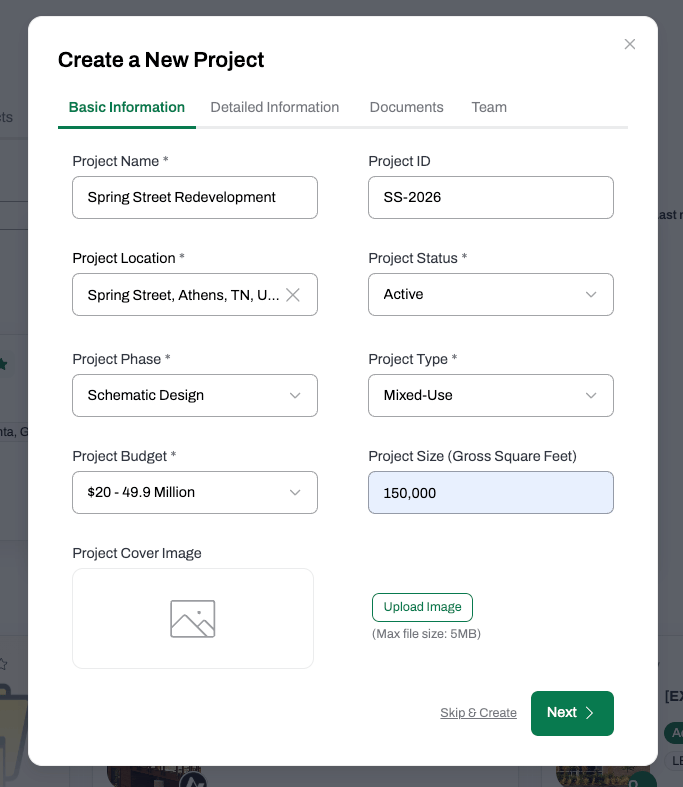
#### Basic Information *(Required)*
Fill in the core details about your project.
| **Field** | **Note** |
| -------------------------------- | --------------------------------------------------------------------- |
| Project Name | Required |
| Project Location | Required |
| Project Type | Required |
| Project Budget | Required |
| Project ID | Optional |
| Project Phase | Optional |
| Project Status | Optional — defaults to *Active*. Options: Active, On-Hold, Completed. |
| Project Size (Gross Square Feet) | Optional — rounds to nearest whole number |
| Cover Image | Optional — click **Upload Image** or drag and drop |
When you're ready, click **Next** to continue or **Skip & Create** to create the project now.
***Note:*** *The first time you click **Skip & Create**, a prompt will ask if you want to keep adding details. Click **Maybe Later** to create the project immediately, or **Add Details** to return to the setup flow.*
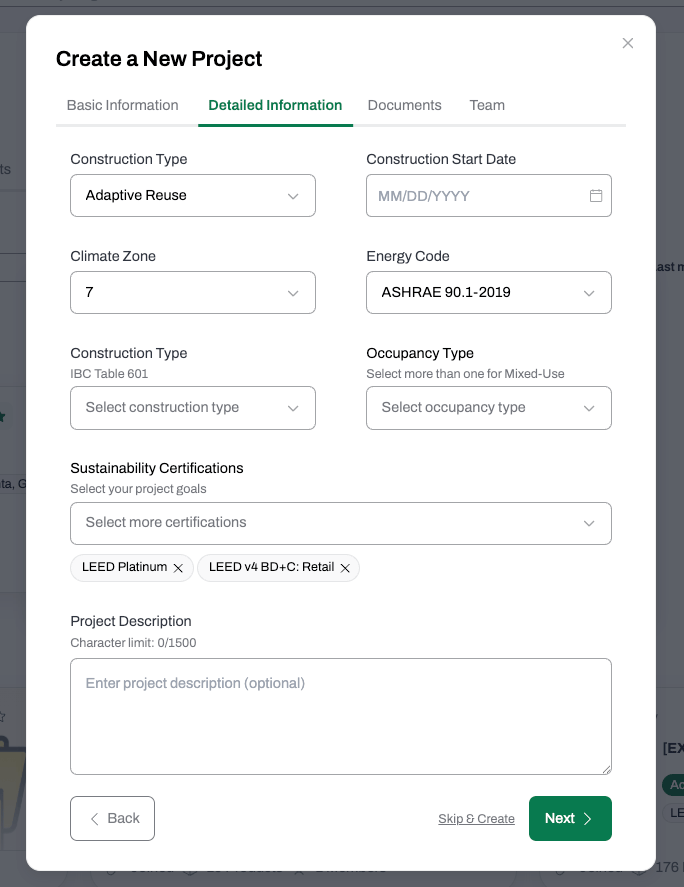
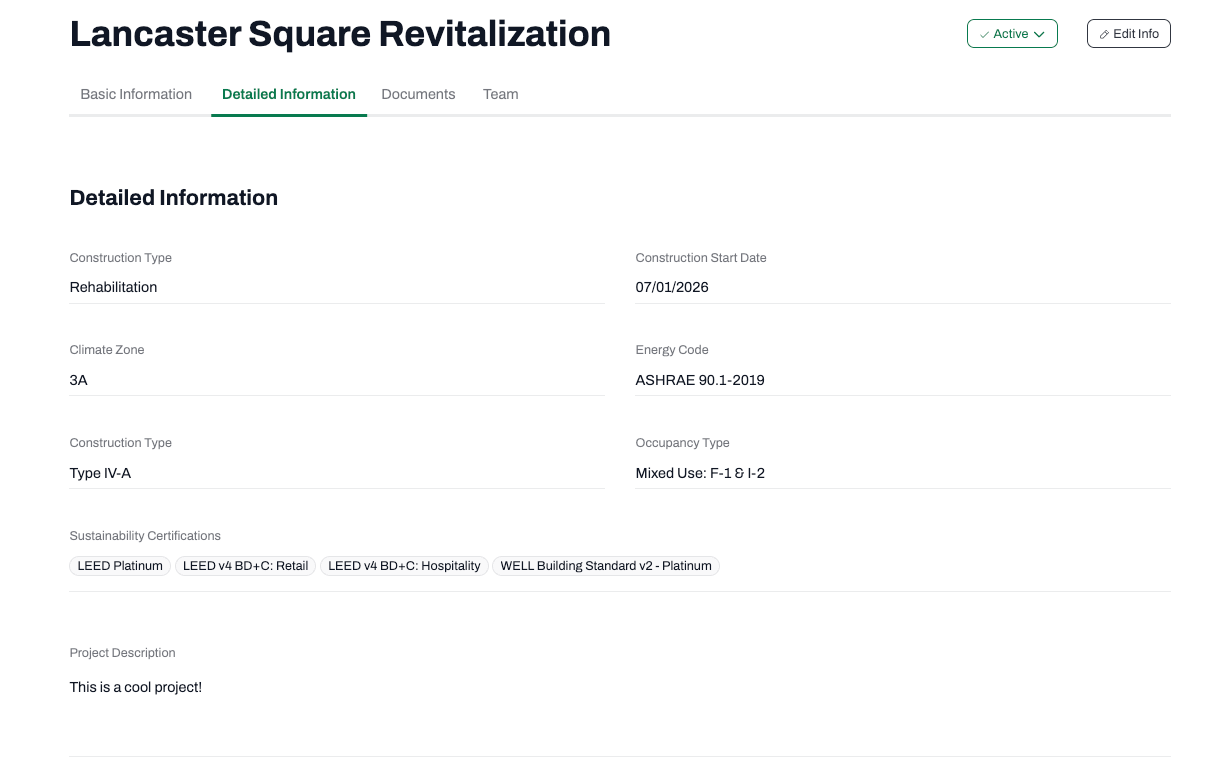
#### Detailed Information *(Optional)*
Add richer project context that powers features like energy modeling and compliance reporting.
| **Field** | **Note** |
| ------------------------------------ | --------------------------------------------------------------------------------------------- |
| Construction Type | New Work, Addition, Adaptive Reuse, Preservation, Rehabilitation, Restoration, Reconstruction |
| Construction Start Date | Click to use the calendar or type a date manually |
| Climate Zone | Auto-populated based on Project Location and Energy Code |
| Energy Code | Pre-1980 through ASHRAE 90.1-2019 |
| Occupancy Classification | Multi-select. Two or more selections display as *Mixed Use: \[list]* |
| Type of Construction (IBC Table 601) | Single-select — Type I A through Type V B |
| Sustainability Certifications | Multi-select |
| Project Description | Character-limited |
Click **Next** to continue or **Skip & Create** to create the project now.
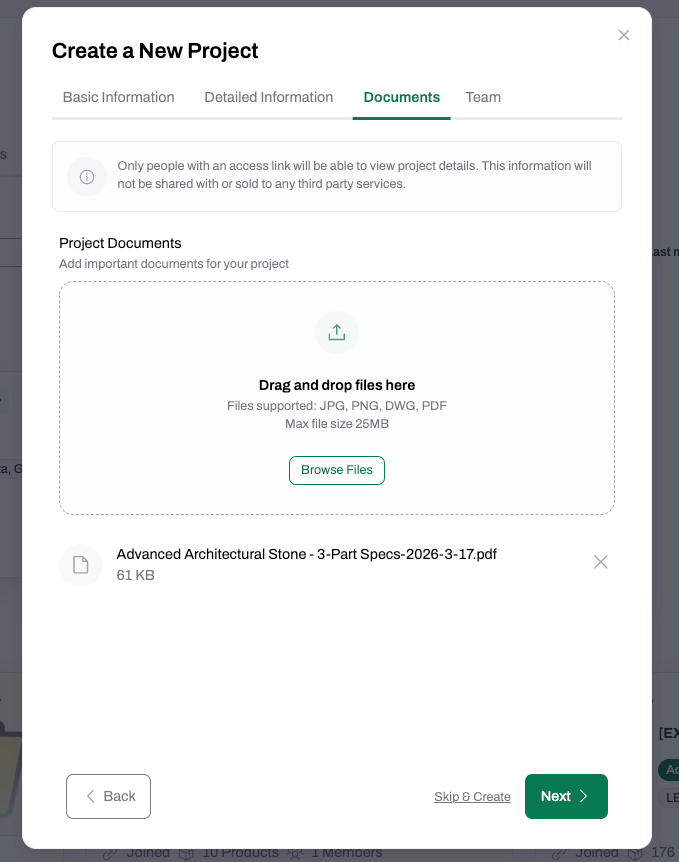
#### Documents *(Optional)*
Upload important project files to keep everything in one place.
1. Drag and drop files into the upload area, or click **Browse Files**.
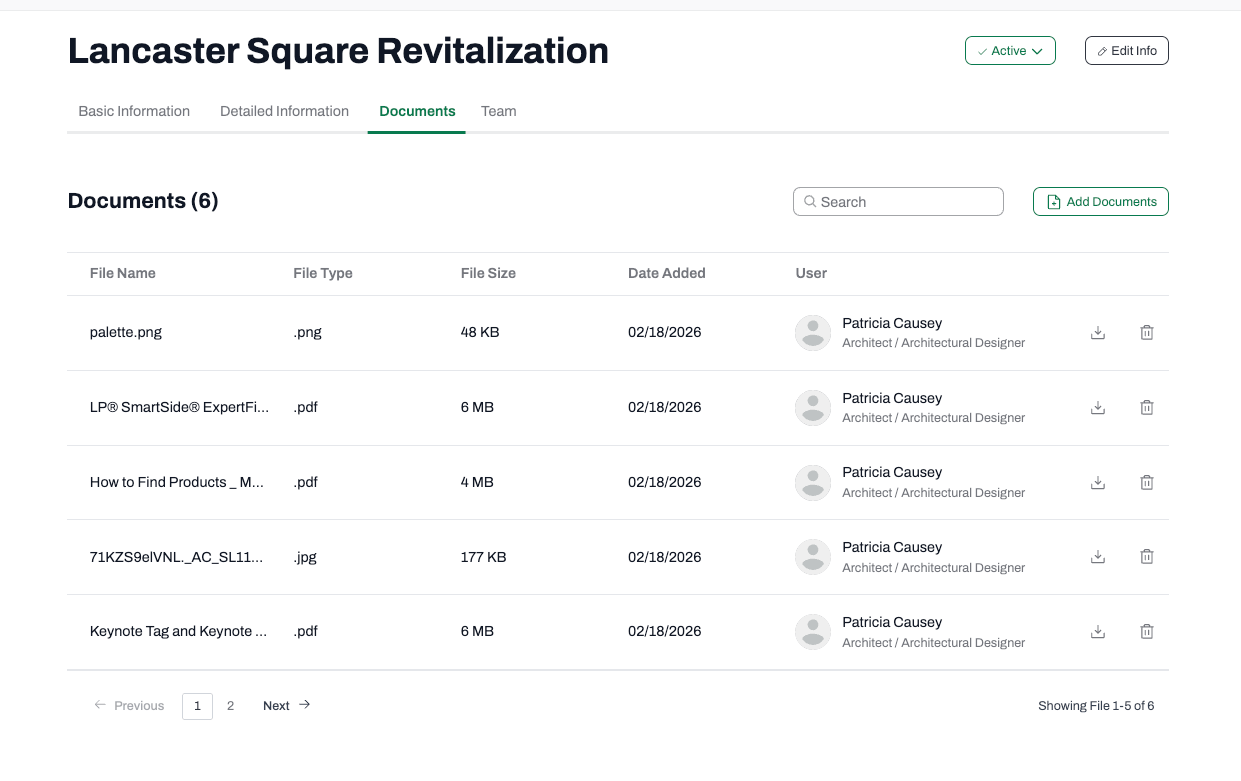
2. Uploaded files appear in a list showing the file name, format, and size.
3. Click the **X** next to any file to remove it before creating the project.
**Supported file types:** JPG, PNG, DWG, PDF
**Maximum file size:** 25 MB per file
Click **Next** to continue or **Skip & Create** to create the project now.
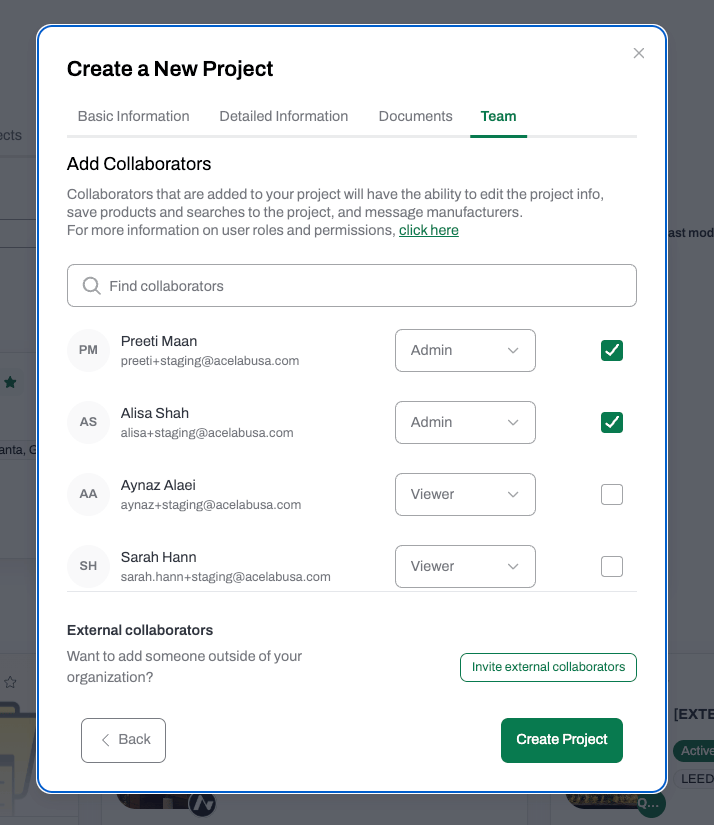
#### Team *(Optional)*
Add collaborators before your project is created.
1. Search for colleagues by name or email address.
2. Assign each person a role.
3. To invite someone outside your firm, click **Invite External Collaborators**.
**Note:** Invitation emails are sent after the project is created, not during setup.
Click **Create** to finish and launch your project.
***
### What to Expect: The Project Information Page
After clicking **Create** or **Skip & Create**, you'll see a confirmation for the creation of your new project.
You'll be taken to the **Project Information Page** — a single scrollable page where all your project details live. From here, you can edit fields, upload documents, manage your team, and keep your project current as the design evolves.
***Note:*** *If you launched the setup flow from a Product Detail Page or Search Results, you'll be returned to that page after the project is created instead of the Project Info Page.*
#### Navigating the Project Information Page
The Project Info Page is organized into four sections. Click any tab in the sticky navigation bar at the top to jump directly to that section.
* In the **Basic Information** section, review or update the core details of your project: name, location, type, phase, budget, size, and status. These fields were set during project creation and can be edited at any time.
**Tip:** After completing Basic Information, you can click **Skip & Create** at any point to create your project immediately and fill in the rest from the Project Info Page.
#### Basic Information *(Required)*
Fill in the core details about your project.
| **Field** | **Note** |
| -------------------------------- | --------------------------------------------------------------------- |
| Project Name | Required |
| Project Location | Required |
| Project Type | Required |
| Project Budget | Required |
| Project ID | Optional |
| Project Phase | Optional |
| Project Status | Optional — defaults to *Active*. Options: Active, On-Hold, Completed. |
| Project Size (Gross Square Feet) | Optional — rounds to nearest whole number |
| Cover Image | Optional — click **Upload Image** or drag and drop |
When you're ready, click **Next** to continue or **Skip & Create** to create the project now.
***Note:*** *The first time you click **Skip & Create**, a prompt will ask if you want to keep adding details. Click **Maybe Later** to create the project immediately, or **Add Details** to return to the setup flow.*
#### Detailed Information *(Optional)*
Add richer project context that powers features like energy modeling and compliance reporting.
| **Field** | **Note** |
| ------------------------------------ | --------------------------------------------------------------------------------------------- |
| Construction Type | New Work, Addition, Adaptive Reuse, Preservation, Rehabilitation, Restoration, Reconstruction |
| Construction Start Date | Click to use the calendar or type a date manually |
| Climate Zone | Auto-populated based on Project Location and Energy Code |
| Energy Code | Pre-1980 through ASHRAE 90.1-2019 |
| Occupancy Classification | Multi-select. Two or more selections display as *Mixed Use: \[list]* |
| Type of Construction (IBC Table 601) | Single-select — Type I A through Type V B |
| Sustainability Certifications | Multi-select |
| Project Description | Character-limited |
Click **Next** to continue or **Skip & Create** to create the project now.
#### Documents *(Optional)*
Upload important project files to keep everything in one place.
1. Drag and drop files into the upload area, or click **Browse Files**.
2. Uploaded files appear in a list showing the file name, format, and size.
3. Click the **X** next to any file to remove it before creating the project.
**Supported file types:** JPG, PNG, DWG, PDF
**Maximum file size:** 25 MB per file
Click **Next** to continue or **Skip & Create** to create the project now.
#### Team *(Optional)*
Add collaborators before your project is created.
1. Search for colleagues by name or email address.
2. Assign each person a role.
3. To invite someone outside your firm, click **Invite External Collaborators**.
**Note:** Invitation emails are sent after the project is created, not during setup.
Click **Create** to finish and launch your project.
***
### What to Expect: The Project Information Page
After clicking **Create** or **Skip & Create**, you'll see a confirmation for the creation of your new project.
You'll be taken to the **Project Information Page** — a single scrollable page where all your project details live. From here, you can edit fields, upload documents, manage your team, and keep your project current as the design evolves.
***Note:*** *If you launched the setup flow from a Product Detail Page or Search Results, you'll be returned to that page after the project is created instead of the Project Info Page.*
#### Navigating the Project Information Page
The Project Info Page is organized into four sections. Click any tab in the sticky navigation bar at the top to jump directly to that section.
* In the **Basic Information** section, review or update the core details of your project: name, location, type, phase, budget, size, and status. These fields were set during project creation and can be edited at any time.
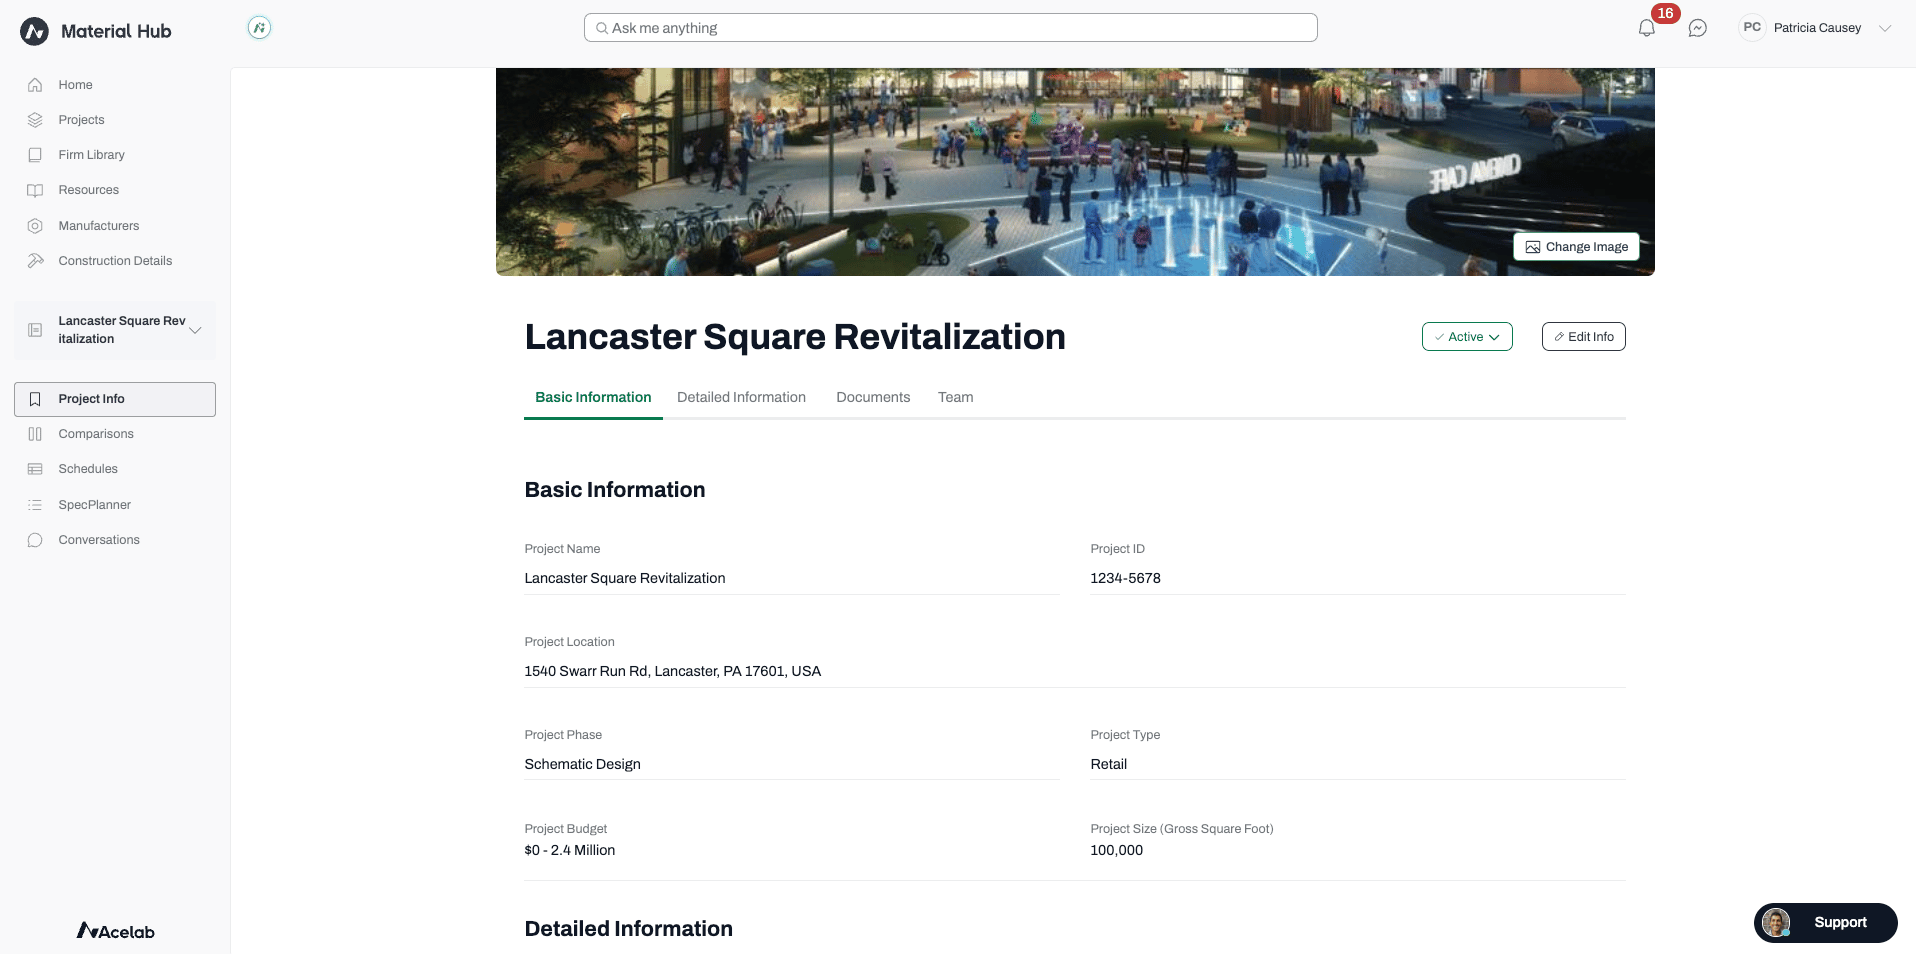 * In the **Detailed Information** section, add or update richer project context — construction type, occupancy classification, climate zone, energy code, sustainability certifications, and project description. This information powers upcoming integrations to other applications and supports compliance reporting.
 * In the **Documents** section, upload any files you want to keep handy and accessible to your team — PDFs, drawings, photos, and more. Documents are searchable, and the list paginates automatically when more than five files are uploaded.
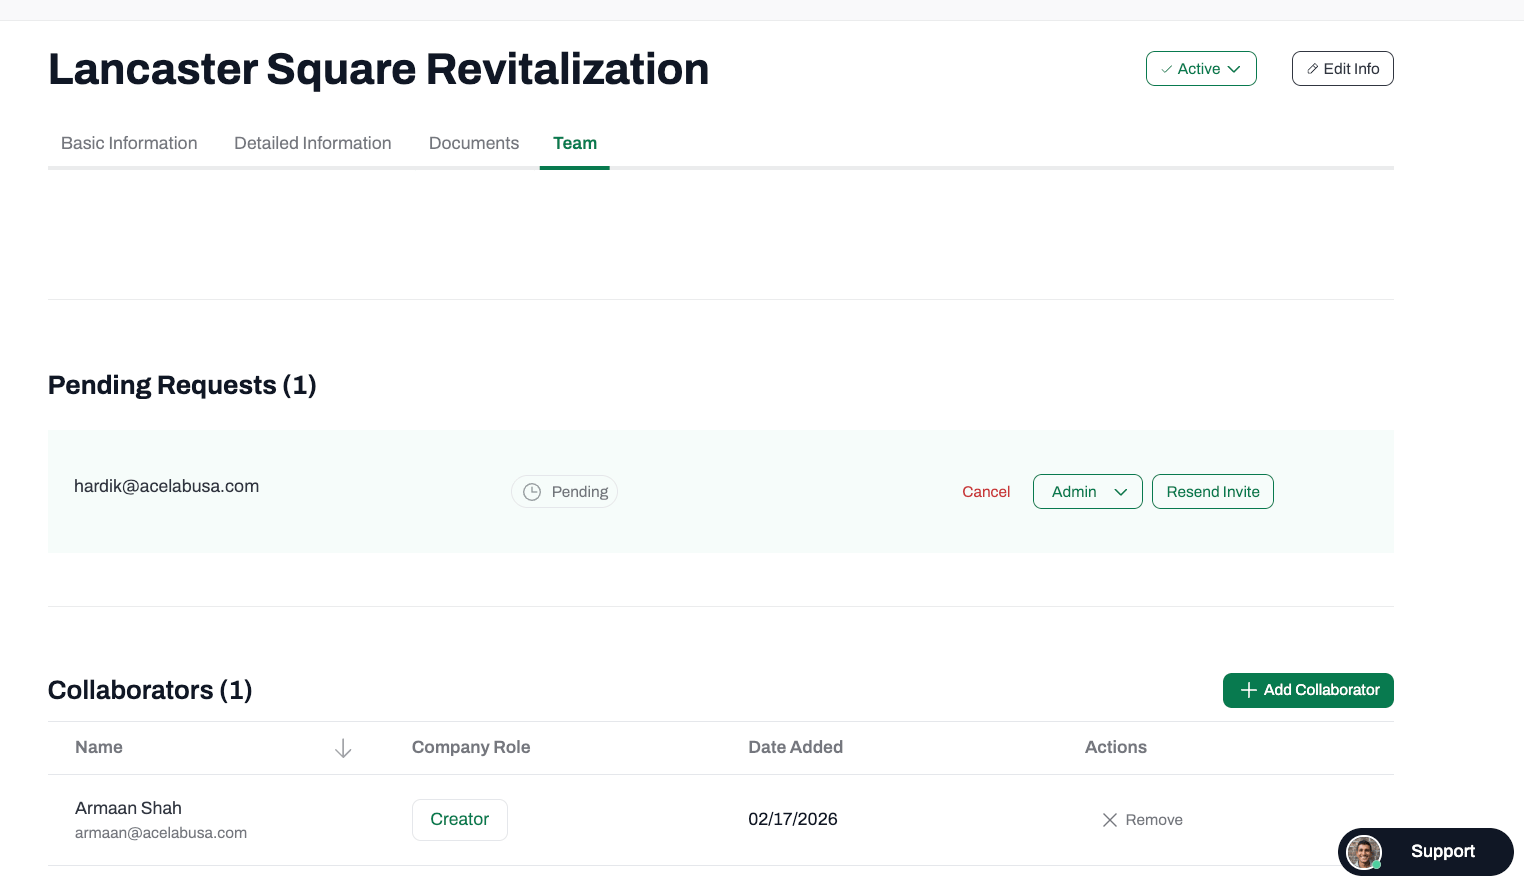
 * In the **Team** section, Admins can add internal collaborators, invite external collaborators such as consultants or contractors, update permission levels, and remove members from the project.
* The **Pending Requests** section displays firm collaborators who have requested to join the project, as well as external collaborators whose invitations are still outstanding. From here, you can approve or deny requests, update a pending member's role, and resend or cancel invitations.
* To learn more about **managing collaborators**, check out [this article.](/help-center/working-on-projects/managing-project-collaborators)
* In the **Team** section, Admins can add internal collaborators, invite external collaborators such as consultants or contractors, update permission levels, and remove members from the project.
* The **Pending Requests** section displays firm collaborators who have requested to join the project, as well as external collaborators whose invitations are still outstanding. From here, you can approve or deny requests, update a pending member's role, and resend or cancel invitations.
* To learn more about **managing collaborators**, check out [this article.](/help-center/working-on-projects/managing-project-collaborators)
 ***
### **Outcome**
Your Project Info Page is your project's single source of truth. All details are visible in one scrollable view, editable by anyone with the appropriate permissions, and automatically saved when you click **Save Changes**. If you navigate away with unsaved changes, Acelab will prompt you to confirm before anything is lost.
***
📚 Keep Learning 📚
### Next: **Searching for Products**
[Go to next article](/help-center/searching-for-products/how-to-find-products)
***
### **Outcome**
Your Project Info Page is your project's single source of truth. All details are visible in one scrollable view, editable by anyone with the appropriate permissions, and automatically saved when you click **Save Changes**. If you navigate away with unsaved changes, Acelab will prompt you to confirm before anything is lost.
***
📚 Keep Learning 📚
### Next: **Searching for Products**
[Go to next article](/help-center/searching-for-products/how-to-find-products)