

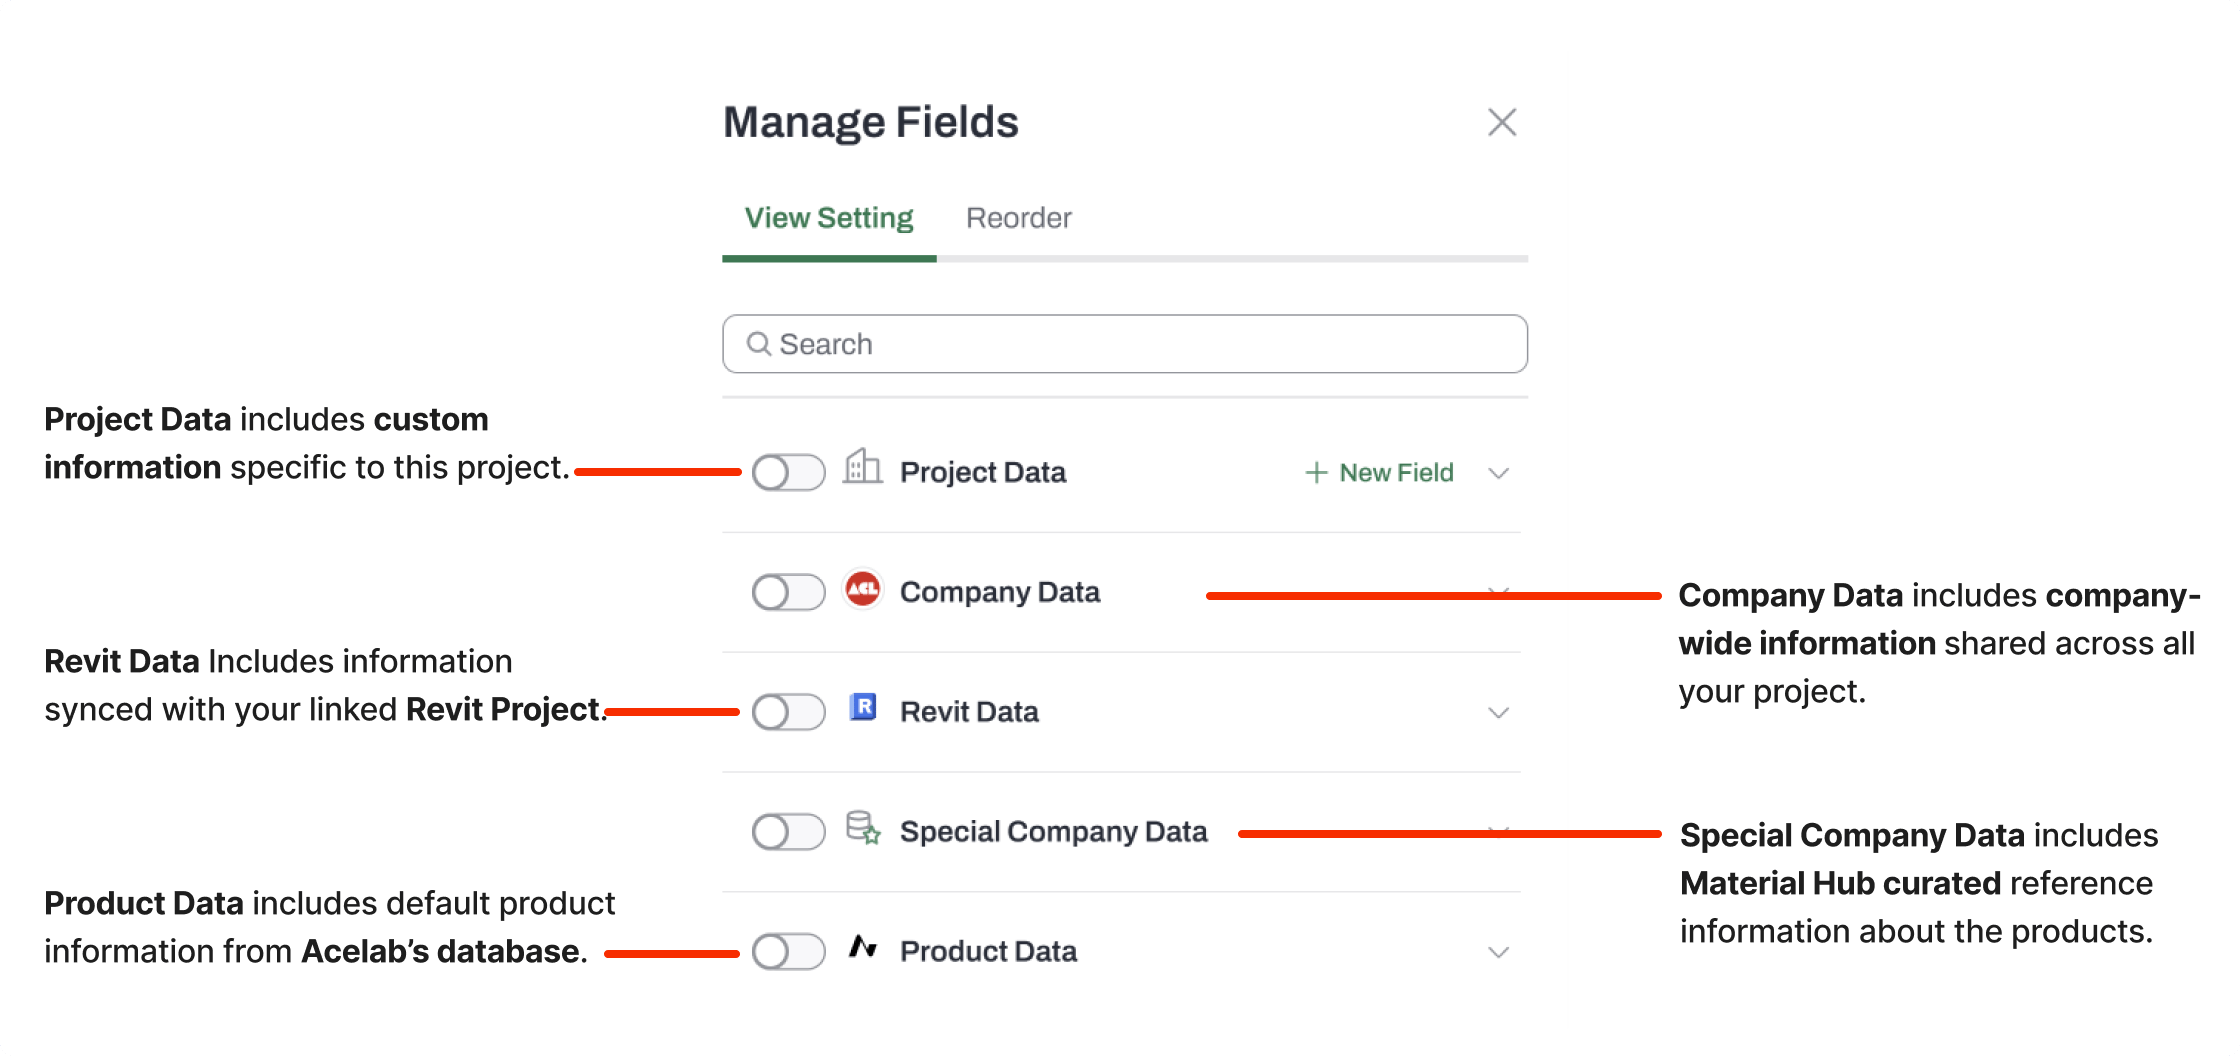
Product Data Fields
Product Data fields contain data from Acelab’s database, which are automatically added to the schedule when you add the product. Product Data fields include a small Acelab logo to the left of the field header, as shown in the image below. A small icon overlapping the Acelab logo indicates whether that field is informational or a “decision data”. Decision data allows you edit ability.For a multi-select List or Number field, the header also shows a small round badge next to the field name: a green checkmark for a Decision field, or an info icon for an Information field. Hover the badge to see which it is. This badge appears in the schedule grid and in PDF exports (not in CSV exports).
-
Information - Product Data Field
Information Fields contain information about the products, including fields such as Certification, documents, etc.

-
Decision - Product Data Field
Decision Field allows you to select a specific attribute of the product from the available options for that field, such as Material, Color, etc.

Examples of Product Data Fields
Product Data fields include, but are not limited to, the following:- Material: This field is automatically populated with the primary material of the added product.
- LEED v5 Scoring fields
- Performance fields, such as R-Value, SHGC
- Document fields, such as downloadable Revit families, warranties, and brochures
- Certifications, and more!
Acelab Default Fields Description
For a complete list of all Product Data Fields and their descriptions, check out Acelab Default Fields Description. Note: Empty cells in a Product Data Field mean that the data is not available in Acelab’s database.
Special Company Data
Special Company Data fields contain Acelab-curated reference information about how a product relates to your firm and the wider catalog. They’re great for cross-project awareness and reaching the right contacts. Examples include:- Used in Projects
- MasterFormat Section
- Reps
- Project Notes
Company Data Fields
Company fields are created at the company level, i.e. in a company’s library. Once they are set up, they can be added to any project. These fields are great for recording official data from the company that can be shared consistently across projects. Examples include “Standard”, “Tags”, “Experience Notes”, Sustainability Ratings”, and more. Company fields are identified by the company logo on the header. There are two types of company fields:-
Decision: Appears with no data once added to a project, but data can be filled in. The field structure cannot be edited in projects.

-
Information: Once added to a project, data is automatically populated. If you have Creator or Admin permission on the field’s owning firm library, you can edit the data and add new dropdown options directly from the project — changes are written back to the firm-wide field. Otherwise, the field remains read-only in the project.

Project Data Fields
With the release of Company fields in Dec 2025, former Custom fields are now called Project fields.

Data Types
There are five data types of Project Fields:- Text
-
Number
- Single-entry
- Multi-entry
-
List
- Single-entry
- Multi-entry
-
Attachment
- Single-entry
- Multi-entry
-
Date
- Enter a value with the date picker. Displays and exports as
YYYY-MM-DD. - Once a field is created as a Date type, its type can’t be changed to another type.
- Enter a value with the date picker. Displays and exports as
Examples of Project Fields
These are some of the project fields you may create:- Approval Status
- Notes
- Assemblies
- Reference Photos
- Cost
- Design Option
Steps for Creating a Project Field
-
Alternatively, you can create a new Project Field by clicking + New Field next to the Project Data field category
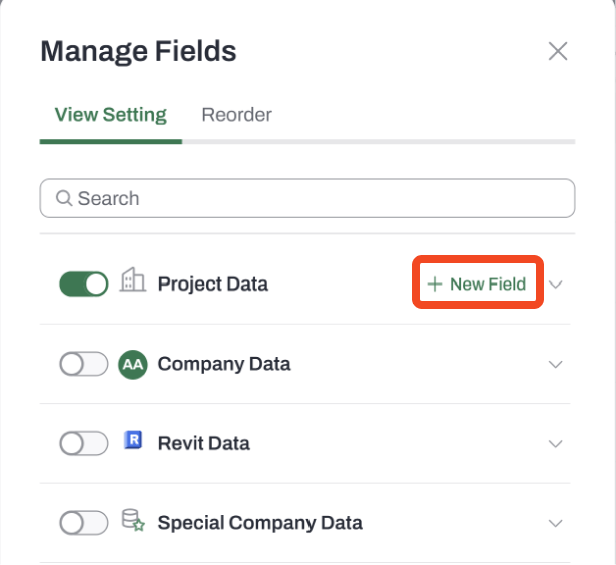
- Enter a name for your new Project Field and select the data type. Note: You cannot have two project fields with the same name and data type. You can have a project field with the same name but a different data type.
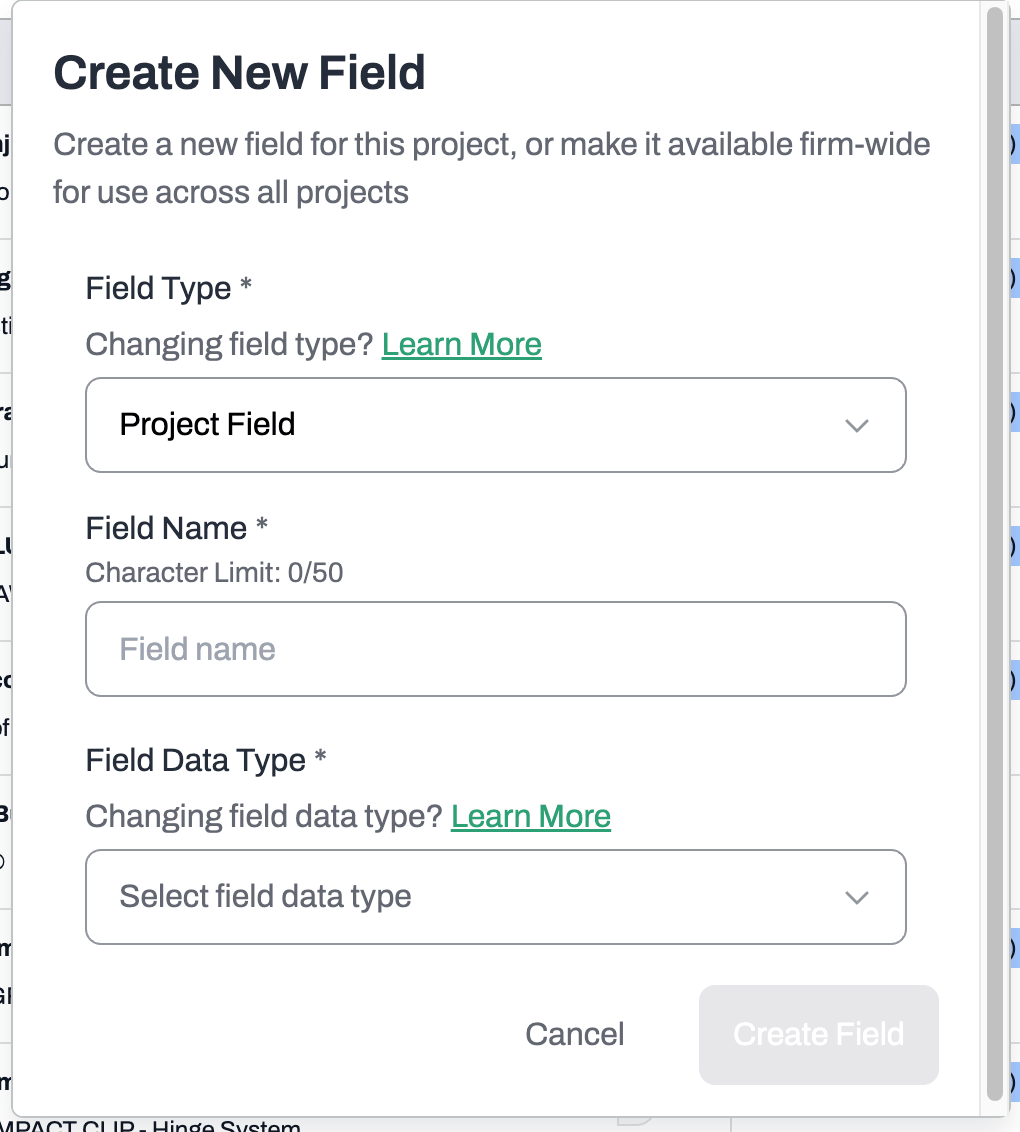
- If you selected the Text type, your new Text field will be automatically added to the Schedule
-
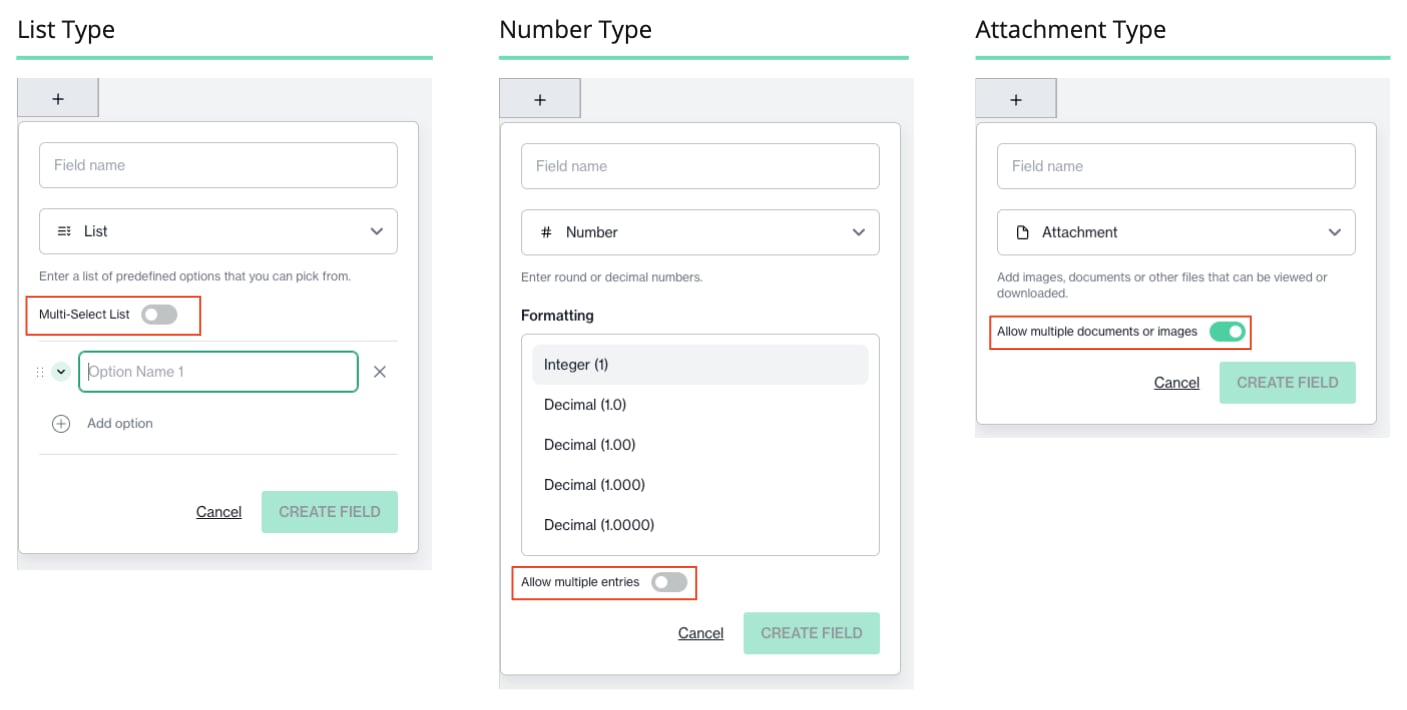
If you selected a List, Number, or Attachment types, you can set additional behaviors for your field:
- List Type: Select whether your list will be Single-Select (only one option may be selected) or Multi-Select (multiple options may be selected). You will also set Options, and may customize the color of each option
- Number Type: Select whether to Allow Multiple Option. You can also select the decimal formatting.
-
Attachment Type: Select whether you want to allow multiple documents or images. For a list of acceptable attachment types, click here. Hover an attachment’s thumbnail or file icon in a schedule cell to see a tooltip with its file name.
- Once you’ve set the behavior of your field type, click Create Field. Your new Custom Field will be visible in your Schedule and is ready to be used!
- To edit/remove Project fields, check out this article.
Revit Data Fields
Revit fields contain information synced from your linked Revit project, once Material Hub and Revit are integrated. Add them to your schedule and the data comes in automatically. Revit fields are identified by a Revit icon on the header. There are two types, based on how they sync:-
Model Driven : Data flows one way, from Revit into Material Hub — like Level, Count, and Area. Great for takeoffs and coordination.

-
Asset Identity : Data syncs both ways between Revit and Material Hub — like Type Mark, Mark, and Cost — so changes in either place stay matched.

Available Revit Fields
- Revit Family & Type
- Revit Level
- Revit Count
- Revit Area (SF)
- Revit Material Name
- Revit Dimension (in)
- Revit Room
- Revit Material Type Mark (Pro)
- Revit Type Mark (Pro)
- Revit Keynote Tags (Pro)
- Revit Keynote Text (Pro)
- Revit Description (Pro)
- Revit Cost (Pro)
- Revit Type Comment (Pro)
- Revit Material Comment (Pro)
Adding and Organizing your fields
-
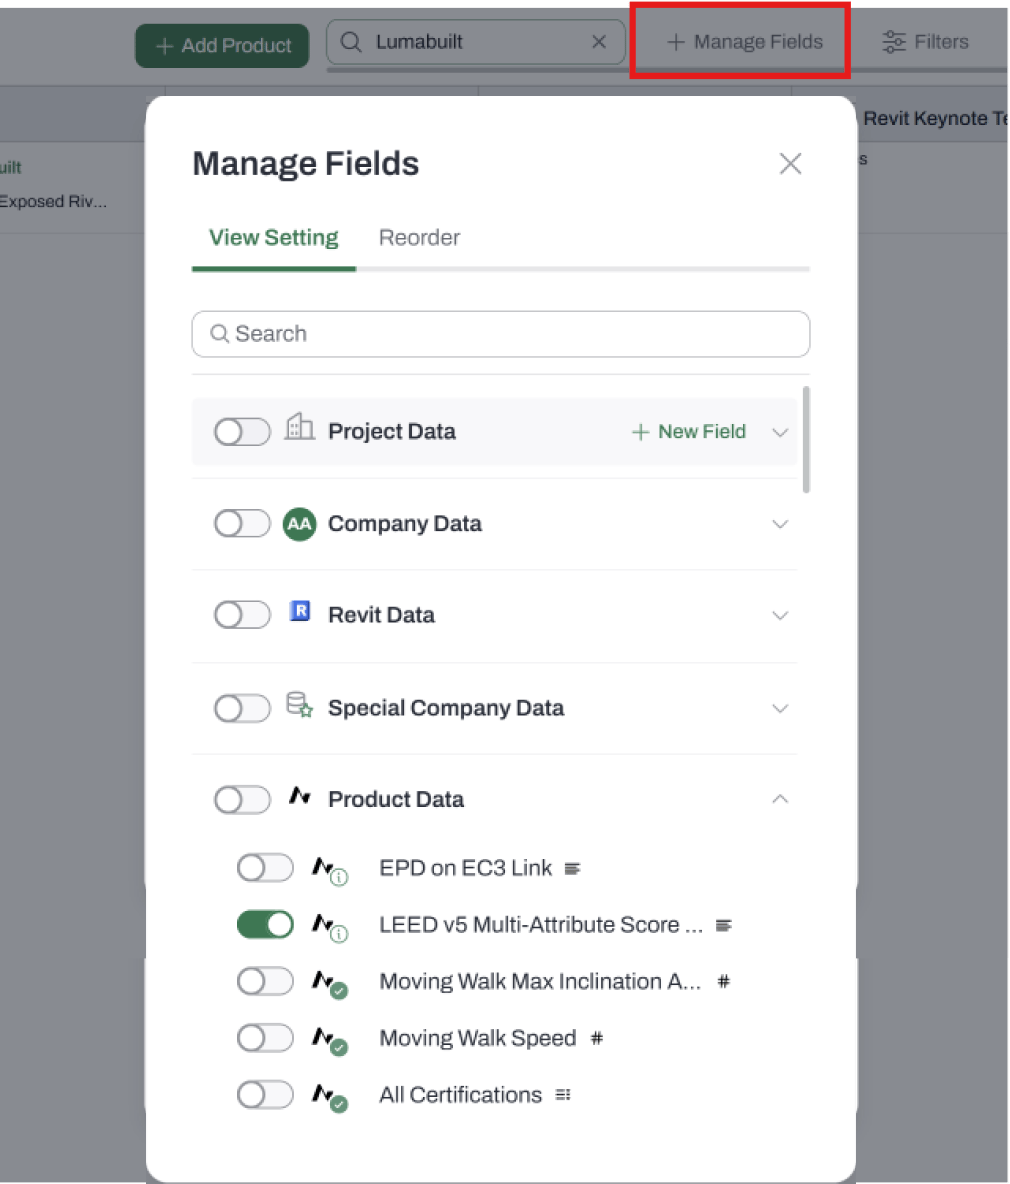
Manage Fields modal:
- Click the Manage Fields button in the top bar. The modal opens on the View Setting tab, where fields are grouped into five collapsible sections: Project Data, Company Data, Revit Data, Special Company Data, and Product Data.
- Scroll to the section you need or use the Search bar to find your field.
- Toggle it to ‘ON’ to add it to the Schedule.
-
A new column and its data will be added automatically.
-
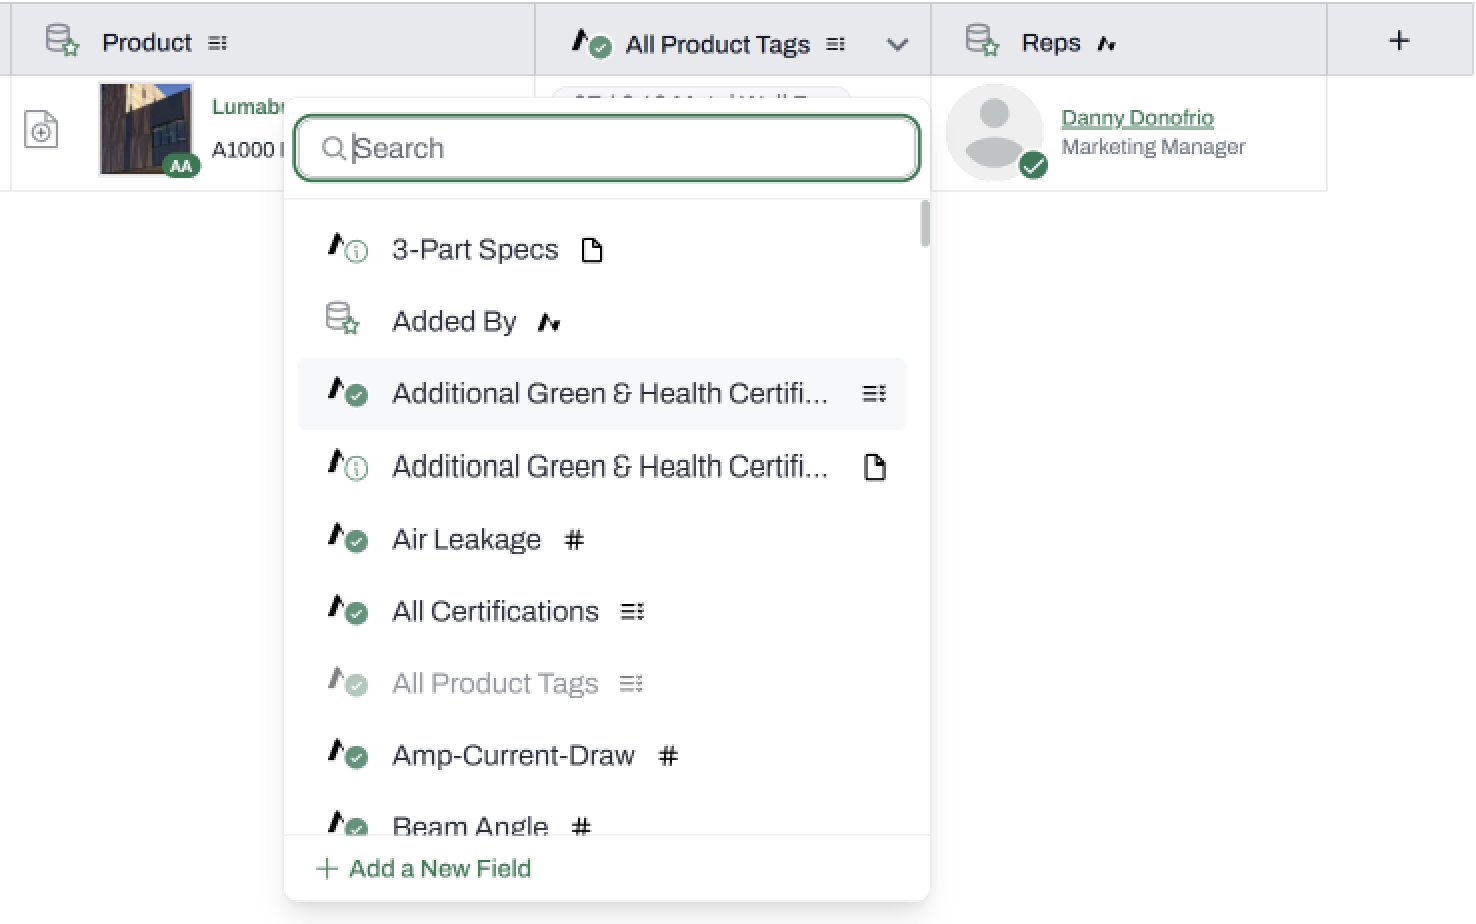
Quick Add Field dropdown:
-
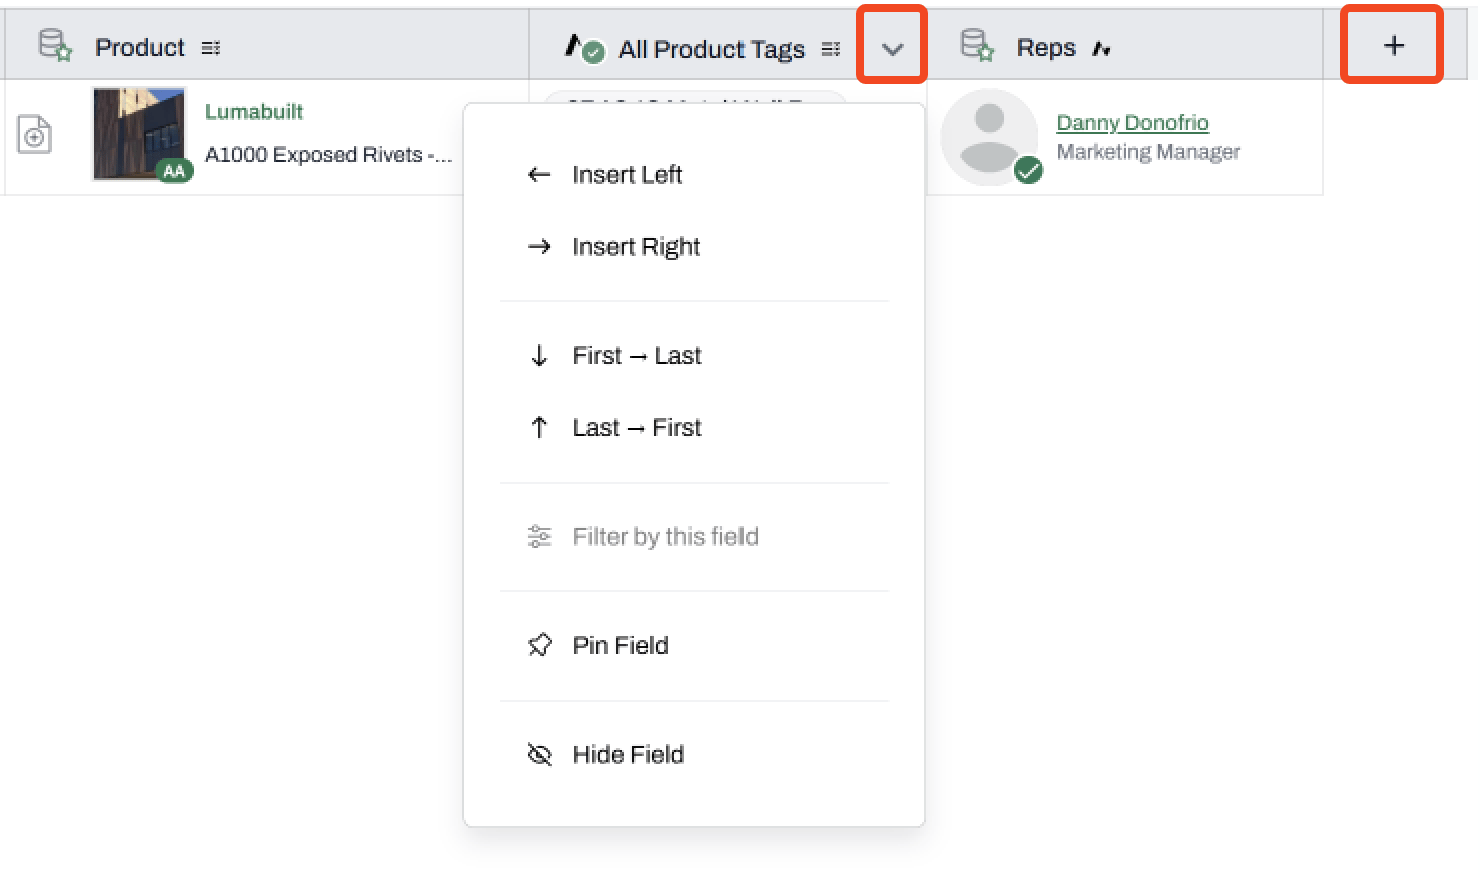
For a fast, in-place insert, click the Plus icon (+) to the right of the last column, or right-click a column header and select Insert Left or Insert Right.
- Scroll down to the Field list to select the field you need. Alternatively, use the Search bar to find the field.
-
A new column and the data associated with that field will be added to the schedule automatically
-
For a fast, in-place insert, click the Plus icon (+) to the right of the last column, or right-click a column header and select Insert Left or Insert Right.
-
Hiding, Editing, and Deleting a Field
- To hide a field, toggle it to ‘OFF’ in the Manage Fields modal, or right-click the column header and select Hide Field.
- To edit or delete a field, use the three-dot menu next to the field in the Manage Fields modal. Deleting a field requires confirmation.
-
Reordering and Pinning Fields
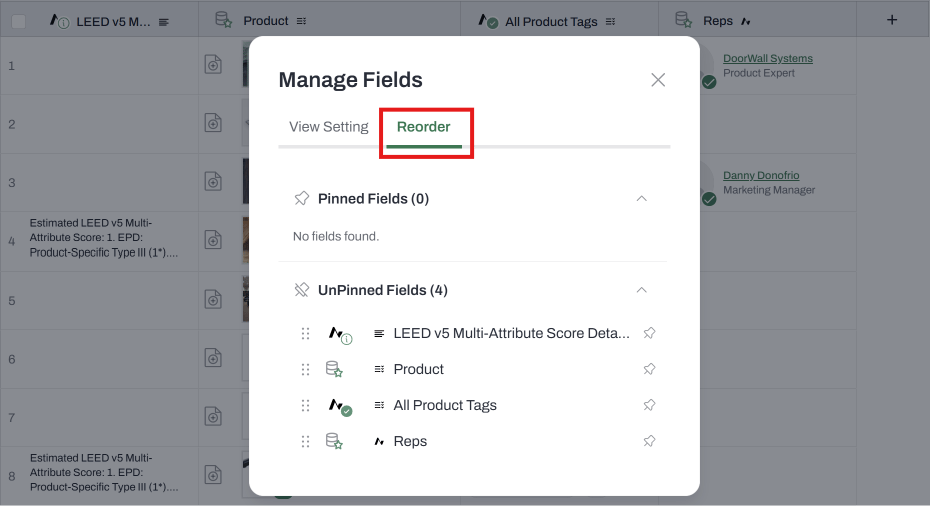
- Open the Reorder tab in the Manage Fields modal to drag fields into the order you want and to Pin or Unpin them.
-
Pinned fields stay visible while you scroll. You can also Pin or Unpin a field by right-clicking its column header.
📚 Keep Learning 📚