

Before you start
- MH Tags are set up for this project in the Settings modal.
- A 2D view is active: a floor, ceiling, area or structural plan, a section, elevation, detail, drafting view, legend or sheet. Tags can’t be placed in 3D views or schedules.
Place a tag
- In the Acelab panel, find the product.
- Click the tag button on the product’s row, next to the link button.
- The first time you tag a product, the panel creates its tag type and shows Loaded “type name” → click in the drawing to place.
- Keep clicking to place more tags of the same product.
- To stop, press Esc or click the tag button again.
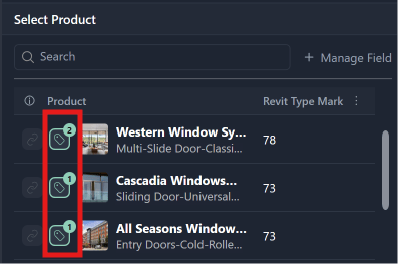
What the tag button tells you
The green badge on the tag button shows how many tags of that product are placed in the project. Hover over the button for details:What a tag label shows
The tag label draws the fields whose eye is open on the MH Tags tab, up to 10 lines, in the order listed there. It also draws any instance parameters you set to show On tag label.- To fill an instance parameter, such as a room name, select the tag and type the value in Revit’s Properties palette.
- To see every Acelab value the tag carries, select it and click Edit Type. Acelab fields are named MH_FieldName.
Work with placed tags
Placed tags are ordinary Revit annotations. Move, copy, align or delete them as you would any tag. Selecting a tag does not change the Acelab panel. Tag types live in the Project Browser under Families → Annotation Symbols → MH_Tags, one type per product, named by your naming pattern.What happens next
Every sync refreshes the values on every placed tag. See How MH Tags Stay in Sync.Troubleshooting
| What you see | What to do |
|---|---|
| MH tags place in 2D views and sheets. | Switch to a plan, section, elevation or drafting view, then click the tag button again |
| The MH Tags family is not loaded in this project. | Open Settings → MH Tags and click Save & Sync to load it |
| Could not prepare the MH tag. | Save the MH Tags settings once, then try again. If it keeps happening, use Report Error or contact support |
| Rename the family ‘MH_Tags’ in this project and try again. | Your project already has a different family named MH_Tags. Rename it in the Project Browser |
| There is no saved tag configuration to apply. | Set up and save the MH Tags tab first |
| A tag shows Updating… | The field was just turned on. Its value fills in when the sync finishes |