

Before you start
- MH Tags are part of AECO Pro. Without it, the MH Tags tab is greyed out.
- Your model is linked to an Acelab project.
- You know where your Shared Parameters file is (the same
.txtfile as Manage → Shared Parameters in Revit). If you don’t have one, choose a location and the add-in creates the parameters for you.
Step 1: Open the MH Tags tab
- On the Acelab tab, click Settings, or click the gear icon in the Acelab panel.
- Click the MH Tags tab.
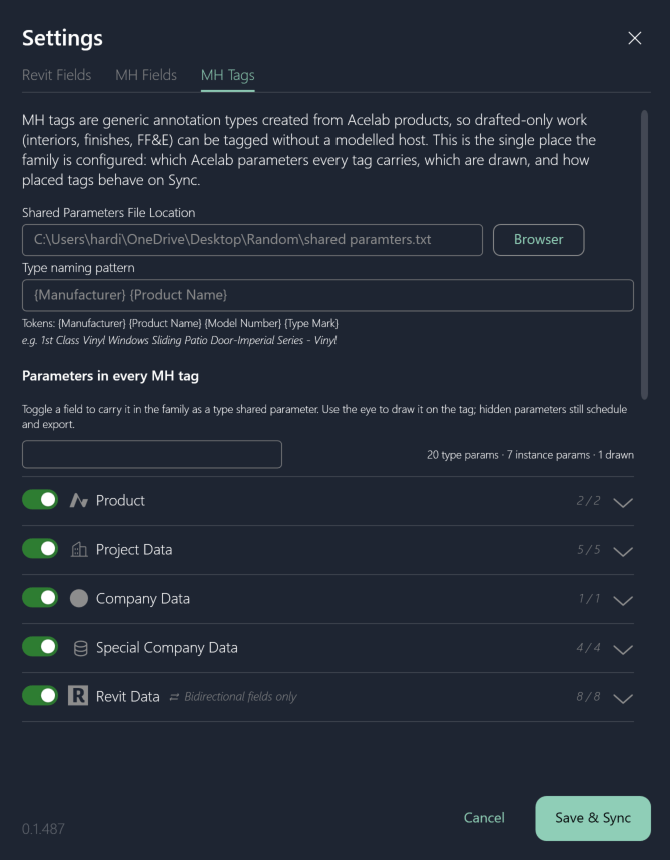
Step 2: Set the Shared Parameters file
Under Shared Parameters File Location, click Browse and pick your Shared Parameters.txt file.
Step 3: Choose how tag types are named
Each product gets its own tag type. In Type naming pattern, combine these tokens with any text you like:{Manufacturer}{Product Name}{Type Mark}
{Manufacturer} {Product Name}. The example below the box shows how a real product from your schedule will be named.
Step 4: Choose the fields every tag carries
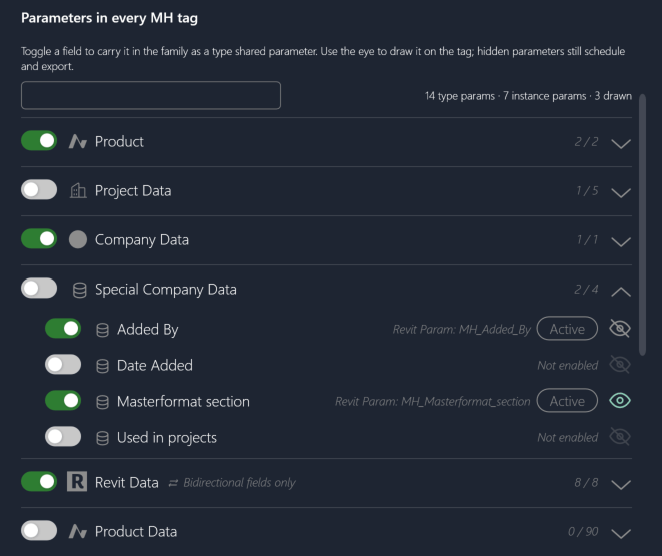
Under Parameters in every MH tag, each Acelab field has a toggle and an eye:- Toggle on: the field is carried by every tag as a type parameter named MH_FieldName, so you can schedule and export it. The field shows Active.
- Eye open: the field’s value is also drawn on the tag face. Click the eye again to hide it from the face but keep carrying it.
- Manufacturer and Product Name are always carried. You can only hide them from the tag face with the eye.
- Revit Data lists only fields that sync both ways, such as Revit Type Mark, Revit Description, Revit Cost and Revit Keynote. Values like area and count are not available on tags.
- A tag draws up to 10 lines, in the order the fields are listed. There’s no limit on how many fields a tag carries. The limit is only on what the label shows: if more than 10 eyes are open, the tab tells you, and the label draws the first 10.
Step 5 (optional): Add your own instance parameters
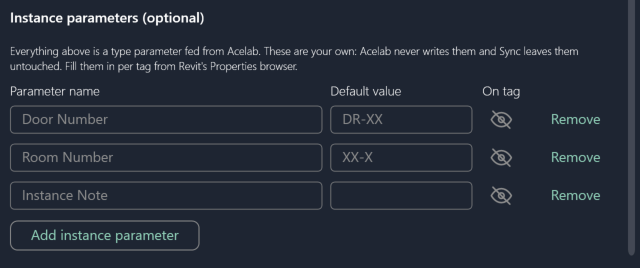
Instance parameters hold values you type per tag in Revit, such as a room name or a note. Acelab never writes them, and sync never changes them.- Under Instance parameters (optional), click Add instance parameter.
- Enter a Parameter name and, if you want, a Default value.
- Click the eye under On tag to draw it on the tag face. You can add as many instance parameters as you need. The label shows up to 5 of them.
Step 6: Choose the tag style
Under Symbol:
Note: Leader settings apply to tags you place from now on. Tags already on your drawings keep their leaders. Boxed symbol is set when the tag family is first added to the project.
Step 7: Save
- Click Save & Sync.
- If you turned fields on or off, the Load New Tag Parameters window lists them:
- New Fields will be added to your Shared Parameters file: fields turned on that the file doesn’t have yet
- Already in file, it will be loaded into this project: fields turned on that the file already has
- These fields will be turned off and will no longer sync: fields you turned off
- New Fields will be added to your Shared Parameters file: fields turned on that the file doesn’t have yet
- Check the lists and click Append & Load. Click Cancel to go back without saving.
- Settings closes and a sync runs. Every MH tag type in the project is updated to your new settings.
What happens next
- You can now place tags from the Acelab panel. See Placing MH Tags on Drawings.
- Settings are saved in this Revit project. Other projects keep their own MH Tags settings.
Troubleshooting
| What you see | What to do |
|---|---|
| MH tags are available on AECO Pro. | Your project needs AECO Pro. See plans |
| The type naming pattern must contain at least one token. | Add at least one token, such as {Product Name} |
| {X} is not a naming token. | Use only the four tokens listed above |
| Every instance parameter needs a name. / Two instance parameters cannot share a name. | Name every instance parameter, and give each a different name |
| Tag is full | A tag draws up to 5 instance parameters. Close the eye on another one first |
| Invalid File: This file does not have write permission. | Pick a Shared Parameters file you can edit, or ask IT for access |
| Revit could not read the shared parameters file. | The file is empty or not a Shared Parameters file. Pick another file |
| Failed to load the shared parameters. | Append & Load didn’t finish. Try again, or click Report Error to send the details to Acelab |
| Close the MH Tags family in Revit and try again. | Close the MH_Tags family if you have it open in the Family Editor |
| Close the open Revit command and try again. | Press Esc to end the current Revit command, then save again |